
Installation of a Midea ATOM X central heat pump in Sainte-Dorothée (Laval)
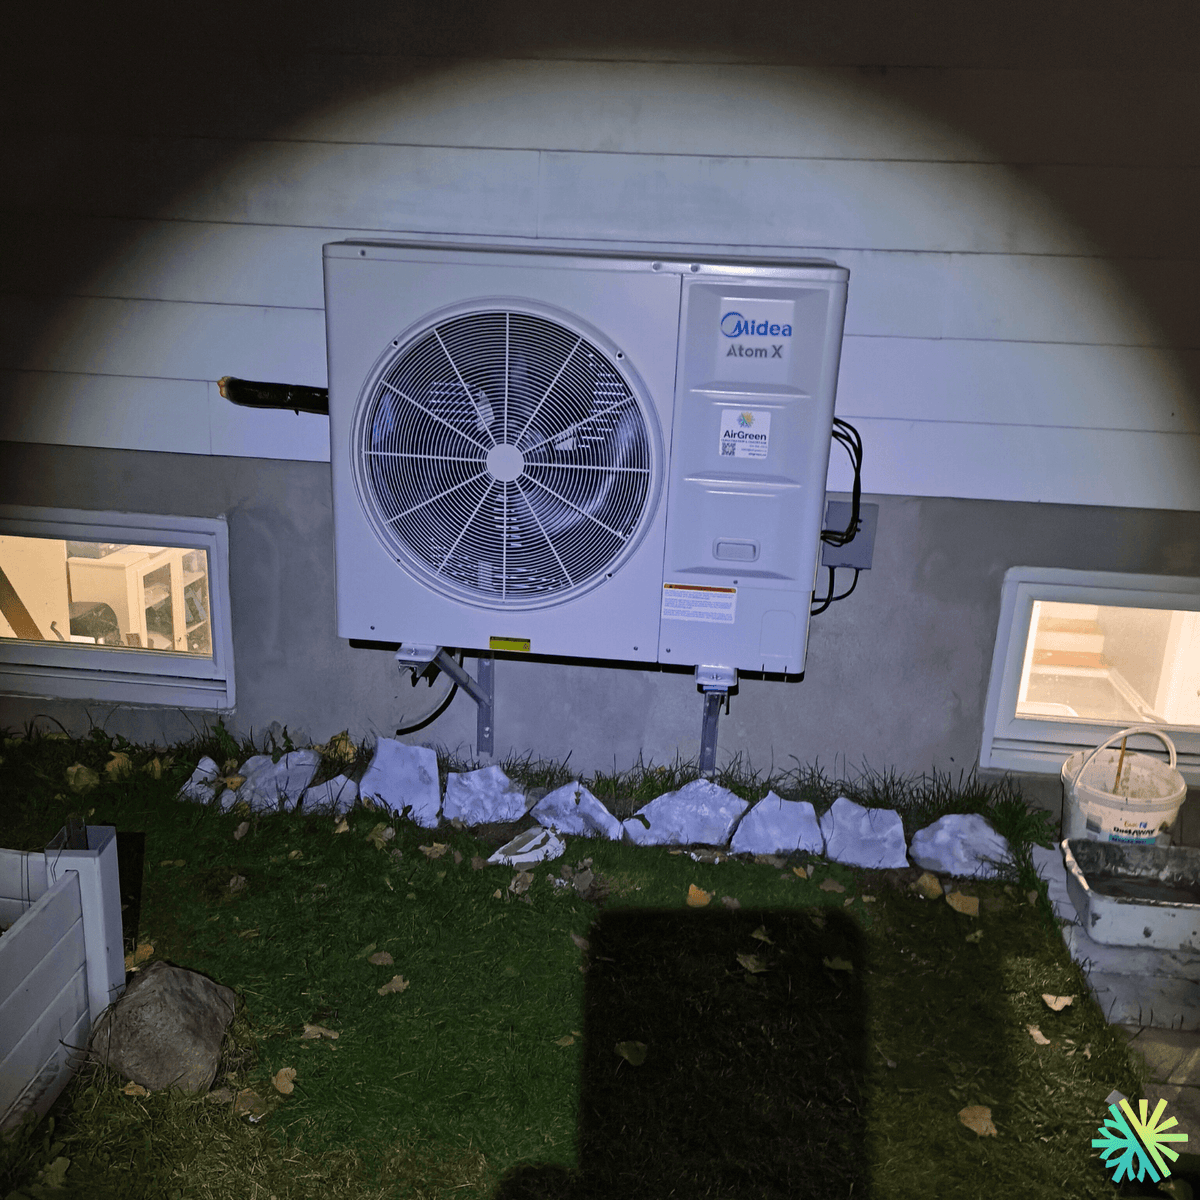
In Sainte-Dorothée (Laval), AirGreen installed a Midea ATOM X central heat pump with an outdoor unit on wall brackets, an installation designed for snow resistance, quiet operation, and durability. A clean and optimized project for four-season comfort.
Take a tour of the installation
Each number is a point we check on site. Switch between summer and winter to watch air and heat move.
In summer, the outdoor unit rejects the house's heat outside.
Generic illustration of this type of installation, not a survey of this job site. Tap a number.
It captures or rejects heat outside. It sits on a level base, above the snow, with free space all around.
The insulated refrigerant lines enter the house through a sealed opening and run to the indoor coil.
A shut-off switch near the outdoor unit isolates it safely for service.
Sitting on the indoor module, it moves heat between the house air and the refrigerant.
Electric furnace or air handler: its fan pushes air through the ducts. The electric backup takes over in extreme cold.
Supply ducts bring air to the rooms; returns bring it back to the unit. Their condition matters as much as the unit's.
It protects the coil and the fan. A dirty filter cuts airflow, so it gets checked regularly.
It runs the heat pump and the backup heat. It must be compatible with the installed system.
In Sainte-Dorothée, many single-family homes have a semi-basement, foundation windows, and landscaping that must remain clean and functional despite snow, ice, and freeze/thaw cycles. This is exactly the kind of situation where a well-chosen and properly installed central heat pump makes all the difference.
At AirGreen , we recently installed a Midea ATOM X (confirmed brand: Midea ) for a client who wanted:
-
stable comfort (heating + air conditioning)
-
a discreet solution , without cluttering the courtyard
-
an installation designed for Quebec winters , especially with regard to the outdoor unit
The result: a clean, robust installation, optimized for performance… and for peace of mind.
Why a central heat pump in Sainte-Dorothée is often the best choice
In several areas of Laval (and particularly in Sainte-Dorothée), properties already have existing air distribution systems (ducts, plenums, centralized ventilation). In these cases, a central heat pump allows for:
-
air-condition the whole house evenly , not just one or two rooms
-
to heat efficiently during the shoulder seasons (and well beyond, depending on the configuration)
-
reduce temperature differences between the upper floor, the ground floor, and the basement
-
maintain a clean interior aesthetic (no visible wall-mounted headboards)
The Midea ATOM X fits very well into this type of project, especially for customers who want a modern, reliable and consistent solution with a house already “ready” for central.
The installed model: Midea ATOM X (central heat pump)
The photo clearly shows the Midea ATOM X outdoor unit: central format, large front fan, compact chassis, and understated design. Within the range of central systems, the ATOM X is designed to meet the realities of North America: temperature variations, the need for performance in both summer and winter, and stable operation over extended periods.
Without overwhelming the client with technical details, our role at AirGreen is to size and configure the system to suit the house (volume, insulation, windows, occupancy habits), and then install everything in a way that maximizes:
-
air circulation
-
the actual performance
-
sustainability
-
silence
-
accessibility for maintenance
Visible installation details: a layout designed to last
This installation in Sainte-Dorothée is a good example of what we like to do: clean, solid, and logical .
1) Outdoor unit on wall brackets (elevated)
The unit is installed on wall brackets fixed to the foundation, which offers several tangible advantages:
-
useful elevation against snow accumulation
-
reduced risk of obstruction by slush/ice
-
improved protection during freeze/thaw cycles on the ground
-
Easier maintenance (access, clearance, inspection)
In Laval, it's a detail that quickly becomes "non-negotiable" when you want to avoid problems in the middle of winter.
2) Location between basement windows: space and noise management
We can see that the unit is placed along a foundation wall, between two windows. This type of positioning requires careful planning:
-
clearances for air circulation
-
the distance from the openings (acoustic comfort)
-
visual cleanliness (central unit, clean lines, controlled cabling)
Our goal: that it works, but also that it “fits in” as if it had always been planned.
3) Refrigeration connections and clean inlet to the interior
We distinguish between the pipework outlet and the inlet to the house. Good execution at this stage involves:
-
limit losses and risks (protection, fixing, sealing)
-
Avoid areas where water can accumulate.
-
maintain a clean (and easy to inspect) finish
4) Electrical connection with a nearby disconnect switch
The power supply and service box are also visible near the unit. This is a crucial point for:
-
security
-
compliance
-
future maintenance (technician, diagnosis, intervention)
5) Soil management: clear and stable area
On the ground, a clear area (with stones) is visible under the device. In real life, this helps to:
-
reduce mud and splashing
-
keep the underside “clean”
-
limit stagnant moisture around the installation
How AirGreen approaches this type of project (and why it changes everything)
A central heat pump isn't just about "installing an outdoor unit." To have a system that truly performs, the project must be treated as a whole:
Typical steps we apply
-
Building analysis (surface area, insulation, orientation, habits)
-
Validation of the conduit network (leaks, restrictions, balancing)
-
Choosing the right tonnage/configuration (neither too small nor too large)
-
Intelligent outdoor installation (snow, noise, access, drainage)
-
Complete commissioning (testing, adjustments, functional validation)
It is this method that transforms a “correct” installation into an excellent one, especially in a city like Laval where winter puts everything to the test.
Comfort, savings and stability: what the customer gains on a daily basis
After installation, the benefits are very tangible:
-
Uniform temperature throughout the house (fewer areas that are too hot or too cold)
-
Efficient air conditioning in summer , without excessive noise
-
More economical heating for a good part of the year
-
Improved comfort in the basement , often a sensitive point in Sainte-Dorothée
-
A discreet system on the outside, without sacrificing performance
And above all: an installation designed for durability. Because a heat pump isn't a purchase "for 2 years." It's an investment that must remain reliable, year after year.
Recommended maintenance (essential to maintain performance)
Even with a good installation, maintenance remains key to avoiding drops in performance and preventable problems.
At AirGreen, we particularly recommend:
-
Periodic cleaning (depending on the environment: dust, leaves, pollen)
-
inspection of clearances around the outdoor unit
-
checking drainage and the condition of the supports
-
complete preventative maintenance at regular intervals
A high-performing central system is a clean, well-tuned and monitored system.
Conclusion: a properly installed Midea ATOM X offers "unsurprising" comfort
This installation in Sainte-Dorothée (Laval) perfectly illustrates our philosophy:
create a solid, clean installation, optimized for winter, and pleasant for everyday use .
The Midea ATOM X is an excellent base… but it's the quality of the installation, connections, clearances, and commissioning that determines the customer experience. And that's precisely where AirGreen stands out.
The big day, step by step
The main steps of this kind of job at AirGreen. Every house has its quirks: the estimate brings them out.
We look at the ducts, the current indoor module, the electrical panel and the planned spot for the outdoor unit.
The equipment combination, capacity and price, in writing. We check whether the combination qualifies for assistance programs.
Access protected, old unit disconnected and removed when it is being replaced.
Electric furnace or air handler, with its coil, connected to the supply and return ducts.
On a level base, raised above the snow, with free space all around.
Insulated, they enter through a sealed opening and run to the indoor coil.
Dedicated circuits, accessible disconnect, a thermostat that works with the heat pump and the backup heat.
Leak test, vacuum, start-up, airflow check and a test of both modes.
Filter, thermostat, backup heat in extreme cold: what to know before winter.
- The on-site estimateWe look at the ducts, the current indoor module, the electrical panel and the planned spot for the outdoor unit.
- The quoteThe equipment combination, capacity and price, in writing. We check whether the combination qualifies for assistance programs.
- Getting readyAccess protected, old unit disconnected and removed when it is being replaced.
- The indoor moduleElectric furnace or air handler, with its coil, connected to the supply and return ducts.
- The outdoor unitOn a level base, raised above the snow, with free space all around.
- The refrigerant linesInsulated, they enter through a sealed opening and run to the indoor coil.
- Electrical and thermostatDedicated circuits, accessible disconnect, a thermostat that works with the heat pump and the backup heat.
- Tests and start-upLeak test, vacuum, start-up, airflow check and a test of both modes.
- The walkthroughFilter, thermostat, backup heat in extreme cold: what to know before winter.
What would it look like at your place?
Two quick checks with real numbers: what heat costs, and what your current heaters add up to in BTU/h.
Conversion: 1 W = 3.412 BTU/h. An indication, not a load calculation: baseboards and furnaces are often stronger than the real need, and they can stay as backup. AirGreen confirms the capacity on site.
Four mistakes we do not make
Flip each card to see what we do instead.
Your own project, step by step
What to do, season by season
Three habits per season for this unit. They take a few minutes and prevent many calls.
- Check the indoor module's filter.
- Clear winter debris from the outdoor unit.
- Test cooling before the heat arrives.
- Check the filter more often in peak season.
- Keep registers and returns clear.
- Watch condensate drainage near the coil.
- Change or clean the filter.
- Test heating and backup heat before the cold.
- Book periodic maintenance.
- Clear snow around the outdoor unit.
- Store nothing in front of the indoor module.
- Note any unusual noise or smell and call us.
Is your home ready?
Check what applies at your place. A "no" is not a refusal: it is what we sort out during the estimate.
Four statements: true or false?
It all comes down to details you have just seen.
1. A central heat pump uses the house's ducts.
It connects to the existing ducts to heat and cool everywhere.
2. In extreme cold, electric backup heat can take over.
The indoor module (furnace or air handler) works with the heat pump and takes over in extreme cold.
3. The filter only gets changed when the unit breaks down.
A dirty filter cuts airflow. It gets checked regularly.
4. You can reuse the old unit's size without checking.
The house may have changed: insulation, windows, added rooms. Capacity is confirmed on site.
0 / 4 right answers
What people ask us about this kind of work
Can I keep my current ducts?
What happens in extreme cold?
Furnace, air handler, ducted: what is the difference?
Are there grants?
Do I need a permit?
How much can I save?
How is the LogisVert assistance calculated?
Will my current thermostat work?
Central or wall units: which one?
Does AirGreen hold the required licences?
Is the estimate free?
No question matches. Write to us: we answer.
More jobs to see, near you
By town, by equipment or by region: browse more than 4,700 published projects.
Each dot: a town where AirGreen has published projects. The glowing dot: this job.
Every house has its constraints. We see them before we install.
The on-site estimate is free and the quote follows within 24 hours.
Text and photo: a real AirGreen Climatisation & Chauffage job. The diagrams are generic illustrations of the type of installation, not a survey of this job site. Sources of the added figures: airgreen.ca product pages (NEEP / AHRI performance), Hydro-Québec (Heat pumps page, LogisVert, read on 13 October 2026), Régie de l’énergie (rate D as of 1 April 2026).