
Installation of a Gree Charmo heat pump in Saint-Laurent (Montreal): performance, stability and simplified rooftop maintenance
AirGreen installed a Gree Charmo heat pump in Saint-Laurent , with an outdoor unit on a gravel roof mounted on an elevated support: stability, membrane protection, vibration reduction and optimal performance for the climate of Greater Montreal.
- City
- Region
- Equipment
- Brand
- Challenges
- Published
The job on one screen
The article, chapter by chapter
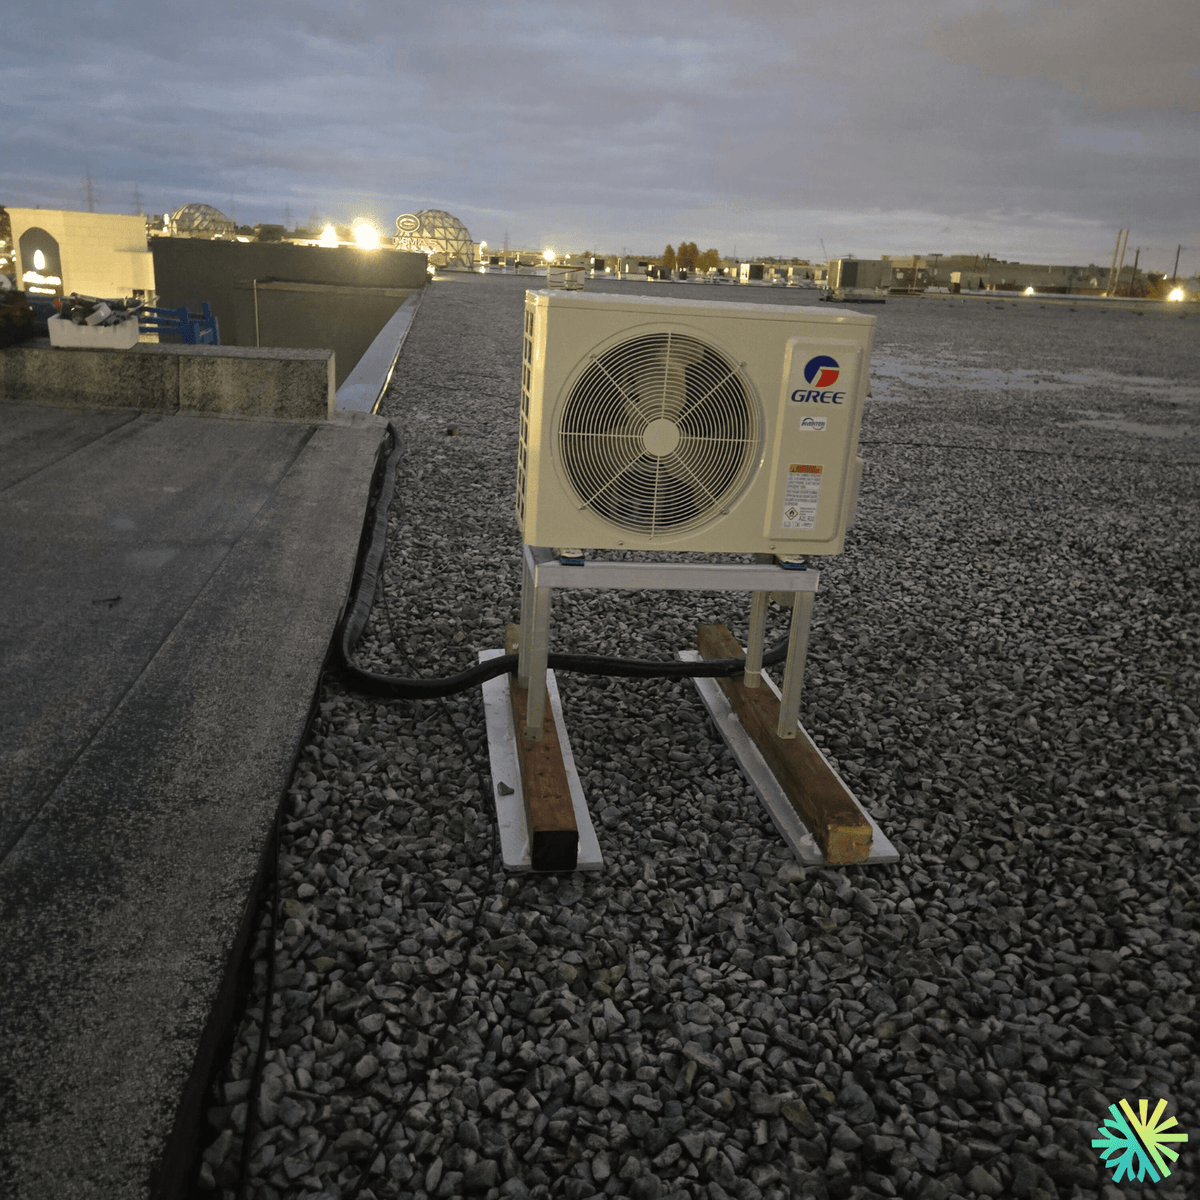
In the Saint-Laurent borough, we recently installed a Gree Charmo heat pump in a unique setting: an outdoor unit mounted on a gravel roof , typical of commercial buildings and some flat-roofed plexes/condos. This type of installation requires a methodical approach, as we need to protect the roof membrane , ensure perfect stability , minimize vibrations , and guarantee easy access for maintenance , both in summer and winter.
At AirGreen , we often see clients who want a reliable HVAC solution without compromising on durability. The Gree Charmo line fits perfectly into this philosophy: a modern wall-mounted heat pump (mini-split), designed to offer consistent comfort, good energy efficiency, and precise temperature control—particularly important in Greater Montreal where temperature variations are extreme.
A construction site on a flat roof: a common reality in Montreal
In Saint-Laurent, several buildings have gravel roofs with curbs (parapets) and technical areas already used for mechanical equipment. Installing an outdoor unit in this environment requires adhering to very clear priorities:
-
Do not puncture or damage the membrane (and thus avoid leaks)
-
Distribute the load over a stable base (and not directly onto the gravel)
-
Prevent the transmission of vibrations within the structure
-
Plan for a positioning that allows good air circulation around the condenser.
-
Enabling quick service without unnecessary gymnastics or dismantling
Visually, the outdoor unit is mounted on a raised support (metal structure) resting on load-bearing pads , with wooden elements providing stabilization and leveling on the uneven roof surface. This is exactly the type of installation preferred when a clean, stable, and durable result is desired.
Type of machine installed: wall-mounted heat pump (mini-split)
Although the photo mainly shows the exterior, the overall configuration is very common: a wall-mounted heat pump with:
-
an outdoor unit (condenser) on the roof
-
an indoor wall unit (evaporator) inside the building
-
a refrigeration connection (insulated piping) and the electrical supply routed neatly
This format is particularly popular in Montreal, Laval, Longueuil, the South Shore and the North Shore because it offers an excellent compromise between cost , comfort , efficiency and ease of installation .
Brand and model: Gree Charmo
The installed unit is a Gree Charmo . In practice, this type of heat pump is chosen for:
-
operational stability (more consistent comfort)
-
good heating capacity for our transitional seasons (autumn, spring)
-
efficient air conditioning in summer, even during periods of humid heat
-
This approach is generally appreciated for projects where a reliable solution is needed, but without resorting to a complete central installation.
At AirGreen, we always adapt the choice of system to the specific characteristics of the building: insulation, orientation, areas to be served, installation constraints, and lifestyle or occupancy patterns. In Saint-Laurent, we often encounter mixed-use spaces (offices, light workshops, apartments above), and the wall-mounted heat pump remains a very flexible option.
Key installation details: stability, vibration, and roof protection
1) Elevated support: essential on roofs
On a flat, gravel-covered roof, placing a unit directly on the ground is rarely a good idea. Here, the unit is mounted on an elevated structure which allows:
-
to limit the accumulation of snow around the condenser
-
to keep the bottom of the unit more unobstructed during freeze/thaw cycles
-
to improve access for inspection and maintenance
2) Load distribution: protect the membrane
We've noticed a base that distributes the pressure over a wider area. This is good practice because the concentrated weight of HVAC equipment can, in the long run, create weak points on the roof. In our installations, we always aim to reduce point loads , especially on commercial roofs.
3) Vibration management: comfort + longevity
Even a well-designed condenser generates vibrations. If these vibrations are transmitted to the building, a humming sound can be heard inside—and this can accelerate wear and tear on certain components. Mounting the condenser on a support and ensuring a stable base generally allows for:
-
a reduction in perceived vibrations
-
quieter operation
-
better long-term behavior
4) Clearance and air circulation
On a roof, you might be tempted to "hide" the unit near a parapet. We prioritize efficiency: we ensure the unit has enough space to draw in and expel air properly. Poor airflow means the system has to work harder, consumes more energy, and can lose performance during peak demand.
Why this type of installation is particularly relevant in Saint-Laurent
Saint-Laurent combines highly urban areas, industrial zones, and mixed-use buildings. The constraints are often:
-
Limited access to the backyard or balconies
-
aesthetics to be respected on the facade
-
need to avoid noise from the neighbors
-
roof already designed as a technical area
Installing the outdoor unit on the roof then becomes a logical solution, provided it's done correctly. And that's precisely where expertise makes all the difference: a hasty installation can create problems (vibrations, drainage issues, difficult access, premature wear, risks to the roof). A clean, well-planned, and stable installation results in a reliable and easy-to-maintain system.
Maintenance and best practices: what to anticipate from the installation stage
A wall-mounted heat pump like the Gree Charmo will perform best if maintenance is simple and regular. For rooftop installations, the following should be considered from the outset:
-
leave space to clean the outer coil
-
facilitate the verification of connections and support
-
Plan for a rapid response in case of ice, debris, or seasonal obstructions.
-
Ensure that the area around the unit remains clear (leaves, dust, displaced gravel, etc.).
Inside, maintenance (filters, cleaning, general inspection) remains crucial for air quality and energy efficiency.
The result: a clean, stable installation ready for Quebec's seasons.
This Gree Charmo installation in Saint-Laurent perfectly illustrates our approach at AirGreen:
-
a smart choice of location (technical roof)
-
a stable and roof-friendly installation
-
an installation designed for maintenance, durability and comfort
-
an efficient solution for heating and air conditioning in Greater Montreal
Whether you are in Montreal , Saint-Laurent , Ville-Marie , Ahuntsic , Laval , Brossard , Terrebonne or Longueuil , we apply the same standards: a clean, efficient installation, designed to last.
The job tools
Two quick checks with real numbers: what heat costs, and what your current heaters add up to in BTU/h.
Conversion: 1 W = 3.412 BTU/h. An indication, not a load calculation: baseboards and furnaces are often stronger than the real need, and they can stay as backup. AirGreen confirms the capacity on site.
How the job unfolds
The main steps of this kind of job at AirGreen. Every house has its quirks: the estimate brings them out.
We look at the room, the outside wall, the line route and where the outdoor unit will go. That is where the capacity gets chosen.
Model, capacity and price, in writing. We also check whether the model qualifies for assistance programs.
Floors and furniture protected, wall plate position marked level, wall opening located.
A single opening, with the slope the drain needs to flow outside.
Set on a stand raised above the snow, with the clearances the manufacturer requires.
Connected, insulated and protected. The opening is then sealed against water, cold air and insects.
A dedicated circuit and an accessible disconnect near the outdoor unit.
Leak test, vacuum, then start-up and a check of heating and cooling.
Remote, modes, filters: we show you the essentials before we leave.
- The on-site estimateWe look at the room, the outside wall, the line route and where the outdoor unit will go. That is where the capacity gets chosen.
- The quoteModel, capacity and price, in writing. We also check whether the model qualifies for assistance programs.
- Getting readyFloors and furniture protected, wall plate position marked level, wall opening located.
- The wall openingA single opening, with the slope the drain needs to flow outside.
- The outdoor unitSet on a stand raised above the snow, with the clearances the manufacturer requires.
- Lines, cable and drainConnected, insulated and protected. The opening is then sealed against water, cold air and insects.
- The electrical workA dedicated circuit and an accessible disconnect near the outdoor unit.
- Tests and start-upLeak test, vacuum, then start-up and a check of heating and cooling.
- The walkthroughRemote, modes, filters: we show you the essentials before we leave.
What we check on a job like this one
Each number is a point we check on site. Switch between summer and winter to watch air and heat move.
In summer, the outdoor unit rejects the house's heat outside.
Generic illustration of this type of installation, not a survey of this job site. Tap a number.
Mounted level on a wall plate, high enough for the air to reach the whole room, with enough space around it to slide the filters out easily.
The refrigerant lines, the communication cable and the drain go through the wall in a single opening, sealed against water, cold air and insects.
Two insulated copper pipes connect the two units. Outside, a line cover can protect them from sun, knocks and weather.
A shut-off switch near the outdoor unit isolates it safely for service. It must stay accessible at all times.
The compressor and the fan. In heating mode it captures heat from the outdoor air, even in winter, and moves it inside.
On the ground or on the wall, it keeps the unit above accumulated snow. The unit stays clear and defrost water can drain away.
The fan needs to blow freely. Storage, a fence or a wall too close, and efficiency drops while noise goes up.
Is your home ready?
Check what applies at your place. A "no" is not a refusal: it is what we sort out during the estimate.
Good habits, once the unit is in place
Six simple habits that keep the unit going. Your list stays on this device.
What to do, season by season
Three habits per season for this unit. They take a few minutes and prevent many calls.
- Clean the indoor unit's filters.
- Clear leaves and debris left on the outdoor unit by winter.
- Test cooling before the first hot days.
- Clean the filters more often when the unit runs a lot.
- Keep plants away from the outdoor unit.
- Check that no water drips from the indoor unit.
- Rake the leaves around the outdoor unit.
- Test heating before the first cold days.
- Book periodic maintenance before winter.
- Keep snow away from the stand and the front of the unit.
- Let the unit defrost: it is normal.
- Never hit the ice on the fins; call us if the unit stays iced up.
The right pages, at the right time
Four statements: true or false?
It all comes down to details you have just seen.
1. In heating mode, the outdoor unit can produce water.
During defrost cycles. That water must drain away without forming ice.
2. You pick the capacity with a simple square-footage rule.
Windows, insulation, orientation and how the room is used all count. Capacity is chosen on site.
3. A multi-zone connects several indoor heads to a single condenser.
One head per room, all on the same condenser. Each room keeps its own temperature.
4. The disconnect can sit behind the patio furniture.
It must stay accessible: it is what shuts the unit off for service.
0 / 4 right answers
What people ask us about this kind of work
Does a wall-mounted heat pump heat in winter?
Wall-mounted or multi-zone: how do I choose?
Where does the outdoor unit go?
Are there grants?
Do I need a permit?
How cold can it heat?
How much can I save?
How is the LogisVert assistance calculated?
Is it noisy?
The outdoor unit is covered in ice: is that normal?
Does AirGreen hold the required licences?
Is the estimate free?
No question matches. Write to us: we answer.
More jobs to see, near you
By town, by equipment or by region: browse more than 4,700 published projects.
Each dot: a town where AirGreen has published projects. The glowing dot: this job.
An on-site estimate, the right capacity, the right equipment.
The on-site estimate is free and the quote follows within 24 hours.
Text and photo: a real AirGreen Climatisation & Chauffage job. The diagrams are generic illustrations of the type of installation, not a survey of this job site. Sources of the added figures: airgreen.ca product pages (NEEP / AHRI performance), Hydro-Québec (Heat pumps page, LogisVert, read on 13 October 2026), Régie de l’énergie (rate D as of 1 April 2026).