
Installation of a Midea heat pump on a roof in Ville-Marie (Montreal)
In Ville-Marie, AirGreen installs a Midea wall-mounted heat pump with an outdoor unit on the roof: elevated support, snow and defrost management, sustainable comfort in heating and air conditioning.
In summer, the outdoor unit rejects the house's heat outside.
Generic illustration of this type of installation, not a survey of this job site. Tap a number.
Mounted level on a wall plate, high enough for the air to reach the whole room, with enough space around it to slide the filters out easily.
The refrigerant lines, the communication cable and the drain go through the wall in a single opening, sealed against water, cold air and insects.
Two insulated copper pipes connect the two units. Outside, a line cover can protect them from sun, knocks and weather.
A shut-off switch near the outdoor unit isolates it safely for service. It must stay accessible at all times.
The compressor and the fan. In heating mode it captures heat from the outdoor air, even in winter, and moves it inside.
On the ground or on the wall, it keeps the unit above accumulated snow. The unit stays clear and defrost water can drain away.
The fan needs to blow freely. Storage, a fence or a wall too close, and efficiency drops while noise goes up.
In Ville-Marie, a large proportion of the housing consists of modernized condos and plexes where every centimeter counts—both inside and out. For this project, we installed aMidea wall-mounted heat pump with an outdoor unit on the roof , a common configuration in urban buildings where floor space is limited and the facade aesthetics must be preserved.
From the outset, the objective was clear: to offer four-season comfort (air conditioning in the summer, efficient heating in the winter) while respecting the access, noise and vibration constraints specific to buildings in downtown Montreal.
A Midea wall-mounted heat pump designed for everyday Montreal life
A wall-mounted heat pump (mini-split) is one of the most popular solutions in urban areas: it allows for a quick improvement in comfort without major ductwork work. In Ville-Marie, this is particularly relevant for:
-
open-concept condos,
-
the units on the top floor (often more exposed to heat),
-
buildings where adding central ducts would be complex or too invasive.
In this type of project, winter stability and defrost cycle management become essential — especially when the outdoor unit has to deal with snow, wind and frost.
Selected model: Midea28 (consistent with the installation)
Based on the format and logic of residential use in Montreal, this project is a very good match for a Midea28 , a new generation wall-mounted heat pump designed for solid heating performance, even during the cold periods typical of Quebec.
Without making unrealistic promises, the idea is simple: a reliable, efficient system adapted to our climate, while remaining discreet and easy to maintain.
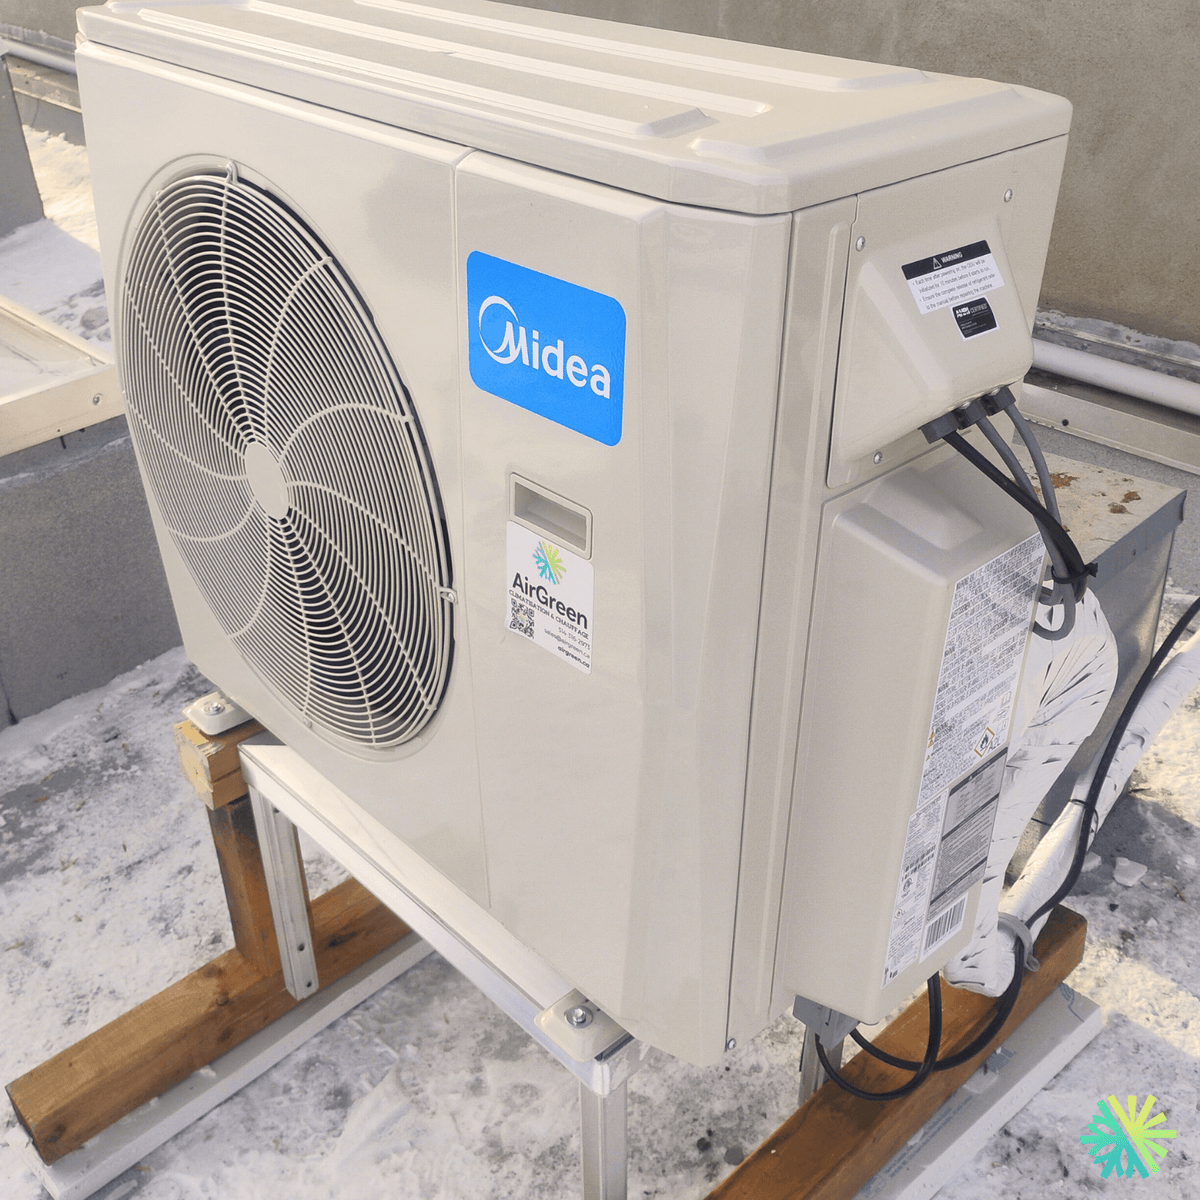
What the photo reveals: an installation on a raised platform, perfect for snow
The image clearly shows several installation choices that make a real difference in the long run:
1) Elevated outdoor unit on a robust structure
The unit is installed on a metal support , itself placed on wooden beams (like stringers) that distribute the load and protect the roof surface. This raised structure serves to:
-
keep the unit away from snow accumulation,
-
to facilitate drainage during defrosting,
-
to limit the risk of ice forming around the compressor,
-
to facilitate maintenance and visual inspection.
2) Careful management of connections (refrigerants + electricity)
We can see isolated lines (white insulation) and a properly routed electrical connection . On a roof, this is crucial:
-
to avoid heat loss,
-
to protect the pipes against UV radiation, humidity and extreme variations,
-
to maintain a clean and safe facility.
3) Accessibility and clearances
Even on a roof, adequate clearances are needed around the device (ventilation side, rear, top) in order to:
-
preserve yield,
-
reduce fouling,
-
allow for quick maintenance (which lowers costs in the long term).
Why roofing is often the best choice in Ville-Marie
Installing an outdoor unit on the roof isn't just a matter of space. In many buildings in Ville-Marie, it's also a strategic choice:
-
Aesthetics : we avoid cluttering a balcony or an interior courtyard.
-
Noise : at height, the direct sound impact towards the windows is limited (provided that vibrations are well managed).
-
Safety : less risk of impact, vandalism or obstruction.
-
Logistics : some condominiums require the roof to standardize the appearance of the building.
At AirGreen, we take into account the building rules (condo/co-ownership), access, and good HVAC practices to ensure that the installation is compliant and sustainable.
The critical point in winter: de-icing, drainage and ice prevention
In heating systems, heat pumps operate with defrost cycles: this is normal and expected. But on a rooftop, we must anticipate the "after":
-
The water from defrosting can freeze and create a sheet of ice.
-
Ice buildup can impair performance.
-
Wind-blown snow can partially block air intake/exit.
That's why a raised and well-positioned installation is a major advantage. In this project, the height and stability of the support help keep the unit functional even during periods of heavy snowfall.
Indoor comfort: stable heating, precise air conditioning
The customer benefit is felt immediately:
-
More stable temperature (fewer sudden variations),
-
Comfort targeted where life happens (living room, open area, bedroom),
-
Efficient air conditioning during Montreal's heat waves,
-
More pleasant dehumidification in summer (often an issue in condos).
And above all: a modern wall-mounted heat pump allows for precise management, ideal for urban lifestyles (variable hours, teleworking, intermittent occupancy).
Our AirGreen approach for this type of urban project
In Ville-Marie, a successful installation is 50% the right equipment… and 50% the right execution. Our approach focuses on:
-
assessment of actual constraints (roof access, clearances, noise, condominium regulations),
-
solid and elevated support (snow, ice, vibrations)
-
clean routing of connections (durability + aesthetics),
-
rigorous commissioning (pressures, sealing, parameters, functional tests),
-
Usage tips to maximize comfort and reduce consumption.
Common mistakes to avoid (and which are often corrected in practice)
In Greater Montreal, these problems are regularly seen on units installed “too quickly”:
-
Unit too low → engulfed by snow/ice in winter.
-
Insufficient clearance → declining efficiency
-
Damaged pipe insulation → heat loss + condensation
-
Unstable support → vibrations, noise, premature wear,
-
Unprotected exposed lines → accelerated aging.
This project illustrates exactly the opposite: an installation designed to last, adapted to the urban context and the Quebec climate.
Conclusion: A successful Midea installation, clean and well-suited to Ville-Marie
This Midea wall-mounted heat pump (Midea28, consistent with the configuration) installed on a roof in Ville-Marie is an excellent example of a modern HVAC solution in an urban environment: performance, discretion, comfort and durability.
If you are in Montreal (Ville-Marie, Old Port, Plateau, Southwest) or Greater Montreal and are considering a wall-mounted heat pump, our AirGreen team can recommend a realistic, well-sized solution, installed according to best practices — especially when the roof becomes the best option.
How it goes, from the first call to the end
The main steps of this kind of job at AirGreen. Every house has its quirks: the estimate brings them out.
We look at the room, the outside wall, the line route and where the outdoor unit will go. That is where the capacity gets chosen.
Model, capacity and price, in writing. We also check whether the model qualifies for assistance programs.
Floors and furniture protected, wall plate position marked level, wall opening located.
A single opening, with the slope the drain needs to flow outside.
Set on a stand raised above the snow, with the clearances the manufacturer requires.
Connected, insulated and protected. The opening is then sealed against water, cold air and insects.
A dedicated circuit and an accessible disconnect near the outdoor unit.
Leak test, vacuum, then start-up and a check of heating and cooling.
Remote, modes, filters: we show you the essentials before we leave.
- The on-site estimateWe look at the room, the outside wall, the line route and where the outdoor unit will go. That is where the capacity gets chosen.
- The quoteModel, capacity and price, in writing. We also check whether the model qualifies for assistance programs.
- Getting readyFloors and furniture protected, wall plate position marked level, wall opening located.
- The wall openingA single opening, with the slope the drain needs to flow outside.
- The outdoor unitSet on a stand raised above the snow, with the clearances the manufacturer requires.
- Lines, cable and drainConnected, insulated and protected. The opening is then sealed against water, cold air and insects.
- The electrical workA dedicated circuit and an accessible disconnect near the outdoor unit.
- Tests and start-upLeak test, vacuum, then start-up and a check of heating and cooling.
- The walkthroughRemote, modes, filters: we show you the essentials before we leave.
And at your place?
Two quick checks with real numbers: what heat costs, and what your current heaters add up to in BTU/h.
Conversion: 1 W = 3.412 BTU/h. An indication, not a load calculation: baseboards and furnaces are often stronger than the real need, and they can stay as backup. AirGreen confirms the capacity on site.
What to do, season by season
Three habits per season for this unit. They take a few minutes and prevent many calls.
- Clean the indoor unit's filters.
- Clear leaves and debris left on the outdoor unit by winter.
- Test cooling before the first hot days.
- Clean the filters more often when the unit runs a lot.
- Keep plants away from the outdoor unit.
- Check that no water drips from the indoor unit.
- Rake the leaves around the outdoor unit.
- Test heating before the first cold days.
- Book periodic maintenance before winter.
- Keep snow away from the stand and the front of the unit.
- Let the unit defrost: it is normal.
- Never hit the ice on the fins; call us if the unit stays iced up.
Which type of equipment for your project?
Pick what looks like your need.
Four mistakes we do not make
Flip each card to see what we do instead.
What people ask us about this kind of work
Does a wall-mounted heat pump heat in winter?
Wall-mounted or multi-zone: how do I choose?
Where does the outdoor unit go?
Are there grants?
Do I need a permit?
How cold can it heat?
How much can I save?
How is the LogisVert assistance calculated?
Is it noisy?
The outdoor unit is covered in ice: is that normal?
Does AirGreen hold the required licences?
Is the estimate free?
No question matches. Write to us: we answer.
Useful pages for what comes next
More jobs to see, near you
By town, by equipment or by region: browse more than 4,700 published projects.
Each dot: a town where AirGreen has published projects. The glowing dot: this job.
Tell us about your house. We come and see it for free.
The on-site estimate is free and the quote follows within 24 hours.
Text and photo: a real AirGreen Climatisation & Chauffage job. The diagrams are generic illustrations of the type of installation, not a survey of this job site. Sources of the added figures: airgreen.ca product pages (NEEP / AHRI performance), Hydro-Québec (Heat pumps page, LogisVert, read on 13 October 2026), Régie de l’énergie (rate D as of 1 April 2026).