
Installation of a Sharp wall-mounted heat pump in Rosemont–La Petite-Patrie
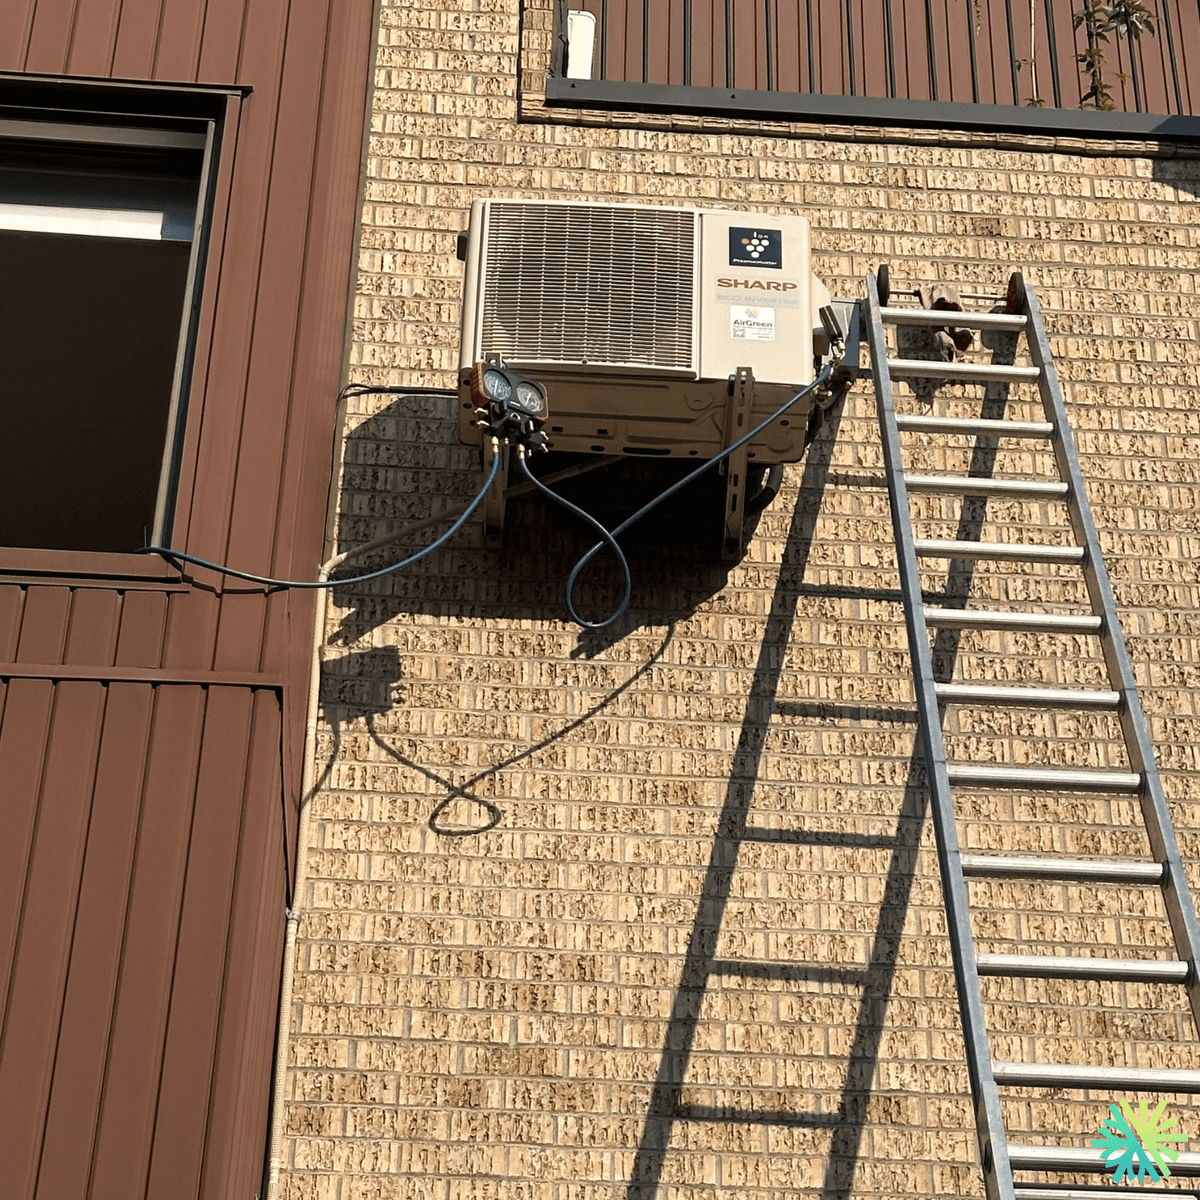
In this typical Rosemont–La Petite-Patrie building, AirGreen installed a Sharp wall-mounted heat pump on the brick façade, high up, with pressure testing and complete commissioning. The result: a comfortable apartment year-round, optimized energy consumption, and a clean, discreet installation perfectly suited to Montreal's climate.
Take a tour of the installation
Each number is a point we check on site. Switch between summer and winter to watch air and heat move.
In summer, the outdoor unit rejects the house's heat outside.
Generic illustration of this type of installation, not a survey of this job site. Tap a number.
Mounted level on a wall plate, high enough for the air to reach the whole room, with enough space around it to slide the filters out easily.
The refrigerant lines, the communication cable and the drain go through the wall in a single opening, sealed against water, cold air and insects.
Two insulated copper pipes connect the two units. Outside, a line cover can protect them from sun, knocks and weather.
A shut-off switch near the outdoor unit isolates it safely for service. It must stay accessible at all times.
The compressor and the fan. In heating mode it captures heat from the outdoor air, even in winter, and moves it inside.
On the ground or on the wall, it keeps the unit above accumulated snow. The unit stays clear and defrost water can drain away.
The fan needs to blow freely. Storage, a fence or a wall too close, and efficiency drops while noise goes up.
When considering how to improve the comfort of a Montreal apartment while keeping energy bills under control, theSharp wall-mounted heat pump stands out as an extremely efficient solution. In this project in Rosemont–La Petite-Patrie , our AirGreen team was tasked with installing and commissioning a Sharp wall-mounted unit on the brick facade of a residential building.
Thanks to careful installation at height, a refrigeration connection calibrated to the nearest tenth of a psi and meticulous work on aesthetics, this system now offers efficient heating and air conditioning, summer and winter, to our client.
Context: an apartment in Rosemont that needs efficient air conditioning and heating
The apartment is located in a typical Montreal-style plex-type building:
-
pale brick facade,
-
casement windows,
-
The outdoor unit is approximately one and a half stories high.
-
dense urban environment with close neighbors.
The client's objective was clear:
-
to replace an inefficient and noisy heating solution,
-
to enjoy comfortable air conditioning in the summer ,
-
to add an economical heating solution during the winter without overloading the building's electrical grid,
-
maintain a clean facade, without messy ducts or haphazard installation.
We therefore recommended the installation of a Sharp wall-mounted heat pump , residential range, of 12,000 BTU , perfectly suited to the main area of the apartment (open-plan living room and living space).
The chosen solution: a high-performance and reliable Sharp wall-mounted heat pump
For this project, we installed a Sharp ZU1 series wall-mounted heat pump, 12,000 BTU , model:
-
operating with R-32 refrigerant , which is more environmentally friendly than R-410A,
-
Designed for the Quebec climate , with very good efficiency in heating mode in cold weather,
-
offering an excellent compromise between performance, noise level and energy consumption .
Inside, the wall-mounted head unit is installed high up in the main living area, so that:
-
to promote uniform air circulation ,
-
Avoid blowing directly on the occupants.
-
limit the perceived noise even at full power.
Outside, the Sharp condenser shown in the photo is fixed to robust wall brackets , sized to support the weight and vibrations while complying with local standards and manufacturer's recommendations.
Technical challenges of installation on a brick facade
This type of installation, on a facade several meters above the ground, requires careful preparation and methodical execution. Several constraints guided our work:
1. Working at height
The outdoor unit is installed high enough to:
-
clear the path on the ground,
-
to protect it from snow accumulation,
-
facilitate air circulation around the condenser.
We used a professional access ladder (visible in the photo) and applied all necessary safety measures: stabilization, harnesses as needed, marking of the work area.
2. Fixing to brick
The brick facade requires:
-
mechanical anchors adapted to the support,
-
Precise layout to respect the slope of the unit and allow for proper drainage.
-
the use of anti-vibration pads to limit the transmission of vibrations to the structure.
Thanks to these precautions, the Sharp unit operates silently, without disturbing the occupants or neighbors.
3. Management of refrigeration connections and aesthetics
The refrigeration pipes and communication cable are:
-
fired from the inner head to the outer unit,
-
protected by a sheath and neatly fixed along the facade,
-
arranged in such a way as to minimize visual impact while remaining accessible for maintenance.
The photo shows the set of pressure gauges connected to the fittings: this is the vacuuming, leak testing, and circuit loading stage. We systematically check that the system:
-
shows no leaks.
-
is charged to the exact pressure recommended by Sharp.
-
achieved the expected performance before leaving the premises.
Key steps in installing a Sharp heat pump
Here is how a typical installation like the one in Rosemont–La Petite-Patrie unfolds:
-
Technical inspection and electrical validation
-
Checking the amperage available at the panel.
-
Choosing the appropriate circuit breaker and cable gauge.
-
Planning the routing of refrigeration lines and the condensation drain.
-
-
Positioning the head inside
-
Wall bracket screwed onto the uprights.
-
Drilling through the wall at a controlled angle for water drainage.
-
Passage of pipes, cables and drain to the outside.
-
-
Installation of the Sharp outdoor unit
-
Installation of galvanized steel wall brackets.
-
Unit setup, leveling, securing.
-
Connection of refrigeration lines and communication cabling.
-
-
refrigeration work and testing
-
Crimp and tighten to the recommended torque.
-
Vacuuming of the circuit to eliminate moisture and air.
-
Opening the valves and checking the pressures with the pressure gauges (as in the photo).
-
-
Electrical connections and commissioning
-
Connection to the dedicated circuit breaker.
-
System start-up, reading of blown temperatures, pressures and intensity.
-
Fine adjustments as needed to optimize performance.
-
-
Explanation to the customer
-
Presentation of the different modes (heating, air conditioning, dehumidification, automatic).
-
Advice on filter maintenance and winter use.
-
Reminder of Sharp and AirGreen warranties.
-
Results for the client: four-season comfort in Rosemont
Some concrete benefits of this installation:
-
Immediate comfort in summer : the main room cools down quickly even during heat waves.
-
Efficient heating in the off-season and in winter : the heat pump takes over to limit the use of electrical or backup systems.
-
Optimized electricity bill : The Sharp heat pump offers excellent seasonal efficiency, allowing the customer to reduce their costs compared to simple electric baseboard heaters.
-
Controlled noise : the noise level of the outdoor unit is low, and the facade placement limits disturbances for the neighborhood.
-
Clean and professional facade : aligned supports, well-fixed pipes, no "DIY" installations.
Why choose Sharp and AirGreen for your wall-mounted heat pump?
At AirGreen, we install and maintain a wide range of Sharp wall-mounted heat pumps throughout Greater Montreal. This project in Rosemont–La Petite-Patrie perfectly illustrates what we offer:
-
comprehensive support from A to Z , from model selection to commissioning;
-
a safe and compliant installation , even at height and on complex facades;
-
particular attention was paid to aesthetics and sound discretion ;
-
a team available for annual maintenance , diagnostics and any necessary repairs.
Whether you live in Rosemont, Villeray, the Plateau, Laval or the South Shore, we always adapt the solution to your building and your lifestyle.
Conclusion: A Sharp heat pump tailored for the Montreal climate
This Sharp wall-mounted heat pump installation in Rosemont–La Petite-Patrie demonstrates that it is possible to combine year-round comfort, energy efficiency, and respect for the existing architecture. Thanks to careful installation and rigorous commissioning, our client now enjoys:
-
fresh, filtered air in summer ,
-
economical and stable heating in winter ,
-
and a clean, durable and safe installation.
If you are also considering installing a Sharp wall-mounted heat pump in your apartment or house in Greater Montreal, our AirGreen team will be happy to advise you and offer a solution perfectly suited to your situation.
The big day, step by step
The main steps of this kind of job at AirGreen. Every house has its quirks: the estimate brings them out.
We look at the room, the outside wall, the line route and where the outdoor unit will go. That is where the capacity gets chosen.
Model, capacity and price, in writing. We also check whether the model qualifies for assistance programs.
Floors and furniture protected, wall plate position marked level, wall opening located.
A single opening, with the slope the drain needs to flow outside.
Set on a stand raised above the snow, with the clearances the manufacturer requires.
Connected, insulated and protected. The opening is then sealed against water, cold air and insects.
A dedicated circuit and an accessible disconnect near the outdoor unit.
Leak test, vacuum, then start-up and a check of heating and cooling.
Remote, modes, filters: we show you the essentials before we leave.
- The on-site estimateWe look at the room, the outside wall, the line route and where the outdoor unit will go. That is where the capacity gets chosen.
- The quoteModel, capacity and price, in writing. We also check whether the model qualifies for assistance programs.
- Getting readyFloors and furniture protected, wall plate position marked level, wall opening located.
- The wall openingA single opening, with the slope the drain needs to flow outside.
- The outdoor unitSet on a stand raised above the snow, with the clearances the manufacturer requires.
- Lines, cable and drainConnected, insulated and protected. The opening is then sealed against water, cold air and insects.
- The electrical workA dedicated circuit and an accessible disconnect near the outdoor unit.
- Tests and start-upLeak test, vacuum, then start-up and a check of heating and cooling.
- The walkthroughRemote, modes, filters: we show you the essentials before we leave.
What would it look like at your place?
Two quick checks with real numbers: what heat costs, and what your current heaters add up to in BTU/h.
Conversion: 1 W = 3.412 BTU/h. An indication, not a load calculation: baseboards and furnaces are often stronger than the real need, and they can stay as backup. AirGreen confirms the capacity on site.
Four mistakes we do not make
Flip each card to see what we do instead.
Your own project, step by step
What to do, season by season
Three habits per season for this unit. They take a few minutes and prevent many calls.
- Clean the indoor unit's filters.
- Clear leaves and debris left on the outdoor unit by winter.
- Test cooling before the first hot days.
- Clean the filters more often when the unit runs a lot.
- Keep plants away from the outdoor unit.
- Check that no water drips from the indoor unit.
- Rake the leaves around the outdoor unit.
- Test heating before the first cold days.
- Book periodic maintenance before winter.
- Keep snow away from the stand and the front of the unit.
- Let the unit defrost: it is normal.
- Never hit the ice on the fins; call us if the unit stays iced up.
Is your home ready?
Check what applies at your place. A "no" is not a refusal: it is what we sort out during the estimate.
Four statements: true or false?
It all comes down to details you have just seen.
1. In heating mode, the outdoor unit can produce water.
During defrost cycles. That water must drain away without forming ice.
2. You pick the capacity with a simple square-footage rule.
Windows, insulation, orientation and how the room is used all count. Capacity is chosen on site.
3. A multi-zone connects several indoor heads to a single condenser.
One head per room, all on the same condenser. Each room keeps its own temperature.
4. The disconnect can sit behind the patio furniture.
It must stay accessible: it is what shuts the unit off for service.
0 / 4 right answers
What people ask us about this kind of work
Does a wall-mounted heat pump heat in winter?
Wall-mounted or multi-zone: how do I choose?
Where does the outdoor unit go?
Are there grants?
Do I need a permit?
How cold can it heat?
How much can I save?
How is the LogisVert assistance calculated?
Is it noisy?
The outdoor unit is covered in ice: is that normal?
Does AirGreen hold the required licences?
Is the estimate free?
No question matches. Write to us: we answer.
More jobs to see, near you
By town, by equipment or by region: browse more than 4,700 published projects.
Each dot: a town where AirGreen has published projects. The glowing dot: this job.
Every house has its constraints. We see them before we install.
The on-site estimate is free and the quote follows within 24 hours.
Text and photo: a real AirGreen Climatisation & Chauffage job. The diagrams are generic illustrations of the type of installation, not a survey of this job site. Sources of the added figures: airgreen.ca product pages (NEEP / AHRI performance), Hydro-Québec (Heat pumps page, LogisVert, read on 13 October 2026), Régie de l’énergie (rate D as of 1 April 2026).