
Installation of a Sharp wall-mounted heat pump in Villeray–Saint-Michel–Parc-Extension
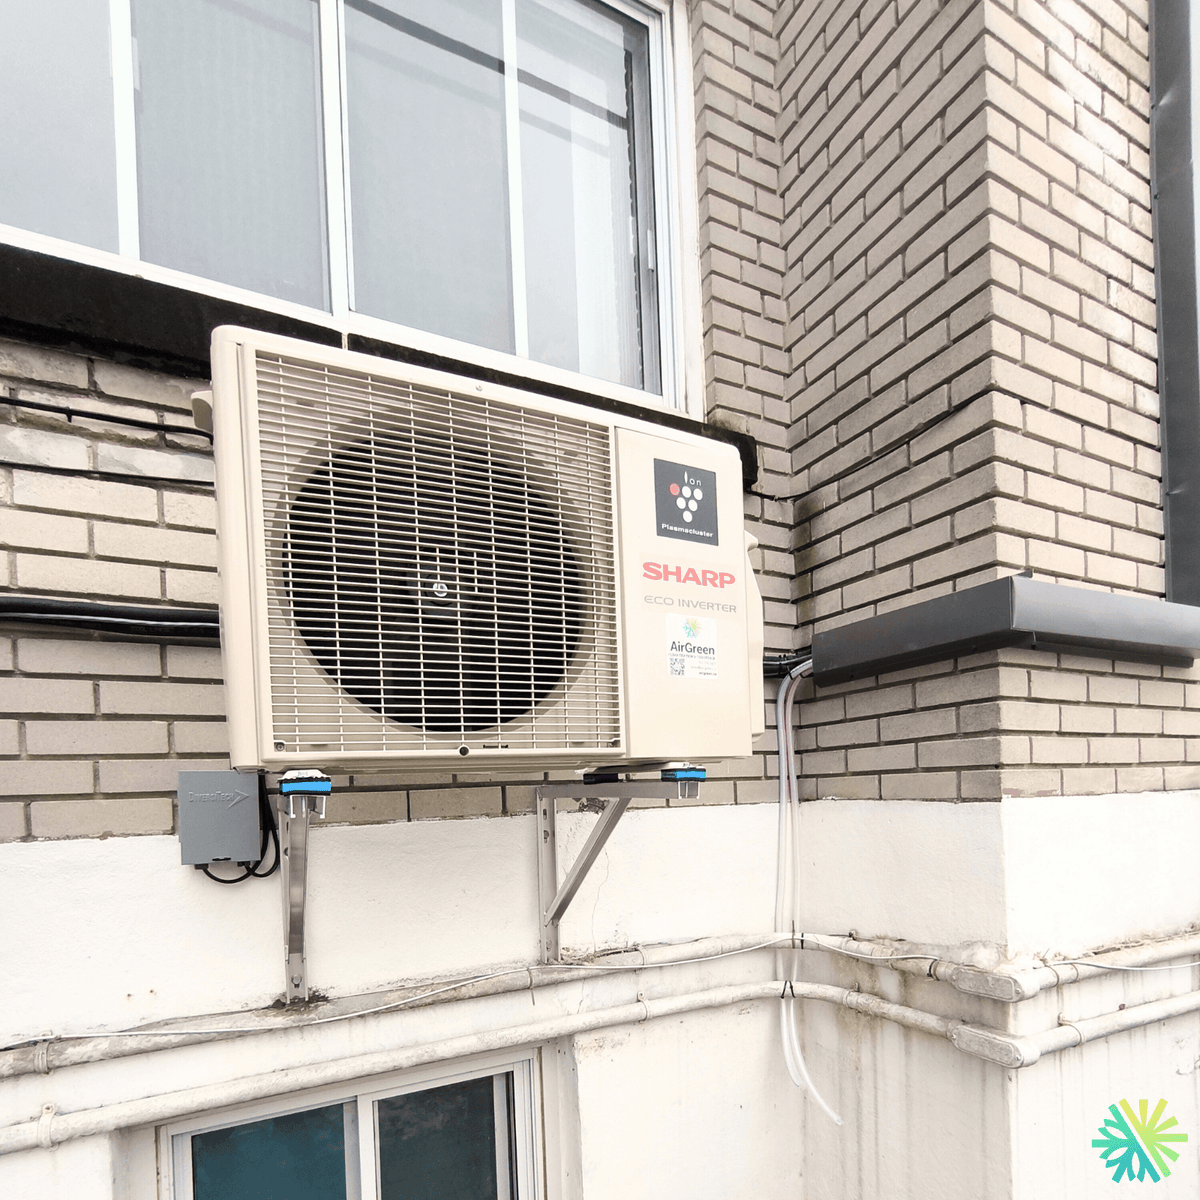
In Villeray, AirGreen installed a Sharp Eco Inverter wall-mounted heat pump (ZU1 coherent series) on a brick facade: wall brackets, optimized clearances, electrical sectioning and cleanly routed connections for reliable four-season comfort.
In summer, the outdoor unit rejects the house's heat outside.
Generic illustration of this type of installation, not a survey of this job site. Tap a number.
Mounted level on a wall plate, high enough for the air to reach the whole room, with enough space around it to slide the filters out easily.
The refrigerant lines, the communication cable and the drain go through the wall in a single opening, sealed against water, cold air and insects.
Two insulated copper pipes connect the two units. Outside, a line cover can protect them from sun, knocks and weather.
A shut-off switch near the outdoor unit isolates it safely for service. It must stay accessible at all times.
The compressor and the fan. In heating mode it captures heat from the outdoor air, even in winter, and moves it inside.
On the ground or on the wall, it keeps the unit above accumulated snow. The unit stays clear and defrost water can drain away.
The fan needs to blow freely. Storage, a fence or a wall too close, and efficiency drops while noise goes up.
In many Montreal buildings, the location of the outdoor unit is often the real challenge: brick walls, windows very close together, existing service passages, and the need to maintain a clean facade. In Villeray–Saint-Michel–Parc-Extension , we installed aSharp wall-mounted heat pump ( Eco Inverter range, consistent with the Sharp ZU1 series) on a grey brick building, with a clear constraint: to integrate the equipment into the wall discreetly, safely, and sustainably, while respecting air circulation and accessibility for maintenance.
At AirGreen , we like this type of “real” mandate: not just installing a machine, but intelligently integrating it into the building.
Machine type: wall-mounted mini-split (wall-mounted heat pump)
The installed system is a wall-mounted heat pump (mini-split) , consisting of:
-
An outdoor unit (condenser/compressor) fixed to the wall
-
An indoor wall unit (not visible in the photo), which distributes the air conditioning or heating
-
Refrigeration lines (insulated pipes) connecting the interior and exterior
-
A dedicated power supply with nearby disconnection
This format is particularly popular in Montreal because it allows for rapid improvement of comfort without redoing ducts, while offering excellent energy efficiency when the sizing and installation are done correctly.
Brand and model: Sharp, ZU1 Coherent Series
The unit supplied is a Sharp brand — and it aligns perfectly with what we see on the unit: Sharp Eco Inverter branding and Plasmacluster module. To remain consistent with the reference system and the residential range installed by AirGreen, we place this installation in the Sharp ZU1 family (wall-mounted, R-32 depending on the series, stable performance, inverter modulation).
When the model plate is not legible in the photo, the important thing is to remain realistic: we are describing a new generation Sharp inverter wall-mounted heat pump , designed for four-season use in Quebec.
Prominent installation details visible in the photo (and why they matter)
This image shows several indicators of a clean and durable assembly, typical of what we aim for at AirGreen:
1) Wall mounting on metal brackets (with anti-vibration supports)
The outdoor unit is mounted on sturdy wall brackets , with support points that help to minimize vibrations. In Montreal, this is a very relevant choice.
-
This avoids the problems of freezing/thawing a floor slab
-
We keep the device away from snow accumulations
-
This facilitates water flow around the unit and access for maintenance.
2) Positioning under the window: managing clearances and airflow
The unit is placed directly under a window , a common scenario on building facades. In this context, we pay particular attention to:
-
The rear and lateral distance is necessary for the unit to breathe.
-
Frontal blowing (no immediate obstruction)
-
the reduction of perceived noise inside (vibration/structure)
3) Electrical disconnect box nearby
A disconnection is clearly visible near the outdoor unit. This is a non-negotiable point for:
-
the safety of interventions
-
compliance and maintenance
-
the speed of diagnosis in case of service
4) Connection routing: clean, protected, and discreet
The pipes and cables are routed along the wall in an orderly fashion (including a corner passage). Good workmanship in this area:
-
protects the connections against shocks and wear
-
improves the aesthetics (very important on a facade)
-
limits mechanical stress (bends, tension, vibrations)
5) Integration on brick: anchoring and durability
Fixing to brick requires a rigorous approach: proper anchoring, stability, and management of seasonal movements. It's precisely this type of detail that makes the difference between "installed" and "properly installed."
Why this choice works well in Villeray (and more broadly in Montreal)
In neighborhoods like Villeray, you often find:
-
brick buildings with ornate facades
-
narrow service areas where every inch counts
-
aesthetic constraints (visibility from the courtyard/alley)
-
a need for reliable comfort in the summer… and efficient heating in the shoulder seasons
A Sharp wall-mounted heat pump responds well to this reality, provided that the installation is done intelligently: clearances, vibration, drainage, routing of connections and future access.
What the customer actually gains
With a properly installed Sharp Eco Inverter wall-mounted heat pump, the goal is:
-
stable comfort , without sudden temperature variations (inverter modulation)
-
efficient air conditioning during hot and humid periods
-
useful heating for a large part of the year (depending on usage and configuration)
-
an installation that remains visually clean and easy to maintain
And above all: a reduction of classic risks (noise, vibration, air recirculation, problems related to snow on the ground, etc.).
Our AirGreen approach for this type of installation
When we install a wall-mounted heat pump on a facade in Montreal, we apply a clear method:
-
validation of clearances (incoming/outgoing air)
-
Selection of the support based on snow, access, structure and vibrations
-
Clean routing of connections (protection + aesthetics)
-
Clean drilling and finishing (waterproofing and durability)
-
Electrical verification and safety (disconnect, protection, fixing)
This is exactly what allows you to obtain a reliable installation that performs well… and ages well.
Conclusion
This installation in Villeray–Saint-Michel–Parc-Extension demonstrates AirGreen's commitment to delivering a Sharp wall-mounted heat pump , securely fixed to the wall, neatly integrated into the brickwork, with accessible electrical disconnection and clean wiring. In short: a system designed for Montreal residential comfort, without compromising on quality of workmanship.
How it goes, from the first call to the end
The main steps of this kind of job at AirGreen. Every house has its quirks: the estimate brings them out.
We look at the room, the outside wall, the line route and where the outdoor unit will go. That is where the capacity gets chosen.
Model, capacity and price, in writing. We also check whether the model qualifies for assistance programs.
Floors and furniture protected, wall plate position marked level, wall opening located.
A single opening, with the slope the drain needs to flow outside.
Set on a stand raised above the snow, with the clearances the manufacturer requires.
Connected, insulated and protected. The opening is then sealed against water, cold air and insects.
A dedicated circuit and an accessible disconnect near the outdoor unit.
Leak test, vacuum, then start-up and a check of heating and cooling.
Remote, modes, filters: we show you the essentials before we leave.
- The on-site estimateWe look at the room, the outside wall, the line route and where the outdoor unit will go. That is where the capacity gets chosen.
- The quoteModel, capacity and price, in writing. We also check whether the model qualifies for assistance programs.
- Getting readyFloors and furniture protected, wall plate position marked level, wall opening located.
- The wall openingA single opening, with the slope the drain needs to flow outside.
- The outdoor unitSet on a stand raised above the snow, with the clearances the manufacturer requires.
- Lines, cable and drainConnected, insulated and protected. The opening is then sealed against water, cold air and insects.
- The electrical workA dedicated circuit and an accessible disconnect near the outdoor unit.
- Tests and start-upLeak test, vacuum, then start-up and a check of heating and cooling.
- The walkthroughRemote, modes, filters: we show you the essentials before we leave.
And at your place?
Two quick checks with real numbers: what heat costs, and what your current heaters add up to in BTU/h.
Conversion: 1 W = 3.412 BTU/h. An indication, not a load calculation: baseboards and furnaces are often stronger than the real need, and they can stay as backup. AirGreen confirms the capacity on site.
What to do, season by season
Three habits per season for this unit. They take a few minutes and prevent many calls.
- Clean the indoor unit's filters.
- Clear leaves and debris left on the outdoor unit by winter.
- Test cooling before the first hot days.
- Clean the filters more often when the unit runs a lot.
- Keep plants away from the outdoor unit.
- Check that no water drips from the indoor unit.
- Rake the leaves around the outdoor unit.
- Test heating before the first cold days.
- Book periodic maintenance before winter.
- Keep snow away from the stand and the front of the unit.
- Let the unit defrost: it is normal.
- Never hit the ice on the fins; call us if the unit stays iced up.
Which type of equipment for your project?
Pick what looks like your need.
Four mistakes we do not make
Flip each card to see what we do instead.
What people ask us about this kind of work
Does a wall-mounted heat pump heat in winter?
Wall-mounted or multi-zone: how do I choose?
Where does the outdoor unit go?
Are there grants?
Do I need a permit?
How cold can it heat?
How much can I save?
How is the LogisVert assistance calculated?
Is it noisy?
The outdoor unit is covered in ice: is that normal?
Does AirGreen hold the required licences?
Is the estimate free?
No question matches. Write to us: we answer.
Useful pages for what comes next
More jobs to see, near you
By town, by equipment or by region: browse more than 4,700 published projects.
Each dot: a town where AirGreen has published projects. The glowing dot: this job.
Tell us about your house. We come and see it for free.
The on-site estimate is free and the quote follows within 24 hours.
Text and photo: a real AirGreen Climatisation & Chauffage job. The diagrams are generic illustrations of the type of installation, not a survey of this job site. Sources of the added figures: airgreen.ca product pages (NEEP / AHRI performance), Hydro-Québec (Heat pumps page, LogisVert, read on 13 October 2026), Régie de l’énergie (rate D as of 1 April 2026).