
Installation of a Zephyr wall-mounted heat pump in Rosemont–La Petite-Patrie (Montreal)
Discover this AirGreen installation of a Zephyr wall-mounted heat pump in Rosemont–La Petite-Patrie: outdoor unit on wall support to better withstand Montreal winters, optimized side passage and perfectly protected connections for lasting comfort.
- City
- Region
- Equipment
- Brand
- Challenges
- Published
The job on one screen
The article, chapter by chapter
In a neighbourhood like Rosemont–La Petite-Patrie , where brick duplexes, narrow side entrances, and compact backyards are common, a successful HVAC installation often hinges on the details: the precise placement of the outdoor unit, noise and vibration management, snow protection, and a clean finish that complements the building's aesthetics. At AirGreen , this is precisely the type of Montreal residential project we love to optimize.
A residential system designed for comfort… summer and winter
For this project, we installed a Zephyr brand wall-mounted heat pump (mini-split) . This type of equipment is particularly appreciated in urban areas, as it allows you to add (or improve) air conditioning and heating without redoing the entire air distribution system of a house.
Even when space is limited, a well-positioned wall-mounted heat pump ensures:
-
stable comfort room by room;
-
efficient air conditioning during heat waves;
-
efficient heating in the fall, spring and often a good part of the Quebec winter (depending on the configuration and use);
-
a reduction in reliance on electric baseboard heaters, when the system serves as primary or smart supplemental heating.
The choice of model: Zephyr, a coherent solution for Montreal's plexes
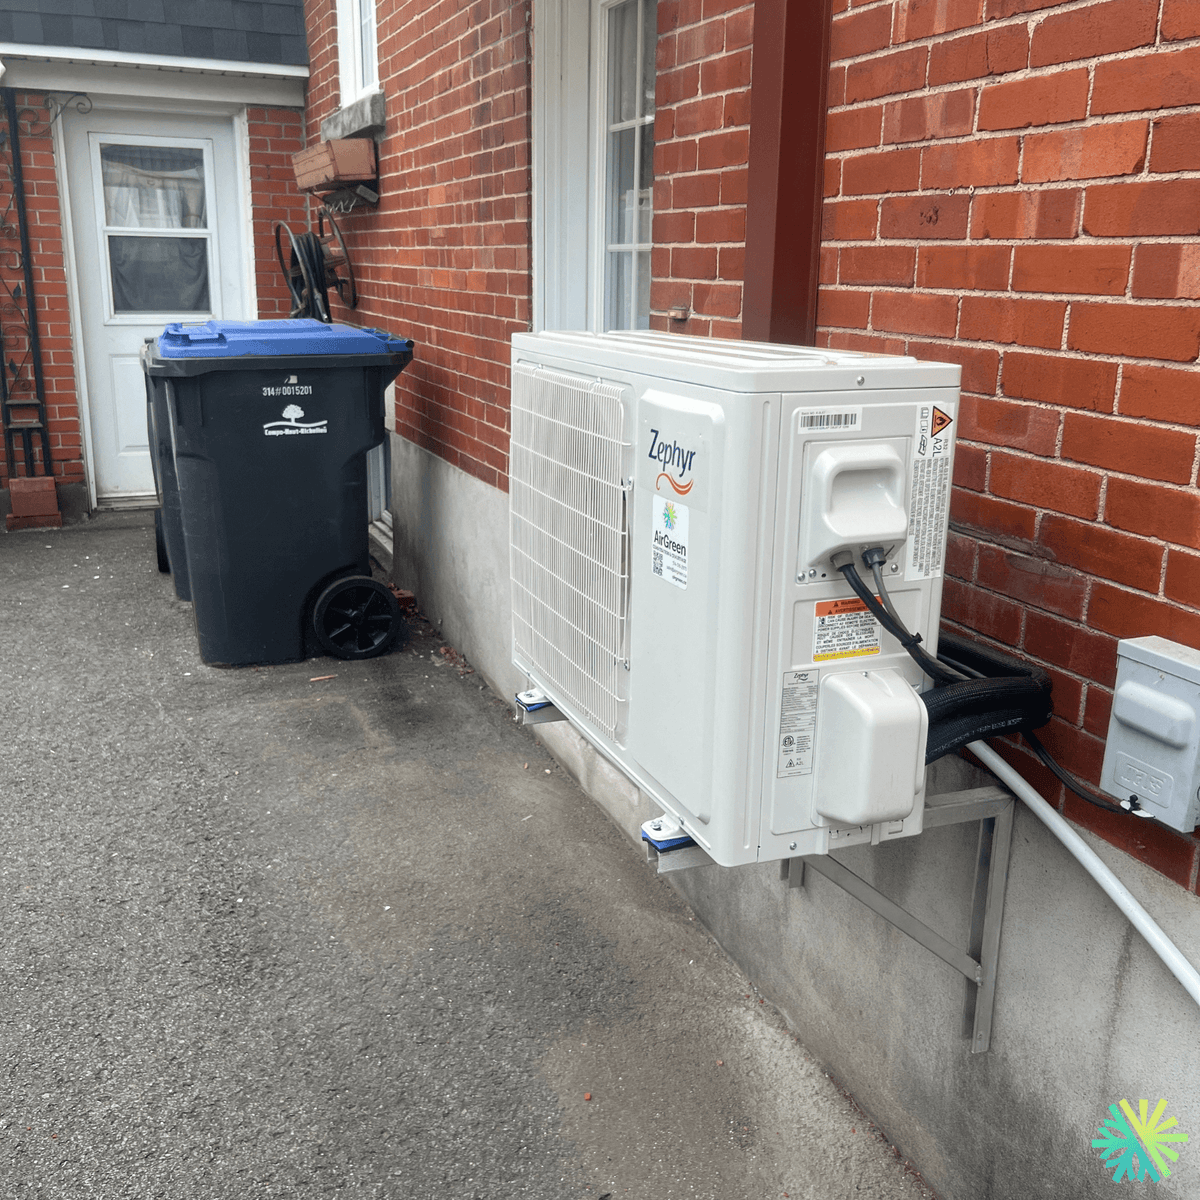
The exact model is not clearly visible in the photo, but the outdoor unit corresponds to a Zephyr wall-mounted inverter type “new generation” , designed for residential use and compact installation.
In real-world situations, this is common: the precise model is confirmed by the complete nameplate, the technical specifications, and the chosen capacity (BTU) based on load calculations and actual usage. The important thing here is the consistency of the choice: a wall-mounted Zephyr is a very logical choice for an urban brick building, where a reliable, discreet, and efficient unit is desired without encroaching on the passageway.
Prominent installation details: a clean and intelligent side-pass mounting
Looking at the installation, several points stand out — and these are precisely the elements that make the difference between “installed” and “properly installed”.
1) Outdoor unit on wall bracket: protection against snow and water
The Zephyr outdoor unit is fixed to a robust wall bracket , securely anchored in the masonry/structure (with clearance above the foundation).
This is an excellent practice in Montreal:
-
We reduce the risk of being buried during periods of snow;
-
we limit the impact of water and slush accumulations on the ground;
-
Maintenance is made easier (defrosting, cleaning, inspection).
2) Ideal location for a small space
The side passage is narrow, and yet the unit is positioned in such a way as to:
-
maintain reasonable traffic flow ;
-
avoid blocking a door or access point;
-
maintain a minimum airflow so that the equipment can breathe properly.
In urban areas, the aim is always to find the best compromise between open space, accessibility, noise and building constraints.
3) Refrigerant lines well protected
We can clearly see the two insulated pipes (liquid line and gas line) exiting to the right, with thick black insulation.
This is essential because:
-
avoid losses in efficiency ;
-
prevent condensation and moisture on surfaces;
-
protect the pipes against mechanical wear and temperature variations.
4) Electricity and safety: presence of an external box
An electrical disconnect switch/box is visible on the nearby wall. This is an important element:
-
for safety during maintenance;
-
for compliance of installation practices;
-
for a quick fix, without improvisation.
5) Vibration management: a priority in densely populated areas
In a neighborhood like Rosemont, the buildings are close together and the shared walls sometimes amplify vibrations. Wall mounting, when done correctly, allows for better control of:
-
micro-vibrations ;
-
sound transmission to the structure;
-
the overall comfort of the occupants (and sometimes the neighbors).
At AirGreen, we pay special attention to anti-vibration and orientation, because silence is a true luxury… especially in the city.
Why this installation is particularly suited to Montreal
A Zephyr wall-mounted heat pump installed in this way is very well suited to the realities of Montreal:
-
Winter and defrost cycles : the elevation of the unit helps prevent snow and ice from interfering with operation and drainage.
-
Space constraints : the wall mount frees up floor space and protects the passage area.
-
Brick buildings : proper fixing and thoughtful positioning protect the facade and ensure stability.
-
Aesthetics : a clean, discreet and well-insulated pipe routing gives a more “professional finish”.
The AirGreen approach: performance, cleanliness, sustainability
In this type of project, our goal is not simply to "install a machine." We aim to deliver a system:
-
optimized for performance (good air circulation, good connection practices);
-
reliable in the long term (stable installation, protected components, maintenance access);
-
comfortable for everyday use (reduced noise, stable operation);
-
clean visually (especially important on visible urban facades).
Each installation becomes a small “signature”: when everything is well aligned, well fixed, well insulated and well thought out, it shows… and it can be felt.
What to expect after installation
Once the Zephyr wall-mounted heat pump is in operation, occupants can generally expect to notice:
-
a rapid increase in comfort during temperature variations;
-
air conditioning that is more efficient than a temporary system (portable type);
-
better humidity management during the summer period;
-
Flexibility : heating when needed, without overheating the whole house.
And above all: a system that integrates well into daily life, without becoming an irritant.
The job tools
Two quick checks with real numbers: what heat costs, and what your current heaters add up to in BTU/h.
Conversion: 1 W = 3.412 BTU/h. An indication, not a load calculation: baseboards and furnaces are often stronger than the real need, and they can stay as backup. AirGreen confirms the capacity on site.
How the job unfolds
The main steps of this kind of job at AirGreen. Every house has its quirks: the estimate brings them out.
We look at the room, the outside wall, the line route and where the outdoor unit will go. That is where the capacity gets chosen.
Model, capacity and price, in writing. We also check whether the model qualifies for assistance programs.
Floors and furniture protected, wall plate position marked level, wall opening located.
A single opening, with the slope the drain needs to flow outside.
Set on a stand raised above the snow, with the clearances the manufacturer requires.
Connected, insulated and protected. The opening is then sealed against water, cold air and insects.
A dedicated circuit and an accessible disconnect near the outdoor unit.
Leak test, vacuum, then start-up and a check of heating and cooling.
Remote, modes, filters: we show you the essentials before we leave.
- The on-site estimateWe look at the room, the outside wall, the line route and where the outdoor unit will go. That is where the capacity gets chosen.
- The quoteModel, capacity and price, in writing. We also check whether the model qualifies for assistance programs.
- Getting readyFloors and furniture protected, wall plate position marked level, wall opening located.
- The wall openingA single opening, with the slope the drain needs to flow outside.
- The outdoor unitSet on a stand raised above the snow, with the clearances the manufacturer requires.
- Lines, cable and drainConnected, insulated and protected. The opening is then sealed against water, cold air and insects.
- The electrical workA dedicated circuit and an accessible disconnect near the outdoor unit.
- Tests and start-upLeak test, vacuum, then start-up and a check of heating and cooling.
- The walkthroughRemote, modes, filters: we show you the essentials before we leave.
What we check on a job like this one
Each number is a point we check on site. Switch between summer and winter to watch air and heat move.
In summer, the outdoor unit rejects the house's heat outside.
Generic illustration of this type of installation, not a survey of this job site. Tap a number.
Mounted level on a wall plate, high enough for the air to reach the whole room, with enough space around it to slide the filters out easily.
The refrigerant lines, the communication cable and the drain go through the wall in a single opening, sealed against water, cold air and insects.
Two insulated copper pipes connect the two units. Outside, a line cover can protect them from sun, knocks and weather.
A shut-off switch near the outdoor unit isolates it safely for service. It must stay accessible at all times.
The compressor and the fan. In heating mode it captures heat from the outdoor air, even in winter, and moves it inside.
On the ground or on the wall, it keeps the unit above accumulated snow. The unit stays clear and defrost water can drain away.
The fan needs to blow freely. Storage, a fence or a wall too close, and efficiency drops while noise goes up.
Is your home ready?
Check what applies at your place. A "no" is not a refusal: it is what we sort out during the estimate.
Good habits, once the unit is in place
Six simple habits that keep the unit going. Your list stays on this device.
What to do, season by season
Three habits per season for this unit. They take a few minutes and prevent many calls.
- Clean the indoor unit's filters.
- Clear leaves and debris left on the outdoor unit by winter.
- Test cooling before the first hot days.
- Clean the filters more often when the unit runs a lot.
- Keep plants away from the outdoor unit.
- Check that no water drips from the indoor unit.
- Rake the leaves around the outdoor unit.
- Test heating before the first cold days.
- Book periodic maintenance before winter.
- Keep snow away from the stand and the front of the unit.
- Let the unit defrost: it is normal.
- Never hit the ice on the fins; call us if the unit stays iced up.
The right pages, at the right time
Four statements: true or false?
It all comes down to details you have just seen.
1. In heating mode, the outdoor unit can produce water.
During defrost cycles. That water must drain away without forming ice.
2. You pick the capacity with a simple square-footage rule.
Windows, insulation, orientation and how the room is used all count. Capacity is chosen on site.
3. A multi-zone connects several indoor heads to a single condenser.
One head per room, all on the same condenser. Each room keeps its own temperature.
4. The disconnect can sit behind the patio furniture.
It must stay accessible: it is what shuts the unit off for service.
0 / 4 right answers
What people ask us about this kind of work
Does a wall-mounted heat pump heat in winter?
Wall-mounted or multi-zone: how do I choose?
Where does the outdoor unit go?
Are there grants?
Do I need a permit?
How cold can it heat?
How much can I save?
How is the LogisVert assistance calculated?
Is it noisy?
The outdoor unit is covered in ice: is that normal?
Does AirGreen hold the required licences?
Is the estimate free?
No question matches. Write to us: we answer.
More jobs to see, near you
By town, by equipment or by region: browse more than 4,700 published projects.
Each dot: a town where AirGreen has published projects. The glowing dot: this job.
An on-site estimate, the right capacity, the right equipment.
The on-site estimate is free and the quote follows within 24 hours.
Text and photo: a real AirGreen Climatisation & Chauffage job. The diagrams are generic illustrations of the type of installation, not a survey of this job site. Sources of the added figures: airgreen.ca product pages (NEEP / AHRI performance), Hydro-Québec (Heat pumps page, LogisVert, read on 13 October 2026), Régie de l’énergie (rate D as of 1 April 2026).