
Installation of a Sharp wall-mounted heat pump on a balcony in Verdun (Montreal)
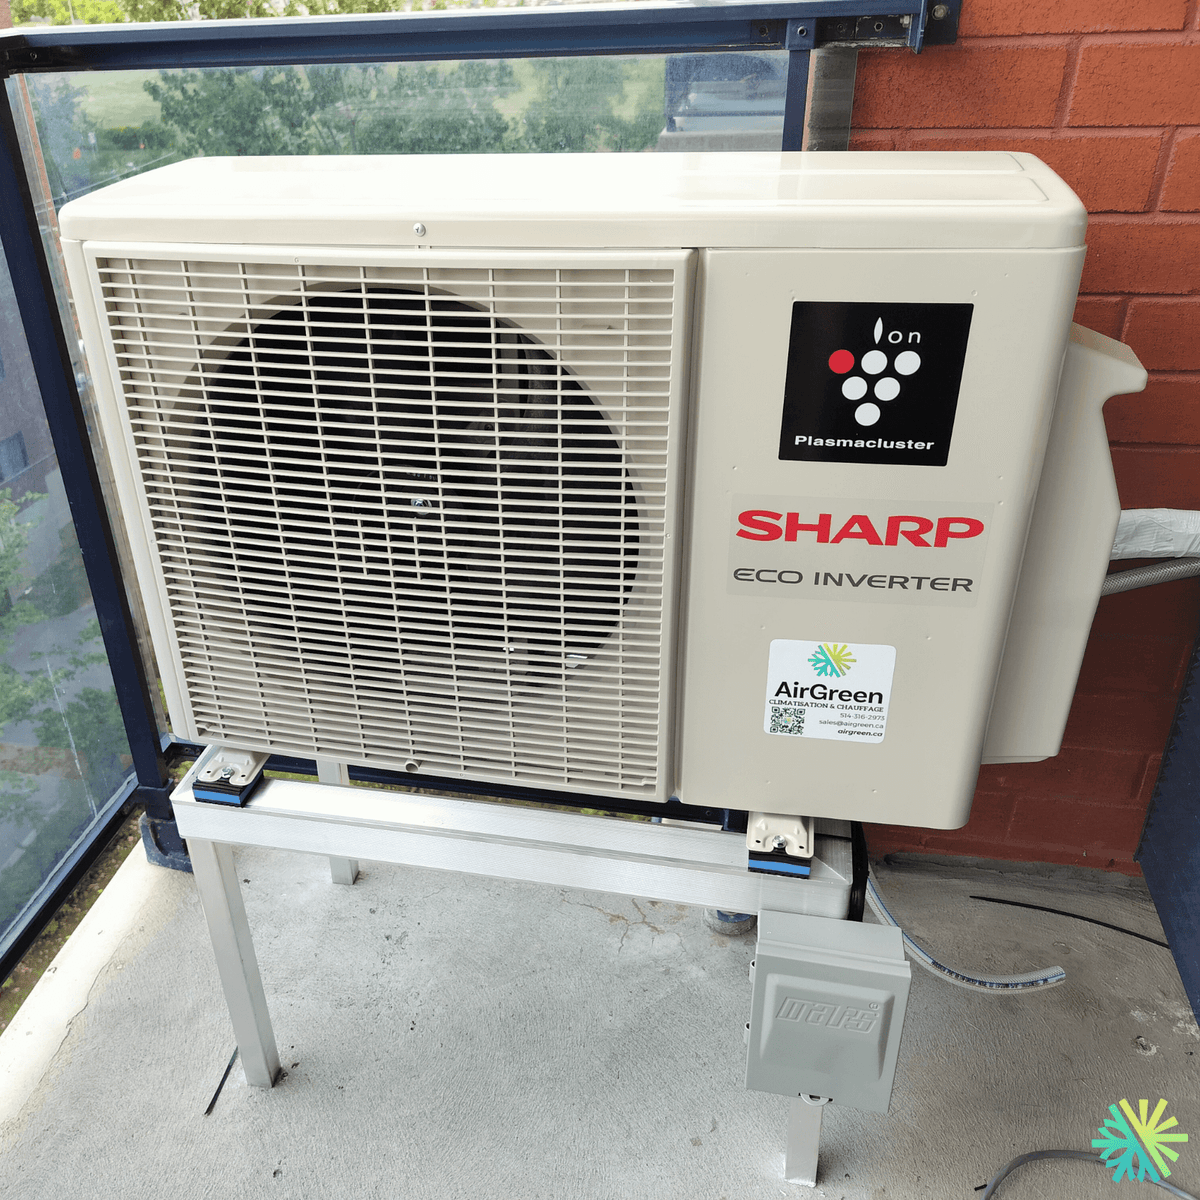
In Verdun, AirGreen installed a Sharp wall-mounted heat pump on a condo balcony with a raised support, anti-vibration pads, and an accessible electrical disconnect switch. A compact, clean, and efficient solution, ideal for year-round comfort in an urban environment.
- City
- Region
- Equipment
- Brand
- Challenges
- Published
The job on one screen
The article, chapter by chapter
In several areas of Montreal, and particularly in Verdun where there are many condominiums and apartment buildings, installing a wall-mounted heat pump requires a technically sound and meticulous approach. The photo clearly shows a Sharp outdoor unit installed on a balcony, in a typical condo setting: brick wall, glass railing, and limited space to optimize.
At AirGreen , we carry out this type of installation regularly: the objective is simple — to offer four-season comfort, without compromising aesthetics, the tranquility of the occupants, or the requirements of the condominium.
An ideal solution for condos: Sharp wall-mounted heat pump
The system installed here is a wall-mounted heat pump (mini-split) . This is one of the most popular formats in Verdun because it combines:
-
Efficient heating for Quebec winters (especially in mid-season and up to more serious cold weather, depending on the range)
-
Stable air conditioning in summer, even during humid periods
-
Precise temperature control in the main area (living room, open area, bedroom, etc.)
-
Compact installation , perfect for a balcony or a facade with constraints
Brand and model: Sharp (Eco Inverter range, type ZU1)
As the brand name is supplied manually, we use Sharp as the primary reference.
As for the model, the photo shows a Sharp outdoor unit with Eco Inverter and Plasmacluster markings—a common feature of recent Sharp wall-mounted heat pumps. Without a legible nameplate, the exact identification may vary depending on the capacity, but the overall design is consistent with a Sharp from the new generation ZU1 (R-32) family .
In practice, this type of device is appreciated for:
-
its stable performance in heating and air conditioning
-
Its modulating (inverter) operation avoids abrupt cycles
-
its comfort-oriented approach + air quality , often highlighted by Sharp
Visible installation details: clean, stable, and designed with the neighborhood in mind.
On this balcony in Verdun, several elements indicate a methodical installation — exactly what we are looking for in a condominium context.
1) Installation on a raised support (and not directly on the ground)
The unit is placed on an elevated metal structure , which offers several advantages:
-
Better protection against standing water and dirt
-
more constant airflow around the condenser
-
simpler maintenance (clearing, inspection, cleaning)
2) Anti-vibration pads to reduce noise
Anti-vibration pads are visible under the support points. In a condo, this is crucial:
-
less vibration transmitted to the structure
-
reduction in the buzzing noise noticeable to the occupants and sometimes to the neighbors
-
improved acoustic comfort, especially at night
3) Clearance and ventilation maintained despite limited space
The balcony offers limited space, but the unit is installed with adequate frontal clearance for the fan's airflow. This point is crucial:
-
to avoid air recirculation
-
to maintain effectiveness (especially during heat waves)
-
to prevent protection shutdowns in case of overheating
4) Accessible electrical disconnection (safety and compliance)
A disconnect switch is visible near the base. This is an important detail:
-
safety during maintenance
-
quick access for a technician
-
compliance with good installation practices
5) Careful transitions between words
The connections exit on the right side, with a clean finish and orderly management of the conduits/cables. In condominiums, the aesthetics and cleanliness of the routing are often among the requirements — and that's exactly what we aim for.
Why does this type of installation work so well in Verdun?
Verdun combines several realities: brick buildings, more compact apartments, balconies, condominium regulations, and close neighbors. A Sharp wall-mounted heat pump on a bracket, well decoupled (anti-vibration), then becomes a particularly logical solution:
-
Immediate comfort in the unit, summer and winter
-
Minimal footprint on the balcony
-
Less noise pollution thanks to a stable and isolated installation
-
Maintenance made easier (access, clearance, electrical safety)
At AirGreen, our approach is always the same: adapt the installation to the building, the lifestyle of the occupants and the concrete constraints of the site — not the other way around.
Something we always check in condos (and that many neglect)
Even though each condo is different, we systematically apply a series of checks before and during installation:
-
location that respects air clearance requirements (performance + longevity)
-
vibration management (supports, bearings, contact points)
-
routing of connections for a discreet finish
-
future accessibility for maintenance (without dismantling everything)
-
choosing a device that is consistent with the surface area, sunlight exposure, and occupancy pattern
It is this level of rigor that makes the difference between an “installed” heat pump and a truly optimized heat pump.
Conclusion: a properly installed Sharp means lasting comfort
This installation in Verdun perfectly illustrates what we love to do at AirGreen: integrating a Sharp wall-mounted heat pump into an urban environment, respecting space, the neighborhood, and performance. The result: a discreet, stable, efficient system, ready to provide reliable comfort season after season.
The job tools
Two quick checks with real numbers: what heat costs, and what your current heaters add up to in BTU/h.
Conversion: 1 W = 3.412 BTU/h. An indication, not a load calculation: baseboards and furnaces are often stronger than the real need, and they can stay as backup. AirGreen confirms the capacity on site.
How the job unfolds
The main steps of this kind of job at AirGreen. Every house has its quirks: the estimate brings them out.
We look at the room, the outside wall, the line route and where the outdoor unit will go. That is where the capacity gets chosen.
Model, capacity and price, in writing. We also check whether the model qualifies for assistance programs.
Floors and furniture protected, wall plate position marked level, wall opening located.
A single opening, with the slope the drain needs to flow outside.
Set on a stand raised above the snow, with the clearances the manufacturer requires.
Connected, insulated and protected. The opening is then sealed against water, cold air and insects.
A dedicated circuit and an accessible disconnect near the outdoor unit.
Leak test, vacuum, then start-up and a check of heating and cooling.
Remote, modes, filters: we show you the essentials before we leave.
- The on-site estimateWe look at the room, the outside wall, the line route and where the outdoor unit will go. That is where the capacity gets chosen.
- The quoteModel, capacity and price, in writing. We also check whether the model qualifies for assistance programs.
- Getting readyFloors and furniture protected, wall plate position marked level, wall opening located.
- The wall openingA single opening, with the slope the drain needs to flow outside.
- The outdoor unitSet on a stand raised above the snow, with the clearances the manufacturer requires.
- Lines, cable and drainConnected, insulated and protected. The opening is then sealed against water, cold air and insects.
- The electrical workA dedicated circuit and an accessible disconnect near the outdoor unit.
- Tests and start-upLeak test, vacuum, then start-up and a check of heating and cooling.
- The walkthroughRemote, modes, filters: we show you the essentials before we leave.
What we check on a job like this one
Each number is a point we check on site. Switch between summer and winter to watch air and heat move.
In summer, the outdoor unit rejects the house's heat outside.
Generic illustration of this type of installation, not a survey of this job site. Tap a number.
Mounted level on a wall plate, high enough for the air to reach the whole room, with enough space around it to slide the filters out easily.
The refrigerant lines, the communication cable and the drain go through the wall in a single opening, sealed against water, cold air and insects.
Two insulated copper pipes connect the two units. Outside, a line cover can protect them from sun, knocks and weather.
A shut-off switch near the outdoor unit isolates it safely for service. It must stay accessible at all times.
The compressor and the fan. In heating mode it captures heat from the outdoor air, even in winter, and moves it inside.
On the ground or on the wall, it keeps the unit above accumulated snow. The unit stays clear and defrost water can drain away.
The fan needs to blow freely. Storage, a fence or a wall too close, and efficiency drops while noise goes up.
Is your home ready?
Check what applies at your place. A "no" is not a refusal: it is what we sort out during the estimate.
Good habits, once the unit is in place
Six simple habits that keep the unit going. Your list stays on this device.
What to do, season by season
Three habits per season for this unit. They take a few minutes and prevent many calls.
- Clean the indoor unit's filters.
- Clear leaves and debris left on the outdoor unit by winter.
- Test cooling before the first hot days.
- Clean the filters more often when the unit runs a lot.
- Keep plants away from the outdoor unit.
- Check that no water drips from the indoor unit.
- Rake the leaves around the outdoor unit.
- Test heating before the first cold days.
- Book periodic maintenance before winter.
- Keep snow away from the stand and the front of the unit.
- Let the unit defrost: it is normal.
- Never hit the ice on the fins; call us if the unit stays iced up.
The right pages, at the right time
Four statements: true or false?
It all comes down to details you have just seen.
1. In heating mode, the outdoor unit can produce water.
During defrost cycles. That water must drain away without forming ice.
2. You pick the capacity with a simple square-footage rule.
Windows, insulation, orientation and how the room is used all count. Capacity is chosen on site.
3. A multi-zone connects several indoor heads to a single condenser.
One head per room, all on the same condenser. Each room keeps its own temperature.
4. The disconnect can sit behind the patio furniture.
It must stay accessible: it is what shuts the unit off for service.
0 / 4 right answers
What people ask us about this kind of work
Does a wall-mounted heat pump heat in winter?
Wall-mounted or multi-zone: how do I choose?
Where does the outdoor unit go?
Are there grants?
Do I need a permit?
How cold can it heat?
How much can I save?
How is the LogisVert assistance calculated?
Is it noisy?
The outdoor unit is covered in ice: is that normal?
Does AirGreen hold the required licences?
Is the estimate free?
No question matches. Write to us: we answer.
More jobs to see, near you
By town, by equipment or by region: browse more than 4,700 published projects.
Each dot: a town where AirGreen has published projects. The glowing dot: this job.
An on-site estimate, the right capacity, the right equipment.
The on-site estimate is free and the quote follows within 24 hours.
Text and photo: a real AirGreen Climatisation & Chauffage job. The diagrams are generic illustrations of the type of installation, not a survey of this job site. Sources of the added figures: airgreen.ca product pages (NEEP / AHRI performance), Hydro-Québec (Heat pumps page, LogisVert, read on 13 October 2026), Régie de l’énergie (rate D as of 1 April 2026).