
Installation of a Zephyr wall-mounted heat pump in Plateau-Mont-Royal
Installation of a Zephyr wall-mounted heat pump in Plateau-Mont-Royal by AirGreen: short route, gravity drainage, clean finishes, and four-season comfort. Greater Montreal intervention.
Take a tour of the installation
Each number is a point we check on site. Switch between summer and winter to watch air and heat move.
In summer, the outdoor unit rejects the house's heat outside.
Generic illustration of this type of installation, not a survey of this job site. Tap a number.
Mounted level on a wall plate, high enough for the air to reach the whole room, with enough space around it to slide the filters out easily.
The refrigerant lines, the communication cable and the drain go through the wall in a single opening, sealed against water, cold air and insects.
Two insulated copper pipes connect the two units. Outside, a line cover can protect them from sun, knocks and weather.
A shut-off switch near the outdoor unit isolates it safely for service. It must stay accessible at all times.
The compressor and the fan. In heating mode it captures heat from the outdoor air, even in winter, and moves it inside.
On the ground or on the wall, it keeps the unit above accumulated snow. The unit stays clear and defrost water can drain away.
The fan needs to blow freely. Storage, a fence or a wall too close, and efficiency drops while noise goes up.
More comfort in a Montreal plex: careful installation, designed for both winter and summer
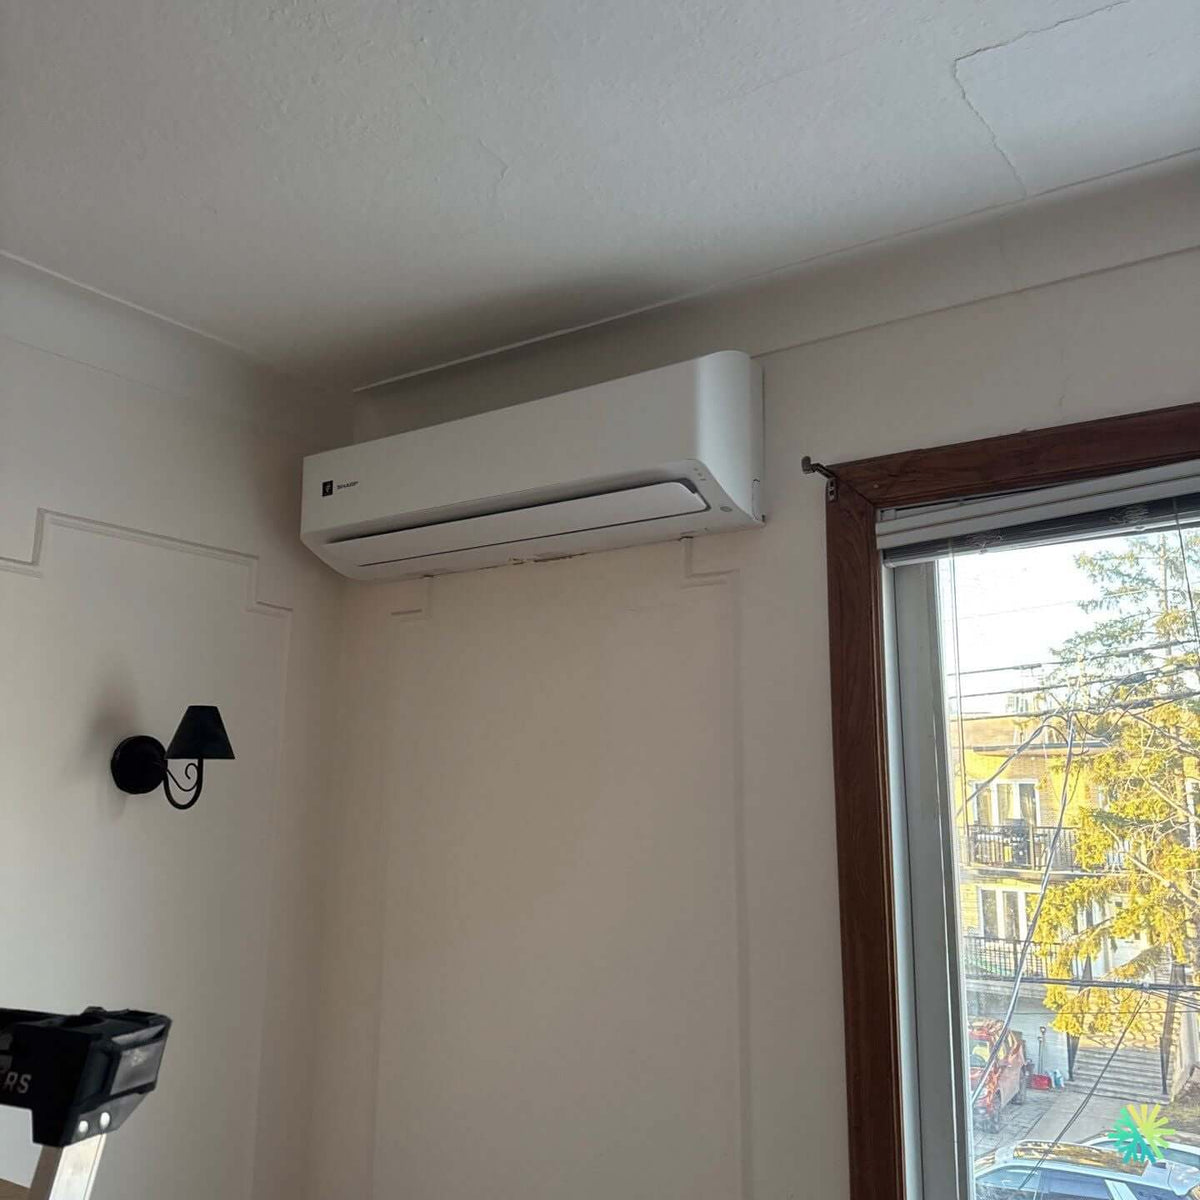
At AirGreen , we prioritize HVAC solutions tailored to Montreal's architecture. In this Plateau-Mont-Royal plex , our team installed a Zephyr wall-mounted heat pump to provide economical heating in the winter and stable air conditioning in the summer, without sacrificing aesthetics or usable space. The indoor unit is discreetly positioned high on a wall, near a window facing the street, to maximize air diffusion in the living room.
Why choose a Zephyr wall-mounted heat pump for urban housing?
The wall-mounted heat pump is essential in buildings with compartmentalized spaces, typical of the Plateau plexes, for several reasons:
-
High energy efficiency ( Energy Star eligible appliances), reducing electricity consumption compared to traditional convectors.
-
Cold weather performance , with reliable heating capacity down to -25°C , essential in Greater Montreal.
-
Quiet operation , welcome in rest rooms or teleworking areas.
-
Precise control (remote control, programming, eco modes) guaranteeing consistent comfort .
-
Eligibility for grant programs when combined with certified performance and compliant installation.
Thermal reading of the premises and sizing
We begin with a simplified load assessment : main room area, orientation, window quality, air infiltration, occupancy habits. In this plex, the main space is around 30–35 m² with generous windows. The chosen size is in the 9,000 to 12,000 BTU range to cover summer peaks while ensuring efficient supplemental heating in the off-season and winter, without the risk of short cycles.
Inner Head Implantation: Every Inch Counts
The interior wall has decorative moldings and a wall sconce on the left. We position the head a few centimeters from the ceiling , set back from the corner, in order to:
-
leave sufficient upper clearance for air suction;
-
avoid turbulence against the ceiling and the fall of cold air on the occupants;
-
free the field of curtains and the rod above the window;
-
maintain service access for filter maintenance.
The supply air flap is oriented toward the center of the room. In this configuration, the conditioned air naturally sweeps the living area and then returns through the sides of the unit, which evens out the temperature without drafts.
Refrigeration path and condensate management
The adjoining window allows for a short and clean route of the connections:
-
Drilling carried out according to the template, with a slight slope towards the outside.
-
Gravity drainage of condensates thanks to this slope (no pump required), limiting noise and maintenance.
-
Insulated refrigeration lines (high density insulating annealed copper), protected by discreet, light-colored external capping .
-
Communication and power cabling laid in the same technical path for a uniform finish.
In plexes, the route is generally towards the rear facade or the side yard , in order to respect the tranquility of the street and municipal regulations. We choose galvanized wall brackets or an anti-vibration slab depending on the available facade and accessibility for the service.
Acoustic and vibration considerations
The urban context requires special attention:
-
Calibrated silent blocks under the condenser reduce the transmission of vibrations to the masonry.
-
Minimal setback from neighboring windows prevents sound reverberation.
-
The surfacing and leveling of the supports are checked to eliminate any long-term hum.
The result: operation that is barely noticeable to the occupants and the immediate vicinity.
Key steps of installation (AirGreen methodology)
-
Protection and preparation : tarpaulins, protection of moldings and checking of the dedicated electrical circuit (circuit breaker, wire gauge).
-
Installation of the interior support : anchors adapted to the support (wood/masonry), laser control of alignments.
-
Drilling and crossing : sheath, controlled slope, foam/air barrier sealing for waterproofing.
-
Refrigeration connections : clean bending, brazed welding if necessary, tightening torque with a dynamometer.
-
Vacuuming : deep vacuum until stabilization, leak test, then opening of the refrigerant fluid .
-
Functional tests : pressures, intensity, blown/return temperatures, defrost control in heating mode.
-
Finishing touches : exterior capping , UV collars, clearances around the condenser, circuit labeling.
-
Customer delivery : demonstration of the remote control, usage advice and HVAC maintenance schedule.
All of these steps ensure the system's durability and compliance with manufacturer standards —an essential condition for warranties.
Expected performance and everyday comfort
In air conditioning, the room quickly reaches the set temperature with a controlled humidity level , a crucial point during the heavy periods of July. In heating, the heat pump takes over from autumn and works efficiently down to negative temperatures, which reduces the load on the baseboards and improves comfort when waking up.
In urban housing, these gains translate into:
-
Substantial energy savings compared to 100% resistive modes;
-
Thermal stability without overheating near windows;
-
Improved air quality thanks to built-in filtration and continuous circulation.
Recommended maintenance: simple and profitable
To maintain seasonal efficiency (SEER/HSPF), we recommend:
-
Clean the filters every 4 to 8 weeks depending on use and ambient dust;
-
Annual inspection (operating pressure, heat exchange, condensates);
-
Clear the condenser of any obstacles (snow, leaves), with a free clearance of 30–45 cm.
Regular maintenance extends compressor life and preserves warranty eligibility .
Grants and Regulatory Compliance
Energy Star wall-mounted heat pump units are eligible for financial assistance (provincial and municipal programs) when installed by a licensed contractor and meet cold climate performance criteria. We support our customers in:
-
verification of technical criteria (seasonal yields, nominal capacity);
-
retention of evidence (AHRI numbers, technical sheets, detailed invoice);
-
the assembly of the file until submission.
Special features of a construction site on the Plateau: what we anticipate
-
Access and logistics : narrow exterior stairs, sometimes narrow alleys, need for a parking slot for installing the condenser.
-
Masonry : old bricks, variable joints; we favor suitable mechanical anchors and, if necessary, a slab to avoid concentrated loads on fragile walls.
-
Neighborhood : coordinated schedules, clean routing of cables and lines to minimize visual impact .
Our experience in the dense neighborhoods of Montreal, Laval and Longueuil allows us to anticipate these constraints and deliver a clean and durable installation.
Tips for maximizing savings
-
Maintain a stable setpoint (e.g. 22–23°C in summer, 20–21°C in winter) rather than large variations.
-
Use the dehumidification mode on heavy days to increase the feeling of comfort at the same temperature.
-
Keep interior doors open when possible to promote air circulation.
-
In winter, clear the condenser area of blown snow and check the defrost water drainage.
What AirGreen delivers, beyond the device
We provide local expertise : understanding of old buildings, respecting finishes, comprehensive technical documentation, and after-sales service . Our team operates throughout Greater Montreal — Montreal, Laval, Longueuil, North Shore, and South Shore —with optimized installation times and fast service slots during peak seasons.
Project review
This Zephyr wall-mounted heat pump installation in a Plateau-Mont-Royal plex illustrates our approach: precise sizing, respectful integration of the interior architecture, short refrigeration path and gravity evacuation of condensates for simplified maintenance. The result is immediate comfort , lower operating costs and a sober aesthetic, perfectly aligned with the neighborhood life.
The big day, step by step
The main steps of this kind of job at AirGreen. Every house has its quirks: the estimate brings them out.
We look at the room, the outside wall, the line route and where the outdoor unit will go. That is where the capacity gets chosen.
Model, capacity and price, in writing. We also check whether the model qualifies for assistance programs.
Floors and furniture protected, wall plate position marked level, wall opening located.
A single opening, with the slope the drain needs to flow outside.
Set on a stand raised above the snow, with the clearances the manufacturer requires.
Connected, insulated and protected. The opening is then sealed against water, cold air and insects.
A dedicated circuit and an accessible disconnect near the outdoor unit.
Leak test, vacuum, then start-up and a check of heating and cooling.
Remote, modes, filters: we show you the essentials before we leave.
- The on-site estimateWe look at the room, the outside wall, the line route and where the outdoor unit will go. That is where the capacity gets chosen.
- The quoteModel, capacity and price, in writing. We also check whether the model qualifies for assistance programs.
- Getting readyFloors and furniture protected, wall plate position marked level, wall opening located.
- The wall openingA single opening, with the slope the drain needs to flow outside.
- The outdoor unitSet on a stand raised above the snow, with the clearances the manufacturer requires.
- Lines, cable and drainConnected, insulated and protected. The opening is then sealed against water, cold air and insects.
- The electrical workA dedicated circuit and an accessible disconnect near the outdoor unit.
- Tests and start-upLeak test, vacuum, then start-up and a check of heating and cooling.
- The walkthroughRemote, modes, filters: we show you the essentials before we leave.
What would it look like at your place?
Two quick checks with real numbers: what heat costs, and what your current heaters add up to in BTU/h.
Conversion: 1 W = 3.412 BTU/h. An indication, not a load calculation: baseboards and furnaces are often stronger than the real need, and they can stay as backup. AirGreen confirms the capacity on site.
Four mistakes we do not make
Flip each card to see what we do instead.
Your own project, step by step
What to do, season by season
Three habits per season for this unit. They take a few minutes and prevent many calls.
- Clean the indoor unit's filters.
- Clear leaves and debris left on the outdoor unit by winter.
- Test cooling before the first hot days.
- Clean the filters more often when the unit runs a lot.
- Keep plants away from the outdoor unit.
- Check that no water drips from the indoor unit.
- Rake the leaves around the outdoor unit.
- Test heating before the first cold days.
- Book periodic maintenance before winter.
- Keep snow away from the stand and the front of the unit.
- Let the unit defrost: it is normal.
- Never hit the ice on the fins; call us if the unit stays iced up.
Is your home ready?
Check what applies at your place. A "no" is not a refusal: it is what we sort out during the estimate.
Four statements: true or false?
It all comes down to details you have just seen.
1. In heating mode, the outdoor unit can produce water.
During defrost cycles. That water must drain away without forming ice.
2. You pick the capacity with a simple square-footage rule.
Windows, insulation, orientation and how the room is used all count. Capacity is chosen on site.
3. A multi-zone connects several indoor heads to a single condenser.
One head per room, all on the same condenser. Each room keeps its own temperature.
4. The disconnect can sit behind the patio furniture.
It must stay accessible: it is what shuts the unit off for service.
0 / 4 right answers
What people ask us about this kind of work
Does a wall-mounted heat pump heat in winter?
Wall-mounted or multi-zone: how do I choose?
Where does the outdoor unit go?
Are there grants?
Do I need a permit?
How cold can it heat?
How much can I save?
How is the LogisVert assistance calculated?
Is it noisy?
The outdoor unit is covered in ice: is that normal?
Does AirGreen hold the required licences?
Is the estimate free?
No question matches. Write to us: we answer.
More jobs to see, near you
By town, by equipment or by region: browse more than 4,700 published projects.
Each dot: a town where AirGreen has published projects. The glowing dot: this job.
Every house has its constraints. We see them before we install.
The on-site estimate is free and the quote follows within 24 hours.
Text and photo: a real AirGreen Climatisation & Chauffage job. The diagrams are generic illustrations of the type of installation, not a survey of this job site. Sources of the added figures: airgreen.ca product pages (NEEP / AHRI performance), Hydro-Québec (Heat pumps page, LogisVert, read on 13 October 2026), Régie de l’énergie (rate D as of 1 April 2026).