
Installation of a Gree Charmo 19 Wall-Mounted Heat Pump in Côte Saint-Luc
Discover how a Côte Saint-Luc family enhanced their home comfort with the Gree Charmo 19, blending technology with efficiency.
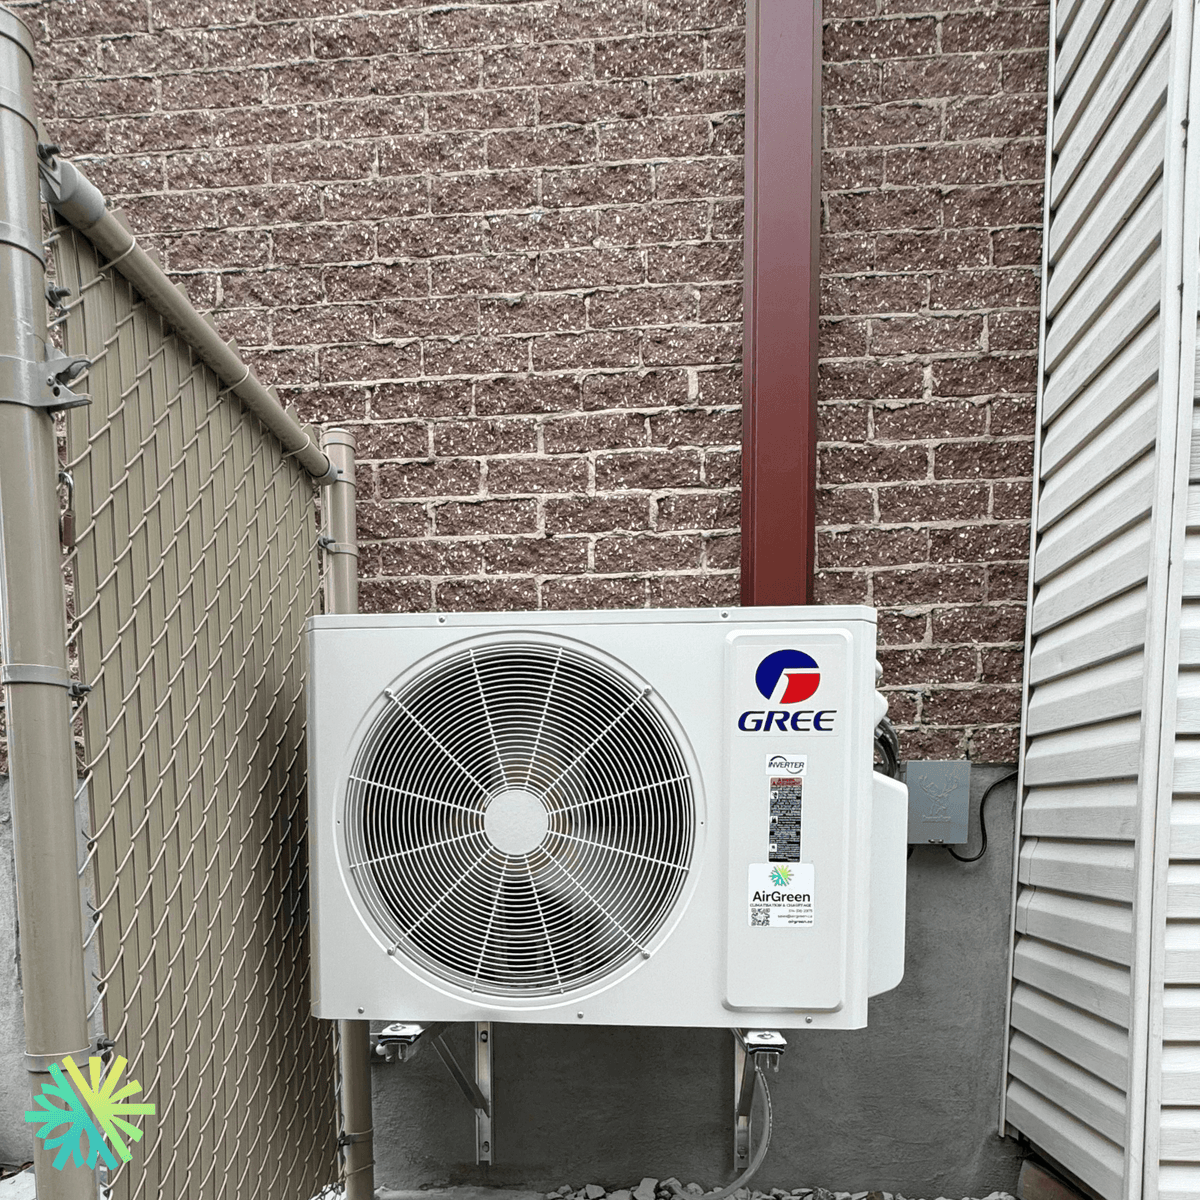
Take a tour of the installation
Each number is a point we check on site. Switch between summer and winter to watch air and heat move.
In summer, the outdoor unit rejects the house's heat outside.
Generic illustration of this type of installation, not a survey of this job site. Tap a number.
Mounted level on a wall plate, high enough for the air to reach the whole room, with enough space around it to slide the filters out easily.
The refrigerant lines, the communication cable and the drain go through the wall in a single opening, sealed against water, cold air and insects.
Two insulated copper pipes connect the two units. Outside, a line cover can protect them from sun, knocks and weather.
A shut-off switch near the outdoor unit isolates it safely for service. It must stay accessible at all times.
The compressor and the fan. In heating mode it captures heat from the outdoor air, even in winter, and moves it inside.
On the ground or on the wall, it keeps the unit above accumulated snow. The unit stays clear and defrost water can drain away.
The fan needs to blow freely. Storage, a fence or a wall too close, and efficiency drops while noise goes up.
A Step Towards Modern Comfort and Efficiency
In the charming neighborhood of Côte Saint-Luc, a family recently chose AirGreen to enhance their home's heating and cooling system with the installation of the Gree Charmo 19 wall-mounted heat pump. This project not only transformed their home comfort but also exemplified how technology and efficiency can harmoniously blend into everyday life.
The Charm of the Gree Charmo 19
The Gree Charmo 19 model is renowned for its superb functionality and smart technology. With a cooling capacity of 12,000 BTU and the ability to heat efficiently down to -25°C, it's perfectly equipped to handle the diverse Canadian climate. The system's notable features include:
- Interior Dimensions: 32.88 x 7.88 x 10.88 inches
- Exterior Dimensions: 28.81 x 13 x 21.88 inches
- Sound Pressure Level: 52 dB(A) exterior and 37/57 dB(A) interior
- Energy Efficiency: 17.5 SEER

Enhancing Home Efficiency
This installation was not just about upgrading a heating and cooling system; it was about improving energy efficiency and reducing environmental impact. The Gree Charmo 19 does not qualify for the Energy Star®, but it does receive a provincial grant of $340, making it an attractive choice for homeowners looking to optimize their energy use and costs.
Smart Technology Integration
One of the standout features of the Gree Charmo 19 is its WiFi capability, allowing homeowners to control their climate settings from anywhere using devices like Google Home or Amazon Alexa. This modern convenience is a significant draw for tech-savvy customers looking to streamline their home automation systems.
Installation by AirGreen: Precision and Professionalism
AirGreen's team, known for their meticulous attention to detail, handled the installation with precision. The necessary piping (1/4 - 3/8) and 220V voltage requirement were expertly installed, ensuring optimal performance and efficiency. The R-410A gas used is known for its environmental friendliness, aligning with the homeowner's values of sustainability.
Warranty and Customer Assurance
The Gree Charmo 19 comes with a robust 12-year warranty on compressor and parts, and an extended 10-year warranty that covers compressor, parts, and labor. This comprehensive coverage offers peace of mind to homeowners, knowing their investment is protected.
The AirGreen Difference
Choosing AirGreen means more than just getting a new heat pump; it's about experiencing an upgrade in service and support. Our team provides:
- Professionalism: Our technicians are highly trained and stay updated with the latest HVAC technologies and installation techniques.
- Reliability: We ensure ongoing support and maintenance, helping to extend the life of the installation.
- Proximity: With locations across Montreal, Laval, Longueuil, and both the North and South Shores, we're always ready to respond to our customers' needs promptly.
A Testimonial to Efficiency and Modern Living
The homeowners of this Côte Saint-Luc residence have expressed immense satisfaction with their new Gree Charmo 19, noting significant improvements in both comfort and utility costs. This installation not only reflects AirGreen's commitment to quality but also showcases the potential for modern technology to enhance residential living spaces efficiently and sustainably.
The big day, step by step
The main steps of this kind of job at AirGreen. Every house has its quirks: the estimate brings them out.
We look at the room, the outside wall, the line route and where the outdoor unit will go. That is where the capacity gets chosen.
Model, capacity and price, in writing. We also check whether the model qualifies for assistance programs.
Floors and furniture protected, wall plate position marked level, wall opening located.
A single opening, with the slope the drain needs to flow outside.
Set on a stand raised above the snow, with the clearances the manufacturer requires.
Connected, insulated and protected. The opening is then sealed against water, cold air and insects.
A dedicated circuit and an accessible disconnect near the outdoor unit.
Leak test, vacuum, then start-up and a check of heating and cooling.
Remote, modes, filters: we show you the essentials before we leave.
- The on-site estimateWe look at the room, the outside wall, the line route and where the outdoor unit will go. That is where the capacity gets chosen.
- The quoteModel, capacity and price, in writing. We also check whether the model qualifies for assistance programs.
- Getting readyFloors and furniture protected, wall plate position marked level, wall opening located.
- The wall openingA single opening, with the slope the drain needs to flow outside.
- The outdoor unitSet on a stand raised above the snow, with the clearances the manufacturer requires.
- Lines, cable and drainConnected, insulated and protected. The opening is then sealed against water, cold air and insects.
- The electrical workA dedicated circuit and an accessible disconnect near the outdoor unit.
- Tests and start-upLeak test, vacuum, then start-up and a check of heating and cooling.
- The walkthroughRemote, modes, filters: we show you the essentials before we leave.
What would it look like at your place?
Two quick checks with real numbers: what heat costs, and what your current heaters add up to in BTU/h.
Conversion: 1 W = 3.412 BTU/h. An indication, not a load calculation: baseboards and furnaces are often stronger than the real need, and they can stay as backup. AirGreen confirms the capacity on site.
Four mistakes we do not make
Flip each card to see what we do instead.
Your own project, step by step
What to do, season by season
Three habits per season for this unit. They take a few minutes and prevent many calls.
- Clean the indoor unit's filters.
- Clear leaves and debris left on the outdoor unit by winter.
- Test cooling before the first hot days.
- Clean the filters more often when the unit runs a lot.
- Keep plants away from the outdoor unit.
- Check that no water drips from the indoor unit.
- Rake the leaves around the outdoor unit.
- Test heating before the first cold days.
- Book periodic maintenance before winter.
- Keep snow away from the stand and the front of the unit.
- Let the unit defrost: it is normal.
- Never hit the ice on the fins; call us if the unit stays iced up.
Is your home ready?
Check what applies at your place. A "no" is not a refusal: it is what we sort out during the estimate.
Four statements: true or false?
It all comes down to details you have just seen.
1. In heating mode, the outdoor unit can produce water.
During defrost cycles. That water must drain away without forming ice.
2. You pick the capacity with a simple square-footage rule.
Windows, insulation, orientation and how the room is used all count. Capacity is chosen on site.
3. A multi-zone connects several indoor heads to a single condenser.
One head per room, all on the same condenser. Each room keeps its own temperature.
4. The disconnect can sit behind the patio furniture.
It must stay accessible: it is what shuts the unit off for service.
0 / 4 right answers
What people ask us about this kind of work
Does a wall-mounted heat pump heat in winter?
Wall-mounted or multi-zone: how do I choose?
Where does the outdoor unit go?
Are there grants?
Do I need a permit?
How cold can it heat?
How much can I save?
How is the LogisVert assistance calculated?
Is it noisy?
The outdoor unit is covered in ice: is that normal?
Does AirGreen hold the required licences?
Is the estimate free?
No question matches. Write to us: we answer.
More jobs to see, near you
By town, by equipment or by region: browse more than 4,700 published projects.
Each dot: a town where AirGreen has published projects. The glowing dot: this job.
Every house has its constraints. We see them before we install.
The on-site estimate is free and the quote follows within 24 hours.
Text and photo: a real AirGreen Climatisation & Chauffage job. The diagrams are generic illustrations of the type of installation, not a survey of this job site. Sources of the added figures: airgreen.ca product pages (NEEP / AHRI performance), Hydro-Québec (Heat pumps page, LogisVert, read on 13 October 2026), Régie de l’énergie (rate D as of 1 April 2026).
2 comments
Bonjour Diane,
Merci beaucoup pour votre question !
Oui, nous installons toujours des amortisseurs anti-vibrations (« pads anti-vibration ») sur toutes nos installations — que l’unité soit posée sur un rack mural ou sur un support au sol. Ces amortisseurs sont placés sous chaque point d’appui de l’unité extérieure afin de réduire au maximum la transmission des vibrations dans la structure.
Cela dit, il est important de préciser que les pads réduisent considérablement les vibrations, mais ne les éliminent jamais complètement — ce n’est pas de la magie ! Selon le modèle et la puissance de la thermopompe, certaines installations sont plus silencieuses au sol que sur un mur, surtout lorsqu’on veut éviter toute résonance vers les étages supérieurs.
Pour une unité de 12 000 BTU, c’est très rarement un problème sur un mur de brique. Mais pour des modèles 18 000 BTU et plus, et pour certaines marques plus puissantes, nous recommandons généralement une installation sur un rack au sol, beaucoup plus stable et silencieuse pour la maison.
Notre équipe évalue toujours la meilleure option lors de la visite afin d’assurer un résultat optimal et sans nuisance.
N’hésitez pas si vous avez d’autres questions — il nous fera plaisir de vous aider !
L’équipe AirGreen
Les amortisseurs anti vibrations sont ils prévus lors de cette installation sur 1 mur de brique; et à quels endroits.
Peut on éviter les vibrations qui se répercuter aux étages supérieurs ?Merci de votre diligence