
Installation of a Sharp Eco Series Inverter wall-mounted heat pump in Chomedey (Laval)
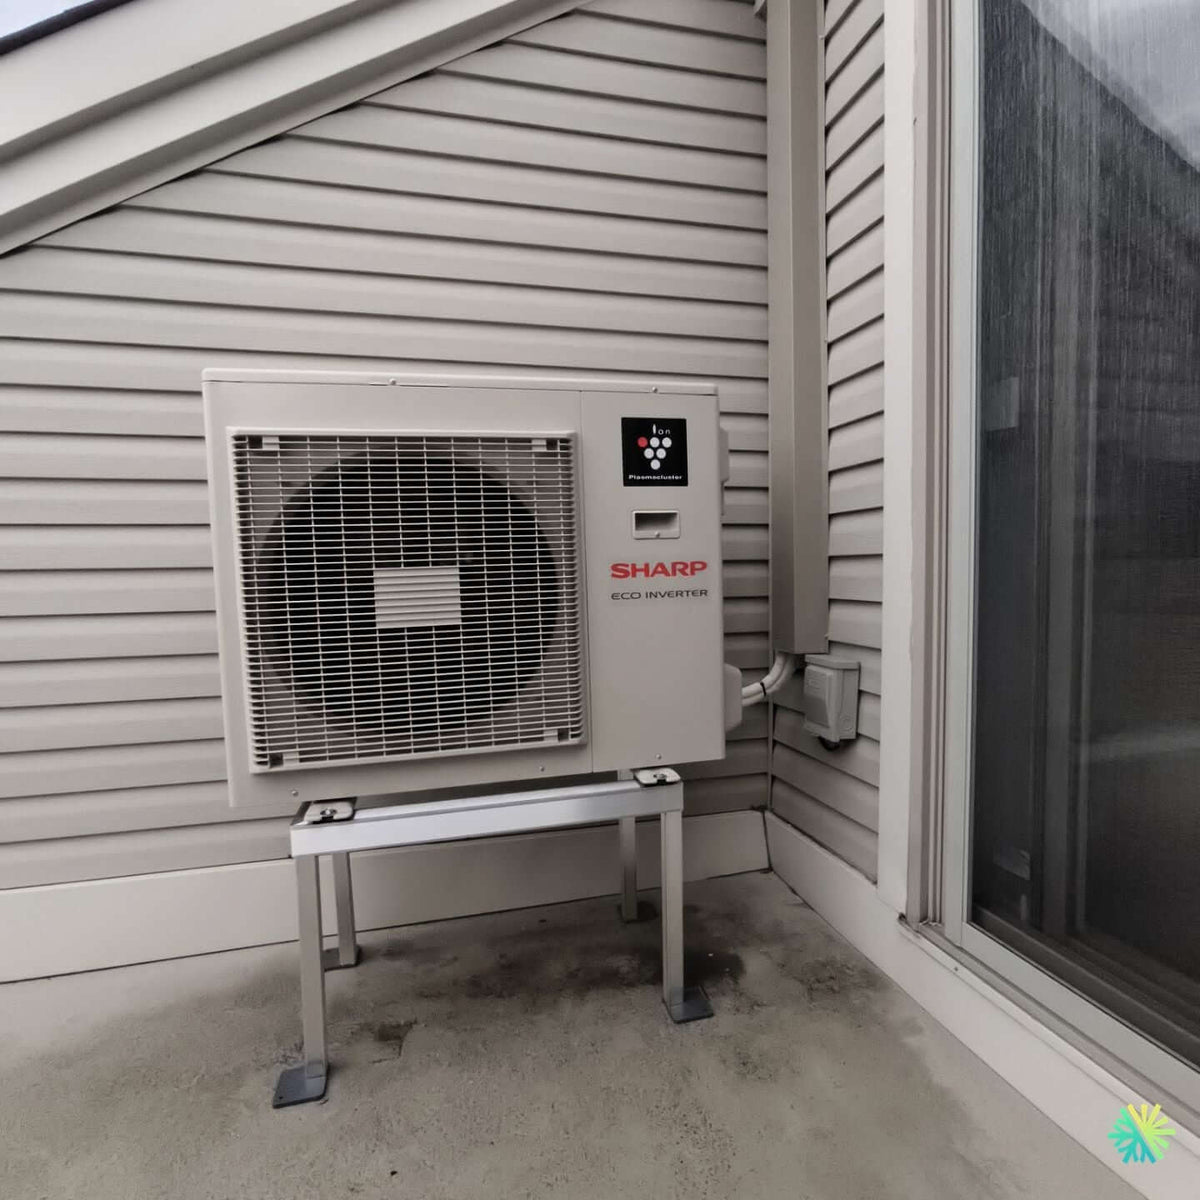
In Chomedey (Laval), AirGreen is installing a Sharp Eco Inverter wall-mounted heat pump on a raised support with careful capping and an external disconnect. Comfort, silence, and performance for condos in Greater Montreal.
Take a tour of the installation
Each number is a point we check on site. Switch between summer and winter to watch air and heat move.
In summer, the outdoor unit rejects the house's heat outside.
Generic illustration of this type of installation, not a survey of this job site. Tap a number.
Mounted level on a wall plate, high enough for the air to reach the whole room, with enough space around it to slide the filters out easily.
The refrigerant lines, the communication cable and the drain go through the wall in a single opening, sealed against water, cold air and insects.
Two insulated copper pipes connect the two units. Outside, a line cover can protect them from sun, knocks and weather.
A shut-off switch near the outdoor unit isolates it safely for service. It must stay accessible at all times.
The compressor and the fan. In heating mode it captures heat from the outdoor air, even in winter, and moves it inside.
On the ground or on the wall, it keeps the unit above accumulated snow. The unit stays clear and defrost water can drain away.
The fan needs to blow freely. Storage, a fence or a wall too close, and efficiency drops while noise goes up.
A clean, quiet HVAC system designed for North Shore winters
At AirGreen , we favor wall-mounted heat pump installations that combine measurable performance, a durable finish, and easy access for maintenance. In Chomedey (Laval) , we recently installed a Sharp Eco Inverter series for a condo with a terrace. The goal: to provide stable heating in the mid-season and regular cooling in the summer, while controlling operating costs and noise levels on the terrace.
Project context and site constraints
The condenser sits on a concrete deck lined with vinyl siding. The client's priorities were clear: maintain traffic flow to the patio door, limit vibration transmission, protect the equipment from water and snow accumulation, and maintain a discreet aesthetic visible from the interior.
To meet these requirements, we have:
-
Positioned the Sharp Eco Inverter outdoor unit on a raised aluminum stand with anti-vibration pads—a choice that raises the equipment by approximately 30-40 cm to prevent slush and freezing, and improves clearance for air exhaust.
-
Used a taupe-colored vertical capping to guide the refrigerant connections and the communication cable, integrated into the facing for a clean finish.
-
Installed a waterproof external disconnect switch (service box) to secure future interventions.
-
Optimized the piping route by favoring a short, straight rise: less pressure loss, better aesthetics, simplified maintenance.
Why the Sharp Eco Inverter series for this condo in Laval
Sharp's Eco Inverter series is distinguished by:
-
Inverter technology capable of adapting the compressor frequency to maintain the temperature smoothly.
-
Quiet operation that respects the peace and quiet of the condominiums.
-
Reliable electronics and integrated protections (intelligent defrosting, automatic restart after power cut).
-
Compatibility with good HVAC installation practices in cold climates when the layout, air clearance and drainage are well thought out.
Based on typical unit sizes in Chomedey, this configuration targets a sizing between 9,000 and 12,000 BTU/h for the main head. We always validate the thermal load room by room (orientation, fenestration, airtightness, occupancy rate) before recommending the final tonnage.
Key steps of installation
1) Study and identification
We confirm the required clearances, the structure behind the siding, the condensate drain, the location of the dedicated circuit breaker , and the distance to the indoor header. The chosen route reduces line length and limits bends, which improves seasonal efficiency.
2) Support, anchors and vibration decoupling
The raised frame is secured with mechanical anchors adapted to the concrete of the terrace. Anti-vibration pads isolate the unit to limit structural transmission within the condominium. This detail often makes the difference during defrosting periods.
3) Drilling and connections
We perform a careful drilling with vapor barrier and grommet. The refrigeration copper pipes are flared, insulated with closed-cell foam and protected in the capping . UV tape protects the exposed joints. The communication cable is pulled in the same path.
4) Power supply and circuit breaker
The 240V power supply is brought from the electrical panel to the outdoor disconnect box. Connections are tightened to the prescribed torque. We label the circuit at the panel for traceability and compliance.
5) Drainage of condensates
On the interior side, we plan a gravity drain where the configuration allows; otherwise, a silent condensate pump with a check valve and safety tray. Here, the gravity slope towards the exterior has been validated, eliminating a maintenance point.
6) Vacuum drawing, charging and testing
A high vacuum (≤ 300 microns) is applied to remove moisture and residual air. We check for leaks, open service valves, check for superheat/subcooling, and perform a run-in in both cooling and heating modes. The supply and return temperatures are recorded in our commissioning sheet.
Results obtained
-
Uniform comfort in the living area and the adjoining bedroom, without the feeling of drafts.
-
Outside noise is controlled thanks to the rigid support and pads. Conversation on the terrace remains natural.
-
Simplified maintenance : compliant rear and side clearance, easy access to the front for cleaning the coil.
-
Clean aesthetics : aligned capping, stainless steel screws, straight and discreet routing.
AirGreen Technical Tips for a Sustainable Installation
-
Clearances : prevent air recycling (short-circuiting) and avoid recesses that trap frost in winter.
-
Raising : Raising the condenser limits corrosion and promotes flow during defrost cycles.
-
Condensate management : a constant slope and an anti-siphon vent prevent backflow.
-
Electricity : use a dedicated line with a circuit breaker rating and conductor gauge that match the rating plate.
-
Finish : use a stable UV capping and a clean seal at the piercing to prevent infiltration and thermal bridges.
Recommended maintenance
To maintain performance:
-
Clean the inner head filters every 4 to 8 weeks during periods of heavy use.
-
Gently rinse the outdoor exchanger in spring and fall (at low pressure).
-
Clear the area around the condenser (leaves, snow) by at least 60 cm.
-
Schedule an annual HVAC maintenance with AirGreen: electrical check, probes, fans, pressures, temperatures, tightenings, update of parameters if required.
These actions extend the lifespan and preserve the seasonal efficiencies (SEER/HSPF) which justify the investment.
Grants and financial benefits
Depending on the chosen configuration and validated performance, the wall-mounted heat pump may be eligible for grant programs in Quebec . Our team supports our customers in:
-
Check eligibility related to heating performance in cold weather.
-
Prepare technical documents (AHRI number, detailed invoices, installation photos).
-
Supervise the submission and monitoring of requests.
We operate throughout Greater Montreal : Montreal , Laval , Longueuil , North Shore and South Shore .
What more we bring to Chomedey
-
A careful reading of the site and lifestyle habits before sizing.
-
Clear timelines : technical visit, installation, commissioning, transmission of documents.
-
Parts/compressor warranties according to the Sharp range and labor covered by AirGreen.
-
Accessible after-sales service : maintenance, priority troubleshooting in cold weather, usage advice (temperature settings, Auto/Dry/Heat modes, programming).
Common mistakes… that we avoid
-
Condenser too low : snow accumulation, increased noise during defrosting, accelerated corrosion.
-
Multiple elbows and excessive lengths : loss of capacity and compressor wear.
-
Drain without slope : odors, overflows and untimely stoppages.
-
Lack of external disconnection : future interventions more risky and non-compliant.
-
Poor clearance in front of the patio door : inconvenience during use and recirculation of hot air in heating mode.
Our installation in Chomedey addresses each of these points: raised support , short path , protected capping , disconnection within reach and clear circulation towards the patio door.
What if your accommodation is different?
Whether you are in a condo in the center of Laval , a triplex in Montreal , a single-family home in Longueuil , or a row house on the North Shore / South Shore , we adapt:
-
the size of the inner head (9k, 12k, 15k, etc.),
-
the type of support (wall brackets, slab on pads, roof frame),
-
condensate management (gravity vs pump),
-
winter protection (deflectors, snow guards where appropriate),
-
the finish (matching capping, cornices, discreet passages).
Our promise: a careful HVAC installation , optimized installation time and a clean result that stands up to Montreal winters.
Are you considering a Sharp wall-mounted heat pump or unsure between several ranges? We evaluate your home, provide a precise estimate for the project and plan a seamless installation, throughout Montreal, Laval, Longueuil, the North Shore and the South Shore .
The big day, step by step
The main steps of this kind of job at AirGreen. Every house has its quirks: the estimate brings them out.
We look at the room, the outside wall, the line route and where the outdoor unit will go. That is where the capacity gets chosen.
Model, capacity and price, in writing. We also check whether the model qualifies for assistance programs.
Floors and furniture protected, wall plate position marked level, wall opening located.
A single opening, with the slope the drain needs to flow outside.
Set on a stand raised above the snow, with the clearances the manufacturer requires.
Connected, insulated and protected. The opening is then sealed against water, cold air and insects.
A dedicated circuit and an accessible disconnect near the outdoor unit.
Leak test, vacuum, then start-up and a check of heating and cooling.
Remote, modes, filters: we show you the essentials before we leave.
- The on-site estimateWe look at the room, the outside wall, the line route and where the outdoor unit will go. That is where the capacity gets chosen.
- The quoteModel, capacity and price, in writing. We also check whether the model qualifies for assistance programs.
- Getting readyFloors and furniture protected, wall plate position marked level, wall opening located.
- The wall openingA single opening, with the slope the drain needs to flow outside.
- The outdoor unitSet on a stand raised above the snow, with the clearances the manufacturer requires.
- Lines, cable and drainConnected, insulated and protected. The opening is then sealed against water, cold air and insects.
- The electrical workA dedicated circuit and an accessible disconnect near the outdoor unit.
- Tests and start-upLeak test, vacuum, then start-up and a check of heating and cooling.
- The walkthroughRemote, modes, filters: we show you the essentials before we leave.
What would it look like at your place?
Two quick checks with real numbers: what heat costs, and what your current heaters add up to in BTU/h.
Conversion: 1 W = 3.412 BTU/h. An indication, not a load calculation: baseboards and furnaces are often stronger than the real need, and they can stay as backup. AirGreen confirms the capacity on site.
Four mistakes we do not make
Flip each card to see what we do instead.
Your own project, step by step
What to do, season by season
Three habits per season for this unit. They take a few minutes and prevent many calls.
- Clean the indoor unit's filters.
- Clear leaves and debris left on the outdoor unit by winter.
- Test cooling before the first hot days.
- Clean the filters more often when the unit runs a lot.
- Keep plants away from the outdoor unit.
- Check that no water drips from the indoor unit.
- Rake the leaves around the outdoor unit.
- Test heating before the first cold days.
- Book periodic maintenance before winter.
- Keep snow away from the stand and the front of the unit.
- Let the unit defrost: it is normal.
- Never hit the ice on the fins; call us if the unit stays iced up.
Is your home ready?
Check what applies at your place. A "no" is not a refusal: it is what we sort out during the estimate.
Four statements: true or false?
It all comes down to details you have just seen.
1. In heating mode, the outdoor unit can produce water.
During defrost cycles. That water must drain away without forming ice.
2. You pick the capacity with a simple square-footage rule.
Windows, insulation, orientation and how the room is used all count. Capacity is chosen on site.
3. A multi-zone connects several indoor heads to a single condenser.
One head per room, all on the same condenser. Each room keeps its own temperature.
4. The disconnect can sit behind the patio furniture.
It must stay accessible: it is what shuts the unit off for service.
0 / 4 right answers
What people ask us about this kind of work
Does a wall-mounted heat pump heat in winter?
Wall-mounted or multi-zone: how do I choose?
Where does the outdoor unit go?
Are there grants?
Do I need a permit?
How cold can it heat?
How much can I save?
How is the LogisVert assistance calculated?
Is it noisy?
The outdoor unit is covered in ice: is that normal?
Does AirGreen hold the required licences?
Is the estimate free?
No question matches. Write to us: we answer.
More jobs to see, near you
By town, by equipment or by region: browse more than 4,700 published projects.
Each dot: a town where AirGreen has published projects. The glowing dot: this job.
Every house has its constraints. We see them before we install.
The on-site estimate is free and the quote follows within 24 hours.
Text and photo: a real AirGreen Climatisation & Chauffage job. The diagrams are generic illustrations of the type of installation, not a survey of this job site. Sources of the added figures: airgreen.ca product pages (NEEP / AHRI performance), Hydro-Québec (Heat pumps page, LogisVert, read on 13 October 2026), Régie de l’énergie (rate D as of 1 April 2026).