
Installation of a Sharp — Wall-mounted heat pump (outdoor unit on flat roof) in Plateau-Mont-Royal
Flat roof installation in Plateau-Mont-Royal: Sharp wall-mounted heat pump , raised support without drilling the membrane, careful HVAC installation , gravity drain and silence. AirGreen — Greater Montreal (Montreal, Laval, Longueuil, North Shore, South Shore), HVAC maintenance included.
Take a tour of the installation
Each number is a point we check on site. Switch between summer and winter to watch air and heat move.
In summer, the outdoor unit rejects the house's heat outside.
Generic illustration of this type of installation, not a survey of this job site. Tap a number.
Mounted level on a wall plate, high enough for the air to reach the whole room, with enough space around it to slide the filters out easily.
The refrigerant lines, the communication cable and the drain go through the wall in a single opening, sealed against water, cold air and insects.
Two insulated copper pipes connect the two units. Outside, a line cover can protect them from sun, knocks and weather.
A shut-off switch near the outdoor unit isolates it safely for service. It must stay accessible at all times.
The compressor and the fan. In heating mode it captures heat from the outdoor air, even in winter, and moves it inside.
On the ground or on the wall, it keeps the unit above accumulated snow. The unit stays clear and defrost water can drain away.
The fan needs to blow freely. Storage, a fence or a wall too close, and efficiency drops while noise goes up.
Installation on a flat roof with joist support and membrane protection: winter reliability and silence in an urban environment
Building context and objectives
At AirGreen , we were commissioned to work on a brick plex in Plateau-Mont-Royal . The client wanted to benefit from efficient supplemental heating in the spring/fall and efficient air conditioning in the summer, while freeing up the already cramped backyard . The solution chosen: a Sharp wall-mounted heat pump (new generation Inverter , modern refrigerant) with a condenser installed on the flat roof . This strategy offers low noise levels on the ground, improved security and preserved aesthetics on the alley side.
Why install on a flat roof?
-
Urban acoustics : Moving the condenser away from windows and relaxation areas reduces the levels perceived by occupants and neighbors.
-
Maintenance : direct access via hatch/ladder; clearances maintained all around for airflow and service operations.
-
Snow and ice : raising the device to prevent accumulation during defrosting ; water flows naturally over the membrane towards the drains.
-
Aesthetics and regulations : the equipment remains invisible from the street; the installation respects the heritage spirit of the brick facades of the Plateau.
Technical choice: Sharp, Inverter and seasonal efficiency
The selected Sharp heat pump belongs to the R-32/eco-Inverter wall-mounted range, recognized for:
-
fine compressor modulation that maintains comfort without overheating or overcooling;
-
higher seasonal efficiency than a wall-mounted air conditioner alone thanks to efficient heating down to low temperatures;
-
increased reliability in defrost mode, useful on roofs exposed to wind;
-
easy HVAC maintenance (washable filters, access to components through facades and robust covers).
Rooftop installation: AirGreen method
-
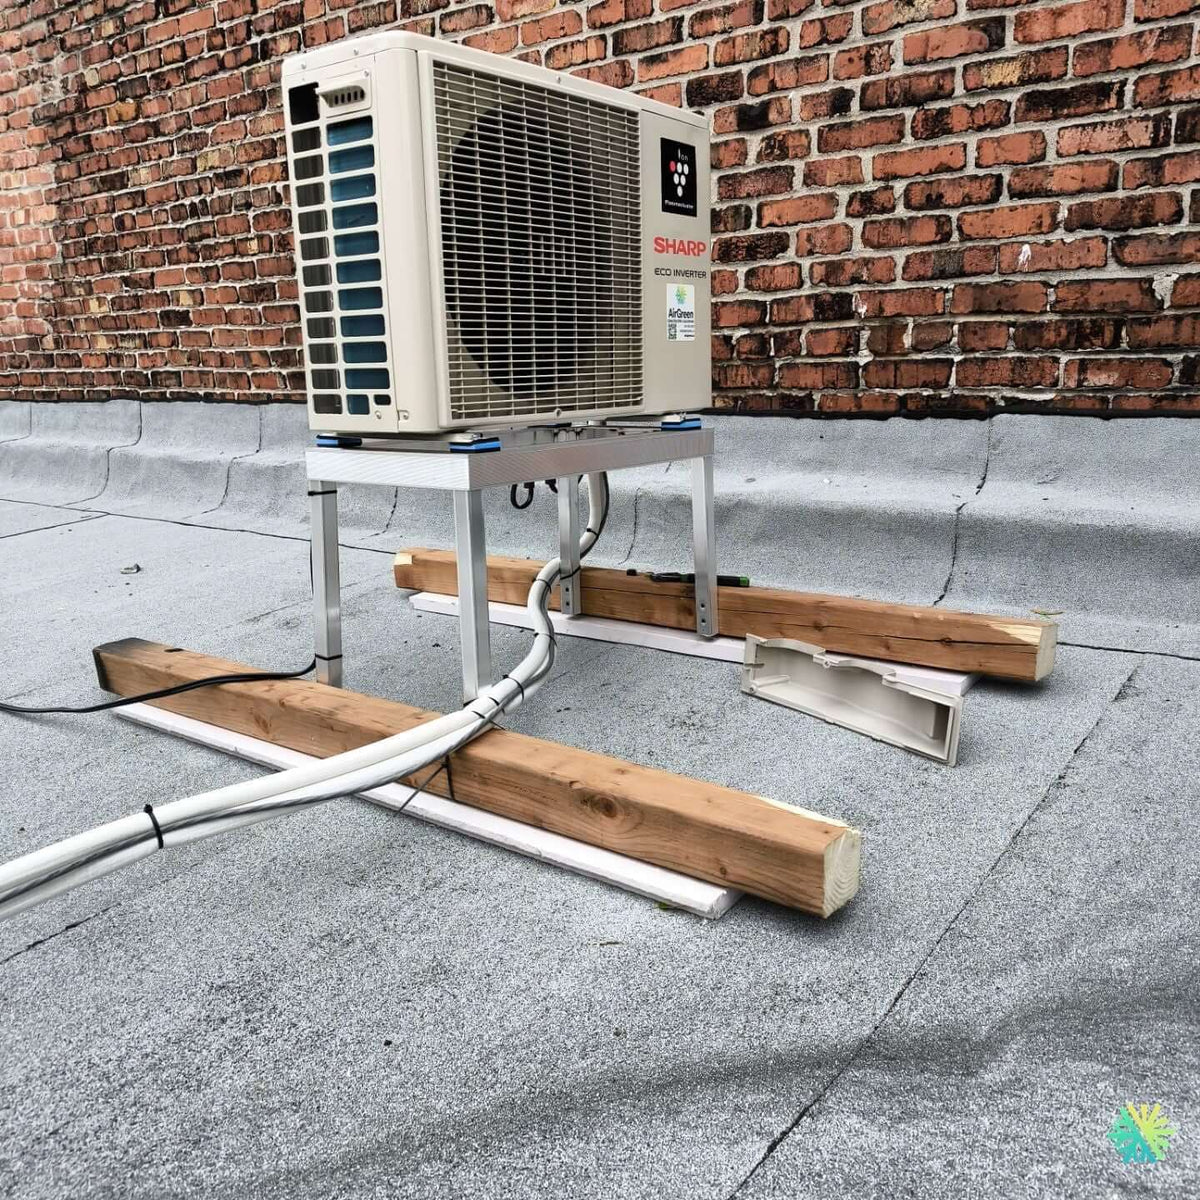
Support : raised aluminum frame mounted on anti-vibration pads (blue), itself placed on treated wooden joists . The joists distribute the loads and prevent any perforation of the membrane.
-
Membrane protection : polymer distribution flanges under each joist to preserve the aggregate and prevent punching.
-
Orientation : Condenser oriented to discharge air to the most open area, away from brick parapets, to avoid recirculation.
-
Clearances : 300–600 mm on the sides and 1500 mm at the front according to the manufacturer's standard; the riser ensures sufficient freeboarding during snow episodes.
-
Leveling : level check (visible on the site photo) to ensure correct evacuation of defrost water and compressor stability.
Refrigeration, electrical and condensate path
-
Layout : The refrigeration connections (gas/liquid) and the communication cable run up the rear wall to the roof, then through a white UV-resistant capping to the chassis. The open section of the visible capping corresponds to the testing phase before closure.
-
Estimated total length : 8 to 12 m (elevation + horizontal travel), perfectly within the range that allows the nominal capacity to be maintained; additional load calculation checked during commissioning.
-
Internal condensate : gravity drainage from the wall head to the exterior (slope > 2%), which eliminates the lifting pump and therefore the associated noise/maintenance.
-
Power supply : dedicated 240 V circuit from the panel, calibrated circuit breaker ; certified outdoor cable section, circuit breaker installed on the roof within easy reach for maintenance.
Finishing details that make the difference
-
Collars and bridges spaced regularly to prevent lines from fluttering in the wind.
-
Vapor barrier sleeve and neutral silicone at the crossings to preserve the sealing and performance of the envelope.
-
Bending radius respected on copper tubes to reduce pressure losses and avoid weakening points.
-
Anti-vibration : elastomer interfaces between the frame and the machine + under the legs of the device; result = low transmission to the building.
-
Expansion management : slight play left in the capping near the radii of curvature to absorb thermal expansion in summer.
Progress of the work (1 typical day)
-
Protection of the membrane and access points; weather check (no precipitation).
-
Tracing the route of the connections and positioning of the chassis.
-
Assembly of the support, leveling and installation of the soles.
-
Drilling holes in the wall (from the inside) with outgoing slope; installation of the sleeve .
-
Bending/brazing of tubes under nitrogen ; high density continuous insulation.
-
Vacuum draw < 500 microns, nitrogen leak test , valve opening, load adjustment if required.
-
Operating tests (heating/cooling), checking intensity/pressure/temperatures .
-
Final closure of the capping, tightening of the connections to the correct torque, provision of operating instructions.
Results obtained
-
Four-season comfort from the first week: rapid heating increase in mid-season, even cooling in summer.
-
Silence : no resonance in the rooms; on the roof, the frame and the pads neutralize vibrations.
-
Aesthetics : Clear courtyard and walkways; no visible structures on the street side.
-
Membrane preservation : surface supports and soles guarantee soft and lasting contact.
HVAC Maintenance and Roofing Recommendations
-
Annual inspection : condenser battery wash, pressure check, defrost test, electrical tightening, condition of silent blocks and chassis.
-
Winter : keep a clear perimeter around the device (blown powder snow); avoid snow walls in front of the exchanger.
-
Spring : Check flow to drains; remove accumulated leaves/gravel; rinse base.
-
Safety : supervised roof access; external circuit breaker accessible before any intervention.
-
Indoor air quality : monthly cleaning of the wall head filters ; this is the key to stable performance and low noise.
Tips for owners of plexes/condos in the Plateau and similar neighborhoods
-
Flat roof = ally : if the courtyard is small or if the co-ownership limits the equipment on the ground, installation on the roof is ideal .
-
Minimum elevation 30–45 cm above the membrane to manage snow and defrost water.
-
Gravity drain first : more reliable and quieter than a pump.
-
Check the structure : our project managers confirm the load-bearing capacity and load distribution (frame + joists).
-
Coordination : plan the route of the connections (fall column, guardrail, parapet) for discreet and durable capping .
Grants and Eligibility
High-efficiency , cold-climate wall-mounted heat pumps are eligible for assistance programs in Quebec (depending on current criteria and certifications). We support our customers in:
-
validate the eligibility of the installed model;
-
compile the file (detailed invoice, photos, installation certificates);
-
submit on time to maximize financial assistance.
Why AirGreen for your HVAC installation in Montreal, Laval, Longueuil, North Shore and South Shore?
-
Roofing expertise : supports without membrane penetration, load management, anti-vibration, de-icing.
-
Rigorous procedures : brazing under nitrogen, deep vacuum , leak tests and recorded parameters.
-
Finishes : aligned cappings , clean radii of curvature, careful seals.
-
Complete service : advice, HVAC installation , HVAC maintenance , grant assistance — everything is taken care of by our teams.
Conclusion
This HVAC installation of a Sharp wall-mounted heat pump with condenser on a flat roof in Plateau-Mont-Royal illustrates our approach: perforation-free support engineering, optimized refrigeration path , gravity drain and durable finishes. The key: four-season comfort , silence, respect for the membrane and energy savings adapted to the realities of Montreal plexes.
The big day, step by step
The main steps of this kind of job at AirGreen. Every house has its quirks: the estimate brings them out.
We look at the room, the outside wall, the line route and where the outdoor unit will go. That is where the capacity gets chosen.
Model, capacity and price, in writing. We also check whether the model qualifies for assistance programs.
Floors and furniture protected, wall plate position marked level, wall opening located.
A single opening, with the slope the drain needs to flow outside.
Set on a stand raised above the snow, with the clearances the manufacturer requires.
Connected, insulated and protected. The opening is then sealed against water, cold air and insects.
A dedicated circuit and an accessible disconnect near the outdoor unit.
Leak test, vacuum, then start-up and a check of heating and cooling.
Remote, modes, filters: we show you the essentials before we leave.
- The on-site estimateWe look at the room, the outside wall, the line route and where the outdoor unit will go. That is where the capacity gets chosen.
- The quoteModel, capacity and price, in writing. We also check whether the model qualifies for assistance programs.
- Getting readyFloors and furniture protected, wall plate position marked level, wall opening located.
- The wall openingA single opening, with the slope the drain needs to flow outside.
- The outdoor unitSet on a stand raised above the snow, with the clearances the manufacturer requires.
- Lines, cable and drainConnected, insulated and protected. The opening is then sealed against water, cold air and insects.
- The electrical workA dedicated circuit and an accessible disconnect near the outdoor unit.
- Tests and start-upLeak test, vacuum, then start-up and a check of heating and cooling.
- The walkthroughRemote, modes, filters: we show you the essentials before we leave.
What would it look like at your place?
Two quick checks with real numbers: what heat costs, and what your current heaters add up to in BTU/h.
Conversion: 1 W = 3.412 BTU/h. An indication, not a load calculation: baseboards and furnaces are often stronger than the real need, and they can stay as backup. AirGreen confirms the capacity on site.
Four mistakes we do not make
Flip each card to see what we do instead.
Your own project, step by step
What to do, season by season
Three habits per season for this unit. They take a few minutes and prevent many calls.
- Clean the indoor unit's filters.
- Clear leaves and debris left on the outdoor unit by winter.
- Test cooling before the first hot days.
- Clean the filters more often when the unit runs a lot.
- Keep plants away from the outdoor unit.
- Check that no water drips from the indoor unit.
- Rake the leaves around the outdoor unit.
- Test heating before the first cold days.
- Book periodic maintenance before winter.
- Keep snow away from the stand and the front of the unit.
- Let the unit defrost: it is normal.
- Never hit the ice on the fins; call us if the unit stays iced up.
Is your home ready?
Check what applies at your place. A "no" is not a refusal: it is what we sort out during the estimate.
Four statements: true or false?
It all comes down to details you have just seen.
1. In heating mode, the outdoor unit can produce water.
During defrost cycles. That water must drain away without forming ice.
2. You pick the capacity with a simple square-footage rule.
Windows, insulation, orientation and how the room is used all count. Capacity is chosen on site.
3. A multi-zone connects several indoor heads to a single condenser.
One head per room, all on the same condenser. Each room keeps its own temperature.
4. The disconnect can sit behind the patio furniture.
It must stay accessible: it is what shuts the unit off for service.
0 / 4 right answers
What people ask us about this kind of work
Does a wall-mounted heat pump heat in winter?
Wall-mounted or multi-zone: how do I choose?
Where does the outdoor unit go?
Are there grants?
Do I need a permit?
How cold can it heat?
How much can I save?
How is the LogisVert assistance calculated?
Is it noisy?
The outdoor unit is covered in ice: is that normal?
Does AirGreen hold the required licences?
Is the estimate free?
No question matches. Write to us: we answer.
More jobs to see, near you
By town, by equipment or by region: browse more than 4,700 published projects.
Each dot: a town where AirGreen has published projects. The glowing dot: this job.
Every house has its constraints. We see them before we install.
The on-site estimate is free and the quote follows within 24 hours.
Text and photo: a real AirGreen Climatisation & Chauffage job. The diagrams are generic illustrations of the type of installation, not a survey of this job site. Sources of the added figures: airgreen.ca product pages (NEEP / AHRI performance), Hydro-Québec (Heat pumps page, LogisVert, read on 13 October 2026), Régie de l’énergie (rate D as of 1 April 2026).