
Installation of an ELIOS R454B central heat pump on a flat roof in Lacolle
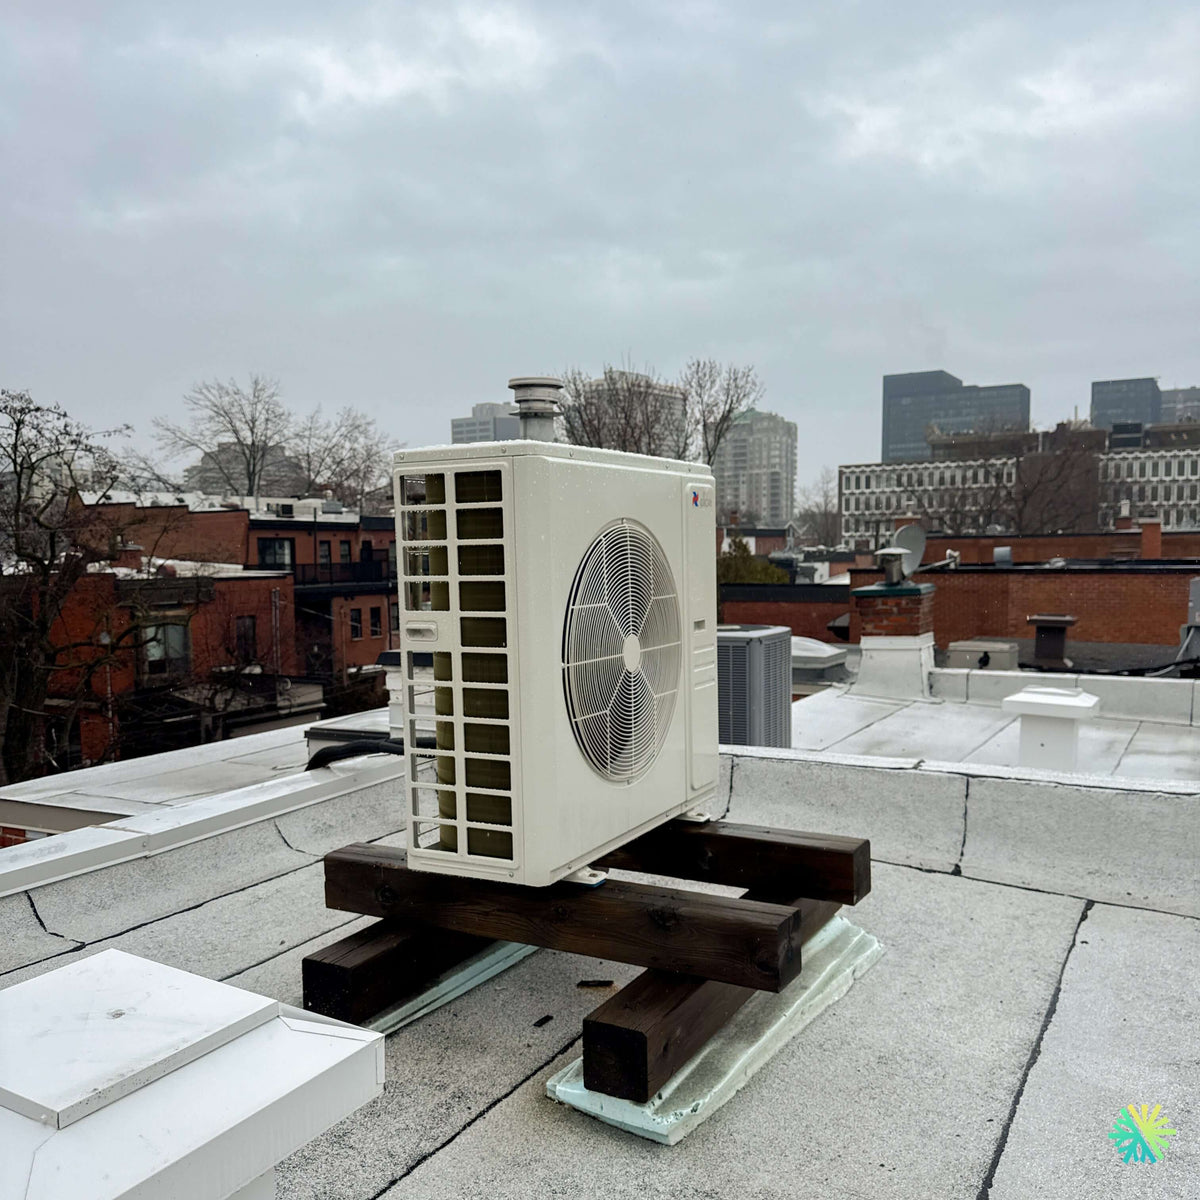
In Lacolle, AirGreen installs an ELIOS R454B central heat pump on a raised rooftop platform designed to protect the membrane, promote drainage, and maintain optimal airflow in winter.
Take a tour of the installation
Each number is a point we check on site. Switch between summer and winter to watch air and heat move.
In summer, the outdoor unit rejects the house's heat outside.
Generic illustration of this type of installation, not a survey of this job site. Tap a number.
It captures or rejects heat outside. It sits on a level base, above the snow, with free space all around.
The insulated refrigerant lines enter the house through a sealed opening and run to the indoor coil.
A shut-off switch near the outdoor unit isolates it safely for service.
Sitting on the indoor module, it moves heat between the house air and the refrigerant.
Electric furnace or air handler: its fan pushes air through the ducts. The electric backup takes over in extreme cold.
Supply ducts bring air to the rooms; returns bring it back to the unit. Their condition matters as much as the unit's.
It protects the coil and the fan. A dirty filter cuts airflow, so it gets checked regularly.
It runs the heat pump and the backup heat. It must be compatible with the installed system.
A rooftop HVAC installation designed to protect the building and ensure stable operation
Installing an ELIOS central heat pump using R454B refrigerant in Lacolle required a different approach from a conventional replacement at ground level. The outdoor unit had to be positioned on a flat roof, in an environment where every detail matters: weight distribution, clearance beneath the appliance, membrane protection, drainage of water and snow, and accessibility for future HVAC maintenance work.
In the photo of this installation, the outdoor unit is installed on a raised structure made of sturdy crossbeams. This configuration creates considerable open space beneath the heat pump while keeping the appliance away from the roof surface. A protective lower support also helps prevent the structure from resting directly on the membrane.
This approach is particularly important for a central heat pump installed on a flat roof in Quebec. In winter, snow, ice, and water from defrost cycles can quickly accumulate around a unit positioned too low. An inadequate installation can then restrict airflow, accelerate ice formation, or considerably complicate maintenance.
At AirGreen, we therefore never consider the support to be a simple accessory. It is an integral part of the performance and durability of the entire system.
Why install the outdoor unit on the roof?
In some buildings in Lacolle, as elsewhere in Montreal, Laval, Longueuil, the North Shore, and the South Shore, the roof is the most logical location for the outdoor unit of a central heat pump.
This solution can, among other things, help to:
- free up the space around the building;
- keep the equipment away from walkways, patios, and parking areas;
- reduce the risk of damage caused by vehicles or snow removal work;
- simplify connection to certain existing mechanical systems;
- preserve the appearance of the façades;
- maintain good airflow around the condenser.
However, a rooftop installation must never be improvised. The unit's weight, vibrations, wind, roof slope, the presence of drains, and the characteristics of the membrane must all be taken into consideration before determining the unit's final position.
A raised structure adapted to winter conditions
One of the most visible features of this ELIOS central heat pump installation is the height of the support. The unit rests on a platform that raises it well above the roof.
This elevation addresses several technical requirements.
Keep the air intake and outlet clear
A heat pump transfers heat through a substantial airflow passing through the outdoor heat exchanger. When snow accumulates against the coils or in front of the fan, the unit must work harder to achieve the same result.
Insufficient clearance can cause:
- reduced heating capacity;
- more frequent defrost cycles;
- increased electricity consumption;
- ice buildup;
- premature wear of certain components.
By elevating the unit, we reduce the risk of snow on the roof quickly reaching the ventilation openings.
Facilitate drainage during defrosting
In heating mode, a heat pump can accumulate frost on its outdoor heat exchanger. It periodically initiates a defrost cycle to melt this buildup. The resulting water must then be able to drain freely beneath the unit.
For a rooftop installation, this aspect must be planned from the design stage. If the unit's base is too close to the membrane, water can freeze beneath the condenser and gradually form a block of ice. This can obstruct drainage openings or reach the lower part of the machine.
The platform installed for this project in Lacolle leaves enough space for water to drain away from the unit and for technicians to inspect the area beneath it.
Protect the roof membrane
An outdoor unit should not be placed directly on a roofing membrane. Concentrated weight, vibrations, and seasonal movement can gradually damage the surface.
In this installation, the load is distributed across several support elements. A protective layer also separates the main structure from the roofing membrane. This configuration helps to:
- distribute the weight over a larger area;
- reduce pressure points;
- limit friction;
- prevent direct contact between the wood and the membrane;
- keep the unit stable despite temperature variations.
Roof protection remains a priority, because a high-performance HVAC installation must never create a new risk of water infiltration.
The ELIOS central heat pump and R454B refrigerant
The term R454B refers to the refrigerant used by this new generation of ELIOS equipment. It is not simply a detail listed on the technical data sheet. The type of refrigerant influences installation methods, the tools used, and the procedures followed by technicians.
R454B belongs to a new generation of refrigerants developed to reduce climate impact compared with several fluids traditionally used in residential systems. It is classified as an A2L refrigerant, meaning a fluid with low flammability.
This involves specific work practices, including:
- use of equipment compatible with R454B;
- strict adherence to brazing and pressurization procedures;
- a complete leak check;
- precise evacuation of the refrigeration circuit;
- application of the manufacturer's clearances and requirements;
- proper system identification.
A heat pump using R454B must therefore not be installed as though it automatically followed the same procedures as an older R410A system. Our technicians take into account the specific characteristics of the new equipment, the refrigeration circuit, and the manufacturer's guidelines.
The role of the outdoor unit in a central system
The unit visible on the roof is the outdoor section of the ELIOS central heat pump. It operates in combination with the components located inside the building, which may include a coil, an air handler, a compatible furnace, a central fan, and a thermostat.
Unlike a wall-mounted heat pump that directly supplies an indoor unit installed in a room, a central heat pump distributes air through a duct network.
This configuration can offer several advantages:
- more uniform temperatures in the various rooms;
- a single main heating and cooling system;
- the ability to use the existing duct network;
- centralized air filtration;
- a discreet indoor appearance;
- shared control from a central thermostat.
However, final performance does not depend solely on the outdoor unit. Heat pump sizing, fan capacity, duct condition, airflow, and the compatibility of indoor components all have a direct impact on comfort.
The key steps in installing a central heat pump on a roof
Assessment of the structure and location
Before installing a heat pump on a roof, we must confirm that the chosen location allows for a safe, durable installation.
Our analysis includes, in particular:
- the roof structure’s capacity;
- the location of load-bearing walls;
- the type of membrane;
- the proximity of drains;
- the clearance around the heat exchanger;
- the prevailing wind direction;
- the height of the parapets;
- the access required for servicing;
- the routing of the refrigerant lines;
- the electrical wiring route.
For this project, the unit was placed in a clear area, at a sufficient distance from immediate obstacles. The front fan can move air freely, while the sides of the unit remain accessible for inspections and maintenance.
Unit stability
A heat pump must be perfectly stable. A tilted unit can promote improper drainage, transmit more vibration, or place unusual stress on certain internal components.
The wooden structure visible in the photo creates a broad, rigid base. The main beams support the unit, while the lower elements distribute the load across the roof.
During this type of work, we also check:
- the level of the platform;
- the quality of the support points;
- the tightness of the fasteners;
- the absence of excessive movement;
- resistance to outdoor conditions;
- the space available beneath the drain pan.
The support must remain reliable despite freeze-thaw cycles, heavy rain, wind, and the temperature changes characteristic of Quebec’s climate.
The refrigerant connection
Refrigerant lines connect the outdoor unit to the indoor components. Their installation requires great precision.
An incorrect pipe diameter, contaminated brazing, or incomplete evacuation can shorten the compressor’s service life and affect system performance. To prevent these problems, we follow a structured work sequence:
- Validation of the diameters required by the manufacturer;
- Proper preparation of the pipes;
- Brazing using appropriate methods;
- Pressure leak test;
- Evacuation of the circuit;
- Confirmation of vacuum stability;
- Controlled opening of the service valves;
- Checking operating temperatures and pressures.
When pipes pass through the roof, the openings must also be protected against water infiltration. Work involving the membrane and flashings must be carried out carefully, in coordination with building requirements.
Electrical supply and circuit protection
A ELIOS R454B central heat pump must be supplied by an electrical circuit that complies with the information on its nameplate.
The selection of the circuit breaker and conductor size must never be based solely on the heat pump’s stated rated capacity. The key values include:
- the minimum circuit ampacity;
- the maximum permitted protection;
- the supply voltage;
- grounding requirements;
- the manufacturer’s recommendations.
A disconnect switch should normally be installed near the unit to allow for safe servicing. On a roof, it must remain accessible without obstructing airflow or the opening of service panels.
System commissioning
An installation is not complete when the equipment has simply been secured and connected. Commissioning makes it possible to confirm the system’s actual operation.
Our checks may include:
- compressor operation;
- outdoor fan rotation and airflow;
- heating mode;
- cooling mode;
- defrost cycles;
- supply and return air temperatures;
- airflow in the ducts;
- communication with the thermostat;
- the absence of unusual noises or vibrations;
- water drainage.
We also take the time to explain the thermostat’s main settings and recommended operating practices to the homeowner.
Mistakes to avoid when installing on a roof
A heat pump installed on a roof can deliver excellent performance, provided certain essential rules are followed.
Among the mistakes we encounter most often in the heating and cooling field are:
Installing the unit too close to the membrane
An appliance installed on supports that are too low may become surrounded by snow or ice. Insufficient clearance also makes it harder to clean beneath the unit.
Blocking airflow
A heat pump should not be confined between walls, high parapets, or other equipment. Discharged air can recirculate toward the heat exchanger and reduce the unit’s efficiency.
Neglecting maintenance access
Service panels, valves, and electrical connections must remain accessible. An installation that is difficult to maintain often leads to additional costs and longer service calls.
Place the support directly on the membrane
Without proper protection and weight distribution, the supports can leave marks on or damage the roof.
Ignoring the consequences of defrost cycles
The water produced must be able to drain away from the heat pump. Repeated accumulation can form a mass of ice beneath the unit.
Automatically reusing existing piping
The piping from an older heat pump is not necessarily compatible with a new R454B unit. The diameter, interior condition, length, and manufacturer requirements must be verified.
Maintenance tips for a rooftop central heat pump
A unit installed on the roof is less exposed to accidental impacts, but it must still be inspected regularly.
We recommend monitoring:
- the accumulation of leaves around the heat exchanger;
- excessive snow;
- ice formation beneath the unit;
- the visible condition of the support;
- unusual vibrations;
- the condition of the pipe insulation;
- panel fastening;
- clearance around the fan.
Avoid striking the ice with a tool or pouring hot water over the heat exchanger. These methods can damage the fins, the unit’s base, or the roof membrane.
Professional central heat pump maintenance allows for a more thorough inspection of the coil, electrical connections, operating temperatures, drainage, and overall performance.
An installation adapted to the building rather than a standardized solution
This central heat pump project in Lacolle clearly demonstrates that a successful installation depends as much on mechanical integration as on the machine itself.
The ELIOS R454B unit was positioned on a raised platform to meet the specific requirements of the flat roof. The structure provides useful clearance beneath the unit, distributes the load, and helps protect the membrane. The location also provides clear space around the fan and heat exchanger.
At AirGreen, we apply this same approach to our central heat pump projects in Montreal, Laval, Longueuil, on the North Shore, and on the South Shore. We analyze the building, ductwork, mechanical access, winter conditions, and occupants’ actual needs before choosing the installation method.
A modern central heat pump can provide efficient heating, even cooling, and better comfort control. However, to achieve these results, it must be properly sized, connected, supported, and commissioned.
The big day, step by step
The main steps of this kind of job at AirGreen. Every house has its quirks: the estimate brings them out.
We look at the ducts, the current indoor module, the electrical panel and the planned spot for the outdoor unit.
The equipment combination, capacity and price, in writing. We check whether the combination qualifies for assistance programs.
Access protected, old unit disconnected and removed when it is being replaced.
Electric furnace or air handler, with its coil, connected to the supply and return ducts.
On a level base, raised above the snow, with free space all around.
Insulated, they enter through a sealed opening and run to the indoor coil.
Dedicated circuits, accessible disconnect, a thermostat that works with the heat pump and the backup heat.
Leak test, vacuum, start-up, airflow check and a test of both modes.
Filter, thermostat, backup heat in extreme cold: what to know before winter.
- The on-site estimateWe look at the ducts, the current indoor module, the electrical panel and the planned spot for the outdoor unit.
- The quoteThe equipment combination, capacity and price, in writing. We check whether the combination qualifies for assistance programs.
- Getting readyAccess protected, old unit disconnected and removed when it is being replaced.
- The indoor moduleElectric furnace or air handler, with its coil, connected to the supply and return ducts.
- The outdoor unitOn a level base, raised above the snow, with free space all around.
- The refrigerant linesInsulated, they enter through a sealed opening and run to the indoor coil.
- Electrical and thermostatDedicated circuits, accessible disconnect, a thermostat that works with the heat pump and the backup heat.
- Tests and start-upLeak test, vacuum, start-up, airflow check and a test of both modes.
- The walkthroughFilter, thermostat, backup heat in extreme cold: what to know before winter.
What would it look like at your place?
Two quick checks with real numbers: what heat costs, and what your current heaters add up to in BTU/h.
Conversion: 1 W = 3.412 BTU/h. An indication, not a load calculation: baseboards and furnaces are often stronger than the real need, and they can stay as backup. AirGreen confirms the capacity on site.
Four mistakes we do not make
Flip each card to see what we do instead.
Your own project, step by step
What to do, season by season
Three habits per season for this unit. They take a few minutes and prevent many calls.
- Check the indoor module's filter.
- Clear winter debris from the outdoor unit.
- Test cooling before the heat arrives.
- Check the filter more often in peak season.
- Keep registers and returns clear.
- Watch condensate drainage near the coil.
- Change or clean the filter.
- Test heating and backup heat before the cold.
- Book periodic maintenance.
- Clear snow around the outdoor unit.
- Store nothing in front of the indoor module.
- Note any unusual noise or smell and call us.
Is your home ready?
Check what applies at your place. A "no" is not a refusal: it is what we sort out during the estimate.
Four statements: true or false?
It all comes down to details you have just seen.
1. A central heat pump uses the house's ducts.
It connects to the existing ducts to heat and cool everywhere.
2. In extreme cold, electric backup heat can take over.
The indoor module (furnace or air handler) works with the heat pump and takes over in extreme cold.
3. The filter only gets changed when the unit breaks down.
A dirty filter cuts airflow. It gets checked regularly.
4. You can reuse the old unit's size without checking.
The house may have changed: insulation, windows, added rooms. Capacity is confirmed on site.
0 / 4 right answers
What people ask us about this kind of work
Can I keep my current ducts?
What happens in extreme cold?
Furnace, air handler, ducted: what is the difference?
Are there grants?
Do I need a permit?
How much can I save?
How is the LogisVert assistance calculated?
Will my current thermostat work?
Central or wall units: which one?
Does AirGreen hold the required licences?
Is the estimate free?
No question matches. Write to us: we answer.
More jobs to see, near you
By town, by equipment or by region: browse more than 4,700 published projects.
Each dot: a town where AirGreen has published projects. The glowing dot: this job.
Every house has its constraints. We see them before we install.
The on-site estimate is free and the quote follows within 24 hours.
Text and photo: a real AirGreen Climatisation & Chauffage job. The diagrams are generic illustrations of the type of installation, not a survey of this job site. Sources of the added figures: airgreen.ca product pages (NEEP / AHRI performance), Hydro-Québec (Heat pumps page, LogisVert, read on 13 October 2026), Régie de l’énergie (rate D as of 1 April 2026).