
Installation of a Fujitsu AIRSTAGE Aquila XLTH dual-zone heat pump in Repentigny
In Repentigny, AirGreen installs a Fujitsu Aquila XLTH dual-zone heat pump with a wall-mounted unit, discreet line-set cover, and precise positioning to ensure comfort, drainage, and easy maintenance.
- City
- Region
- Equipment
- Brand
- Challenges
- Published
The job on one screen
The article, chapter by chapter
A wall-mounted unit installed precisely in an already furnished interior space
This installation in Repentigny, on Montreal’s North Shore, highlights an often-underestimated aspect of a multi-zone heat pump project: integrating the indoor unit into an already furnished room, with real constraints involving height, airflow, and finishing.
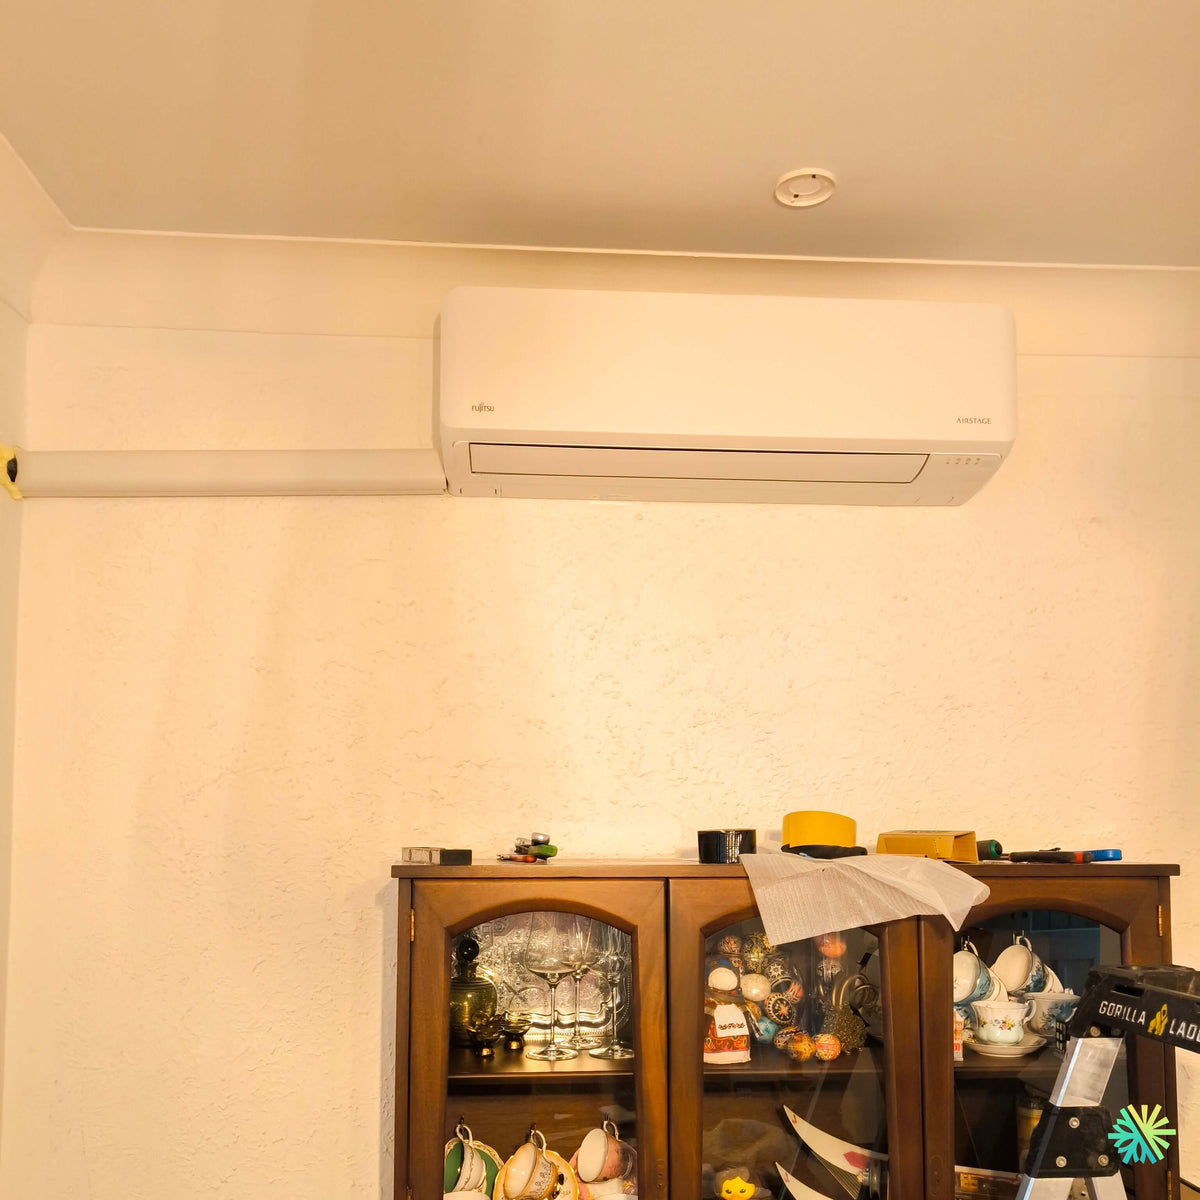
We installed a Fujitsu AIRSTAGE Aquila XLTH dual-zone heat pump, one of whose wall-mounted indoor units is visible in the photograph. It was positioned in the upper part of the wall, above a wooden china cabinet, near the ceiling and a recessed light fixture. The lines run horizontally from the left, inside a white line-set cover that blends discreetly into the décor.
At first glance, the installation appears simple: a white unit, a horizontal cover, and a clear wall. On site, however, several decisions had to be made carefully:
- maintain the required clearances around the unit;
- avoid interference with the recessed light fixture;
- ensure effective air distribution above the cabinet;
- maintain reasonable access for servicing;
- properly align the line-set cover;
- drill through the wall without damaging the finishes;
- route the condensate drain with the proper slope;
- coordinate this unit with the system’s second zone.
The photograph was taken during the final phase of the project. Tools, finishing materials, and a stepladder are still visible. Before we leave, these items are removed, the area is cleaned, and the complete operation of both zones is checked with the homeowner.
Why a dual-zone heat pump was the right choice for this Repentigny residence
A single wall-mounted unit can be effective in an open-plan area, but it cannot always properly serve multiple rooms separated by doors, corridors, or changes in level. In this project, the need involved two distinct areas of the residence.
The dual-zone configuration allows two indoor units to be powered by a single outdoor unit. Each zone has its own equipment and controls.
This solution provides several tangible benefits:
- air distribution directly into each space;
- independent temperature control;
- a single outdoor unit around the house;
- less clutter on the façade or in the yard;
- modulation of the capacity according to the active zones;
- better adaptation to the occupants’ habits.
One zone can be maintained at a different temperature from the other. For example, a living area can be set for consistent comfort during the day, while a bedroom or less frequently used space can operate according to a more moderate setpoint.
Fujitsu documentation for AIRSTAGE H Series multizone systems specifies that each indoor unit can be controlled independently. It also states that a single outdoor unit can power several indoor units, depending on its capacity and the permitted combinations. However, heating and cooling cannot be produced simultaneously by different zones: the entire system must operate in a common mode.
In practical terms, occupants can:
- turn off one zone and let the other continue operating;
- set different temperatures;
- choose a fan speed for each room;
- adjust the direction of the airflow;
- schedule the zones according to their schedule.
They cannot request heating in one room while another requests cooling.
Positioning the unit above the cabinet
The Fujitsu wall-mounted unit was installed above a tall cabinet. This positioning had to be carefully evaluated to ensure that the cabinet would not interfere with air circulation.
A wall-mounted heat pump generally draws in air from above and blows it forward and downward. If a unit is placed too close to the ceiling, the air intake may be restricted. If it is installed too low or directly above a large obstruction, the discharged air may hit the cabinet and return prematurely toward the unit.
This recirculation reduces the effectiveness of air distribution. The temperature sensor may also detect the air that has already been heated or cooled around the unit too quickly, while the rest of the room has not yet reached the setpoint.
We therefore need to find a balance between:
- the upper clearance;
- the height of the cabinet;
- the width of the wall;
- the direction of the louvers;
- the distance from the ceiling;
- the position of the light fixture;
- the reach of the air in the room.
The photo shows that the unit was centered in an area where the lower flap can open without obstruction. The cabinet remains low enough not to directly block the air outlet.
The importance of not modifying the furniture without evaluating it
Before an installation, some homeowners consider moving or replacing a cabinet simply to make room for the heat pump. This is not always necessary.
We first check whether the unit can be installed at an appropriate height while maintaining:
- normal operation of the cabinet;
- door opening;
- access to stored items;
- clearance for cleaning;
- unobstructed air distribution.
In this project, installing the unit above the hutch made it possible to use part of the wall that otherwise would have been underused. The appliance remains visible, but its position respects the existing organization of the room.
Limited ceiling clearance requiring precise measurements
The space between the indoor unit and the ceiling is limited. This type of configuration requires taking measurements before drilling, rather than estimating them when hanging the unit.
We must allow for the space required for:
- the wall bracket;
- the unit cover;
- opening of the front panel;
- removal of the filters;
- air intake;
- access to the fasteners;
- future maintenance.
A heat pump installed too close to the ceiling can become difficult to clean. The front panel may not open fully, and the filters may be impossible to remove without disassembling the unit.
We therefore ensure that the unit meets the manufacturer’s clearances and remains accessible for normal HVAC maintenance.
The recessed light fixture: a detail that changes the installation plan
A recessed light fixture is visible in the ceiling, slightly to the right of the unit. Its presence had to be considered before drilling the wall and routing the lines.
Behind a finished ceiling, the light fixture’s electrical wires may follow a path that is not visible. We must avoid drilling without checking the high-risk areas.
The proximity of the light fixture also affects visual comfort. A unit installed directly beneath a light source can create a significant shadow or make the appliance appear misaligned.
In this case, the chosen position maintains a clear separation between the heat pump and the light fixture while preserving a clean visual axis on the wall.
A cleanly aligned horizontal line-set cover
The white line-set cover visible to the left of the indoor unit contains the components required for its operation:
- the copper lines;
- their insulation;
- the communication cable;
- certain electrical conductors;
- the condensate drain, depending on the configuration selected.
Rather than leaving these elements exposed, we protect them with a rigid cover. This finish improves the appearance of the installation and protects the lines from impacts, dust, and accidental damage.
The cover follows a clean, level horizontal line. This detail is particularly important in a finished room, where a slightly slanted line-set cover would be immediately visible against the ceiling and the top of the cabinet.
We therefore check the alignment with a level before securing it. We also plan the location of the fittings to limit the number of joints and elbows.
Why the drain slope should not be sacrificed for aesthetics
A perfectly horizontal line-hide cover may look ideal visually, but the condensate drain must maintain the slope required for water to flow.
In cooling mode, the indoor unit removes moisture from the air. This water collects in a pan and then drains outside.
If the drain has a reverse slope, sag, or blockage, several problems may occur:
- water leaking beneath the unit;
- overflow of the drain pan;
- stains on the wall;
- odors;
- development of organic deposits;
- irregular drainage noise;
- damage to the furniture beneath the unit.
We must therefore reconcile the exterior appearance of the cover with the functional slope of the drain inside. When gravity drainage is impossible, a condensate pump may be required. However, it must be selected and installed so that it remains accessible for maintenance.
A fastening method suited to the existing wall
The wall has a textured finish. A clean installation requires protecting this finish while drilling, installing the wall plate, and making the connections.
The mounting plate must be perfectly level. A tilted indoor unit can disrupt condensate drainage and increase the risk of leaks.
We also check the nature of the structure behind the wall. Depending on the building, it may consist of:
- wood studs;
- metal studs;
- a masonry wall;
- a multilayer assembly;
- a wall containing piping or wiring.
The fasteners must be suitable for the actual material. An indoor unit must never be supported solely by a fragile finish layer.
A Fujitsu Aquila XLTH system designed to tailor comfort to two zones
Possible combinations in the Fujitsu multi-zone lineup
Fujitsu documentation presents AIRSTAGE H Series outdoor units rated at 18,000, 24,000, 36,000, and 45,000 BTU/h. Depending on the model, they can power up to two, three, four, or five indoor units.
For a two-zone configuration, the tables on page 2 show several permitted combinations, including:
- 7,000 + 7,000 BTU/h;
- 7,000 + 9,000 BTU/h;
- 7,000 + 12,000 BTU/h;
- 7,000 + 15,000 BTU/h;
- 9,000 + 9,000 BTU/h;
- 9,000 + 12,000 BTU/h;
- 9,000 + 15,000 BTU/h;
- 12,000 + 12,000 BTU/h.
The exact capacity of the indoor unit shown in the photograph cannot be confirmed from its appearance. Several models with different capacities use very similar cabinets. We therefore avoid making up a BTU capacity without consulting the rating plate or project records.
Why the BTU capacity should not be selected based on floor area alone
A simplified rule based on BTUs per square foot can provide a preliminary indication, but it is not enough to select a dual-zone heat pump.
For this installation in Repentigny, sizing had to take several factors into account:
- the area of each zone;
- the number of exterior walls;
- insulation quality;
- windows;
- solar exposure;
- ceiling height;
- connecting rooms;
- doors that are usually open or closed;
- internal heat sources;
- the system’s capacity at low temperatures;
- the simultaneous operation of both zones.
An oversized unit can quickly reach its setpoint and stop before properly dehumidifying the room. An undersized unit may operate continuously without maintaining comfort during periods of intense heat or cold.
The manufacturer specifies that its combination tables should not be used alone to determine system capacity. Fujitsu recommends technical selection using its Design Simulator software.
Connection capacity and actual output capacity
In some multi-zone systems, the combined rated capacity of the indoor units may exceed the outdoor unit’s rated capacity. Fujitsu documentation indicates a connection capacity of up to 130%.
This does not mean that the outdoor unit produces 130% of its rated capacity. Fujitsu specifies that exceeding 100% in the combination does not increase the total production capacity.
When both zones require their full capacity at the same time, the system distributes the available power.
This reality is important in a home where both zones may be called upon simultaneously, for example:
- two bedrooms during a very cold night;
- an upper floor and a ground floor during a heat wave;
- two rooms exposed to sunlight;
- a main living area and a finished basement occupied at the same time.
We therefore choose the combination according to actual needs, not solely based on the capacities listed for the indoor units.
How the inverter compressor operates
The Fujitsu AIRSTAGE Aquila range uses an inverter compressor. It can modulate its speed according to demand.
Rather than operating only at full power, the compressor adjusts its output as the temperature approaches the setpoint.
This modulation helps to:
- maintain a more stable temperature;
- reduce repeated starts;
- adapt energy consumption to demand;
- limit temperature fluctuations;
- improve sound comfort;
- distribute capacity between the active zones.
In a dual-zone installation, this adaptability is particularly useful. If only one indoor unit is operating, the system can focus its effort on that zone. When both zones are active, capacity is distributed according to demand and system limits.
Heating during the Quebec winter
The Aquila series documentation states that CTEB units designed for cold climates can operate in heating mode down to -26 °C. It also indicates integrated protection for the circuits, fan motor, and compressor.
This minimum operating temperature does not mean that the capacity remains the same at all temperatures. As with any heat pump, heating capacity changes as the outdoor temperature drops.
We therefore assess:
- the capacity at the design temperature;
- the building’s heat loss;
- the use of both zones;
- the presence of supplemental heating;
- the desired comfort temperature.
In many homes in Repentigny and on the North Shore, electric baseboards remain available as supplemental heating. The heat pump can nevertheless provide much of the seasonal heating when properly sized and used.
The choice of location affects how the temperature is perceived
An indoor unit generally measures the air temperature near its location. However, warm air naturally rises, and the temperature near the ceiling may differ from the temperature felt in the occupied zone.
For this reason, airflow positioning and direction are essential. In heating mode, the louvers should direct air downward to encourage it to mix throughout the room. In cooling mode, a more horizontal airflow can allow cool air to distribute gradually.
The piece of furniture beneath the unit therefore had to remain sufficiently clear so as not to disrupt this airflow.
Common mistakes to avoid with an indoor wall-mounted unit
Installing the unit too close to the ceiling
This can restrict air intake and make filter removal more difficult.
Installing the unit above a piece of furniture that is too tall
The airflow may be blocked or redirected straight back toward the unit.
Choosing the location based solely on appearance
Air distribution, the drain, wall structure, and pipe length are all equally important.
Installing a duct cover without a functional slope
The condensate drain must remain effective, even when the finish appears level.
Neglecting the light fixture and concealed wiring
A poorly placed hole can damage an electrical wire or another concealed component.
Making the filters inaccessible
The filters must be removable regularly without dismantling the unit or moving furniture.
Blowing directly onto occupants
A poorly oriented unit can create a draft, even when the room’s average temperature is comfortable.
Commissioning the two zones
Once the wall-mounted unit is secured and the connections are complete, we perform a full system commissioning.
Our checks include, among other things:
- checking the level of the indoor unit;
- checking the wall mounting;
- inspecting the line-set cover;
- testing the drain flow;
- checking the refrigerant connections;
- performing a leak test;
- evacuating the system;
- checking the communication wiring;
- correctly identifying each zone;
- testing in cooling mode;
- testing in heating mode;
- checking the motorized louver;
- checking the remote control;
- measuring supply-air temperatures;
- explaining the controls to the owner.
With a multi-zone system, we test each unit separately, then both units simultaneously. This procedure confirms that each refrigerant circuit corresponds to the correct communication cable.
Recommended maintenance to preserve performance
The indoor unit must remain clean to maintain good airflow. We particularly recommend:
- clean the filters regularly;
- do not obstruct the top of the unit;
- keep the furniture beneath the unit clear;
- watch for any signs of water;
- do not spray any product directly onto the cabinet;
- have the drain inspected in the event of abnormal drainage;
- schedule HVAC maintenance when more thorough cleaning is required.
A heavily clogged filter reduces airflow, increases noise, and may decrease performance. In a dual-zone system, each indoor unit must be maintained separately, even if one zone is used less often.
An installation adapted to an occupied and furnished room
This project in Repentigny demonstrates that a wall-mounted unit can be cleanly integrated into an existing room when its placement is carefully planned.
The project’s main successful elements are:
- high installation without blocking air intake;
- positioning compatible with the furniture;
- adequate clearance from the light fixture;
- a properly aligned horizontal line-set cover;
- a protected route;
- secure mounting;
- continued access to the filters;
- air distribution adapted to the room;
- integration into a dual-zone system.
The Fujitsu AIRSTAGE Aquila XLTH system can now serve two areas of the home from a single outdoor unit. Each zone can be adjusted according to the occupants’ habits while benefiting from the modulation provided by the multi-zone system.
At AirGreen, we install dual-zone heat pumps in Repentigny, on the North Shore, as well as in Montreal, Laval, Longueuil, and the South Shore. We adapt each project to the walls, furniture, drainage constraints, heating and cooling requirements, and the actual use of the spaces.
The job tools
Two quick checks with real numbers: what heat costs, and what your current heaters add up to in BTU/h.
Conversion: 1 W = 3.412 BTU/h. An indication, not a load calculation: baseboards and furnaces are often stronger than the real need, and they can stay as backup. AirGreen confirms the capacity on site.
How the job unfolds
The main steps of this kind of job at AirGreen. Every house has its quirks: the estimate brings them out.
We look at the room, the outside wall, the line route and where the outdoor unit will go. That is where the capacity gets chosen.
Model, capacity and price, in writing. We also check whether the model qualifies for assistance programs.
Floors and furniture protected, wall plate position marked level, wall opening located.
A single opening, with the slope the drain needs to flow outside.
Set on a stand raised above the snow, with the clearances the manufacturer requires.
Connected, insulated and protected. The opening is then sealed against water, cold air and insects.
A dedicated circuit and an accessible disconnect near the outdoor unit.
Leak test, vacuum, then start-up and a check of heating and cooling.
Remote, modes, filters: we show you the essentials before we leave.
- The on-site estimateWe look at the room, the outside wall, the line route and where the outdoor unit will go. That is where the capacity gets chosen.
- The quoteModel, capacity and price, in writing. We also check whether the model qualifies for assistance programs.
- Getting readyFloors and furniture protected, wall plate position marked level, wall opening located.
- The wall openingA single opening, with the slope the drain needs to flow outside.
- The outdoor unitSet on a stand raised above the snow, with the clearances the manufacturer requires.
- Lines, cable and drainConnected, insulated and protected. The opening is then sealed against water, cold air and insects.
- The electrical workA dedicated circuit and an accessible disconnect near the outdoor unit.
- Tests and start-upLeak test, vacuum, then start-up and a check of heating and cooling.
- The walkthroughRemote, modes, filters: we show you the essentials before we leave.
What we check on a job like this one
Each number is a point we check on site. Switch between summer and winter to watch air and heat move.
In summer, the outdoor unit rejects the house's heat outside.
Generic illustration of this type of installation, not a survey of this job site. Tap a number.
Mounted level on a wall plate, high enough for the air to reach the whole room, with enough space around it to slide the filters out easily.
The refrigerant lines, the communication cable and the drain go through the wall in a single opening, sealed against water, cold air and insects.
Two insulated copper pipes connect the two units. Outside, a line cover can protect them from sun, knocks and weather.
A shut-off switch near the outdoor unit isolates it safely for service. It must stay accessible at all times.
The compressor and the fan. In heating mode it captures heat from the outdoor air, even in winter, and moves it inside.
On the ground or on the wall, it keeps the unit above accumulated snow. The unit stays clear and defrost water can drain away.
The fan needs to blow freely. Storage, a fence or a wall too close, and efficiency drops while noise goes up.
Is your home ready?
Check what applies at your place. A "no" is not a refusal: it is what we sort out during the estimate.
Good habits, once the unit is in place
Six simple habits that keep the unit going. Your list stays on this device.
What to do, season by season
Three habits per season for this unit. They take a few minutes and prevent many calls.
- Clean the indoor unit's filters.
- Clear leaves and debris left on the outdoor unit by winter.
- Test cooling before the first hot days.
- Clean the filters more often when the unit runs a lot.
- Keep plants away from the outdoor unit.
- Check that no water drips from the indoor unit.
- Rake the leaves around the outdoor unit.
- Test heating before the first cold days.
- Book periodic maintenance before winter.
- Keep snow away from the stand and the front of the unit.
- Let the unit defrost: it is normal.
- Never hit the ice on the fins; call us if the unit stays iced up.
The right pages, at the right time
Four statements: true or false?
It all comes down to details you have just seen.
1. In heating mode, the outdoor unit can produce water.
During defrost cycles. That water must drain away without forming ice.
2. You pick the capacity with a simple square-footage rule.
Windows, insulation, orientation and how the room is used all count. Capacity is chosen on site.
3. A multi-zone connects several indoor heads to a single condenser.
One head per room, all on the same condenser. Each room keeps its own temperature.
4. The disconnect can sit behind the patio furniture.
It must stay accessible: it is what shuts the unit off for service.
0 / 4 right answers
What people ask us about this kind of work
Does a wall-mounted heat pump heat in winter?
Wall-mounted or multi-zone: how do I choose?
Where does the outdoor unit go?
Are there grants?
Do I need a permit?
How cold can it heat?
How much can I save?
How is the LogisVert assistance calculated?
Is it noisy?
The outdoor unit is covered in ice: is that normal?
Does AirGreen hold the required licences?
Is the estimate free?
No question matches. Write to us: we answer.
More jobs to see, near you
By town, by equipment or by region: browse more than 4,700 published projects.
Each dot: a town where AirGreen has published projects. The glowing dot: this job.
An on-site estimate, the right capacity, the right equipment.
The on-site estimate is free and the quote follows within 24 hours.
Text and photo: a real AirGreen Climatisation & Chauffage job. The diagrams are generic illustrations of the type of installation, not a survey of this job site. Sources of the added figures: airgreen.ca product pages (NEEP / AHRI performance), Hydro-Québec (Heat pumps page, LogisVert, read on 13 October 2026), Régie de l’énergie (rate D as of 1 April 2026).