
Installation of a Fujitsu Aquila XLTH dual-zone heat pump in La Prairie
In La Prairie, AirGreen installs a Fujitsu Aquila XLTH dual-zone heat pump in a narrow passageway, above a door, with protected lines, planned drainage, and airflow directed indoors.
- City
- Region
- Equipment
- Brand
- Challenges
- Published
The job on one screen
The article, chapter by chapter
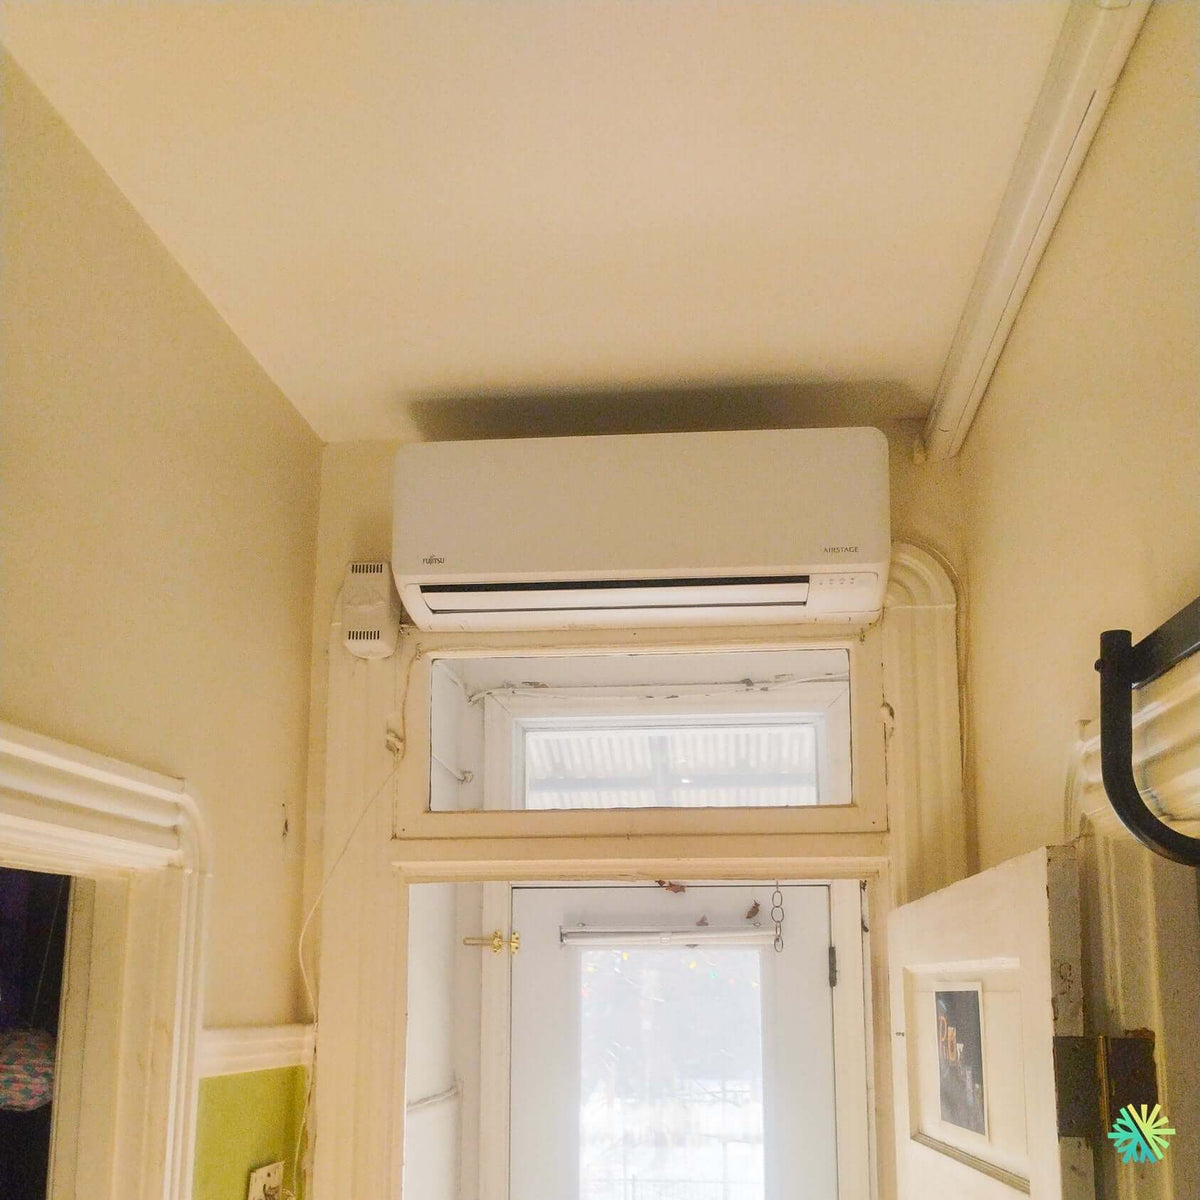
A wall-mounted unit installed in a narrow passage above an exterior door
This Fujitsu Aquila XLTH dual-zone heat pump installation in La Prairie presented a very specific interior constraint: integrating a wall-mounted unit into a narrow circulation area directly above a door, with a low ceiling, existing trim, and very little wall width available.
The photograph shows one of the Fujitsu AIRSTAGE indoor units installed above the glazed transom of an exterior door. This positioning keeps the side walls clear, avoids encroaching on the passageway, and directs air into the home rather than toward a piece of furniture or an area occupied for extended periods.
However, the work required much more than finding a space large enough to accommodate the appliance. We also had to check the front-panel opening, filter access, top clearance, louver swing, line-set routing, and condensate-drain slope.
In this type of project, the slightest misalignment can create a conflict with the door, trim, or ceiling. A successful installation therefore depends on precise measurements and a complete understanding of the mechanical routing behind the unit.
Why a dual-zone heat pump was well suited to the property’s needs
A dual-zone heat pump allows a single outdoor unit to power two indoor units. Each head serves a particular area of the home and has its own control.
This configuration is useful when a home includes two areas with different thermal characteristics. An area near an exterior entrance may experience more air infiltration, while another room may accumulate heat because of its sun exposure.
In La Prairie and elsewhere on the South Shore, dual-zone systems are often chosen to serve:
- a ground floor and an upper floor;
- a living area and a bedroom;
- a main living area and an extension;
- a front room and a back room;
- a basement and part of the ground floor;
- two zones separated by a stairwell or corridor.
The main advantage is achieving more precise comfort control with a single outdoor unit. This reduces clutter around the house and avoids installing two separate compressors.
Each indoor unit can be adjusted separately for temperature and fan speed. However, both zones share the same general mode. The system can heat or cool, but it cannot heat one zone and cool the other simultaneously.
A location above the door that frees up the available wall space
In this passage, available wall surfaces were limited. The door, glazed transom, trim, and side walls significantly reduced the number of possible locations.
Installing the unit above the door offered several advantages:
- no furniture is required beneath the unit;
- the passage remains completely clear;
- the unit does not block the door opening;
- air is directed toward the interior space;
- the side walls remain available;
- the unit is protected against accidental impacts.
However, this type of positioning requires careful analysis. A wall-mounted unit installed above a door must not be mounted too low, as its louver could interfere with the trim or direct air straight at the frame.
Conversely, a unit installed too close to the ceiling may not receive enough air through the upper intake and may become difficult to service.
A height calculated to the nearest centimeter
In the photo, the unit occupies nearly all the vertical space available between the transom and the ceiling. The final height therefore had to be determined before drilling.
We took into account:
- the height of the casing;
- the space required above the unit;
- the panel opening;
- the lower louver outlet;
- the trim located beneath the unit;
- the piping routed along the right side;
- the slope required for the drain.
In such a compact installation, a few centimeters of clearance can determine whether the project is feasible.
Ceiling proximity and air intake
Room air is generally drawn in through the upper part of a wall-mounted unit. The system then circulates it through the filters and coil before redistributing it through the lower louver.
A unit installed too close to the ceiling may have reduced airflow. This can affect:
- heating capacity;
- cooling capacity;
- noise level;
- cycle duration;
- power consumption;
- temperature reading.
In this project, clearance had to be checked against the actual ceiling geometry rather than based solely on an approximate measurement taken at the center of the wall.
The unit is positioned high enough to distribute air effectively while retaining the space required for operation and maintenance.
Piping routed along the right side
The photograph shows the line-set cover rising in the right corner of the room. This vertical route protects the connections between the indoor unit and the outdoor unit.
The elements that generally run through this cover include:
- a liquid refrigerant line;
- a gas refrigerant line;
- insulation;
- a communication cable;
- electrical conductors, depending on the configuration;
- the condensate drain.
Choosing the right side was logical given the available space and the route continuing toward the outside.
The line-set cover helps maintain a clean finish. It also protects the pipes from impacts, UV rays in exposed sections, and damage caused by future work.
The bends must remain gradual
Refrigerant lines must not be forced into excessively tight bends. An inadequate bend radius can partially crush the copper and create a restriction.
In a corner like the one shown in the photo, we must organize the route in order to:
- preserve the pipes’ internal diameter;
- avoid stress on the connections;
- maintain continuous insulation;
- maintain the correct slope for the drain;
- close the cover without compressing the pipes.
A discreet finish must never be achieved at the expense of mechanical performance.
Drainage above a door
In cooling mode, the unit removes moisture from the air. This moisture turns into water and collects in the condensate pan before being drained away.
In this installation, the drain must operate particularly reliably, because a leak would occur directly above a frequently used door.
An incorrect slope or a blockage could result in:
- water on the frame;
- damage to the paint;
- damage to the trim;
- signs of moisture;
- water flowing into the passageway;
- the formation of odors in the drain.
We therefore check the flow before completing the installation. When drainage relies on gravity, the pipe must maintain a continuous slope to the discharge point.
If the building’s configuration prevents this slope, a condensate pump may be necessary. In this project, the route was planned to manage the drain without compromising the unit’s integration.
Air distribution suited to a circulation space
The unit is installed in a passageway rather than in a large open room. This changes how the air should be directed.
The lower louver can project air into the interior space and promote its circulation through adjacent areas. The goal is not to cool only the entrance, but to use this elevated position to distribute air beyond the corridor.
An incorrect louver adjustment could direct the airflow:
- directly onto the door;
- against the ceiling;
- onto someone entering the house;
- in a corner without airflow;
- toward a surface that redirects air back to the unit.
The orientation should therefore be adjusted according to the season. In cooling mode, a more horizontal angle can help distribute cool air. In heating mode, a lower orientation promotes the diffusion of warm air toward the occupied area.
Fujitsu Aquila XLTH features
The Fujitsu AIRSTAGE Aquila series is designed for multi-zone applications. The documentation provided lists outdoor units rated at 18,000, 24,000, 36,000, and 45,000 BTU/h, compatible with various combinations of wall-mounted units, compact cassettes, and ducted units.
Depending on the outdoor unit selected, the system can serve two to five indoor units. For a dual-zone installation, the combinations may vary according to the needs of each room.
The documentation also indicates that the cold-climate versions can operate in heating mode down to -26 °C. It states that the indoor units can be ordered separately, that the system provides heating and cooling without producing both simultaneously, and that certain configurations allow a connection capacity of up to 130%.
Possible dual-zone combinations
For the 18,000 BTU/h outdoor unit shown in the Fujitsu tables, the permitted combinations include:
- 7,000 + 7,000 BTU/h;
- 7,000 + 9,000 BTU/h;
- 7,000 + 12,000 BTU/h;
- 7,000 + 15,000 BTU/h;
- 9,000 + 9,000 BTU/h;
- 9,000 + 12,000 BTU/h;
- 9,000 + 15,000 BTU/h;
- 12,000 + 12,000 BTU/h.
These combinations confirm unit compatibility, but they do not replace sizing.
Fujitsu also specifies that combination tables should not be used alone to select capacity. The Design Simulator software is recommended to validate the equipment selection for H-series AIRSTAGE systems.
Why sizing cannot be based solely on square footage
The photograph does not make it possible to confirm the exact capacity of the indoor unit. The selection must be based on the heating and cooling requirements of the area served.
We analyze, among other factors:
- floor area;
- ceiling height;
- the amount of glazing;
- infiltration around the doors;
- insulation;
- solar orientation;
- the number of exterior walls;
- how the area is used;
- the capacity of the second unit;
- the simultaneous demand of both spaces.
In an area near an exterior door, infiltration may be greater than in a central room. Frequently opening the door can also cause rapid temperature fluctuations.
A general rule based on BTUs per square foot does not take these details into account.
The risks of an oversized unit
An oversized heat pump can reach the requested temperature very quickly and reduce its operation before sufficiently dehumidifying the air.
In summer, the room may feel cool while remaining humid.
A properly sized system operates more consistently, maintains a more stable temperature, and manages humidity more effectively.
The variable-speed compressor
The Fujitsu system uses an inverter-driven compressor. This technology allows the speed to be adjusted according to demand.
When demand is low, the compressor can operate at reduced capacity. When both zones require more heating or cooling, it increases output within the limits of the outdoor unit.
This modulation helps to:
- reduce temperature fluctuations;
- limit repeated starts;
- adjust energy consumption;
- maintain quieter operation;
- distribute capacity among the zones.
Inverter technology improves system flexibility, but it does not compensate for an improperly sized capacity.
An installation adapted to the home's existing architecture
Respecting the moldings and original elements
The photographed passage includes several moldings, frames, and architectural details. The unit had to be integrated without blocking the transom window or preventing the door from opening.
The line-set cover was placed in the corner to follow a natural vertical line. This method avoids running the lines through the center of the wall.
This integration respects the existing elements while keeping the installation accessible.
Maintaining access to the filters
The filters are located behind the front panel. They must be removable for cleaning.
In such a narrow space, it is important to ensure that:
- the panel can be opened;
- the ceiling does not block its movement;
- the filters can be removed;
- a small ladder can be used;
- Maintenance does not require removing the line-set cover.
An inaccessible unit often ends up being poorly maintained, reducing airflow and performance.
The invisible technical steps
The quality of a HVAC installation is not measured only by its visible finish.
The leak test
Every refrigerant connection must be checked before commissioning.
A slow leak can gradually reduce capacity and damage the compressor.
Evacuation
The circuit must be cleared of air and moisture. This step protects the oil and internal components.
Communication checks
Both indoor units must communicate properly with the outdoor unit. A wiring error can prevent startup or generate an error code.
The drain test
Drainage is checked before the system is put back into service, particularly when the unit is installed above a door or a sensitive surface.
Mistakes to avoid in a similar location
Installing the unit too close to the ceiling
The higher airflow may be reduced, and the panel becomes difficult to open.
Ignoring the moulding beneath the unit
The louver must be able to deploy freely without touching the frame.
Using a drain without sufficient slope
Water may flow back into the pan or accumulate in the line.
Compressing the pipes inside a small line-set cover
An overly tight finish can damage the pipes or insulation.
Directing the air straight at the door
Some heating or cooling may be lost outdoors when the doors are opened.
Neglecting maintenance access
The filters and panel must remain accessible despite the height and narrowness of the passage.
Recommended maintenance
To preserve system performance, the filters must be cleaned regularly. In an entryway, outdoor dust, fibres, and particles can accumulate more quickly.
Routine maintenance includes:
- cleaning the filters;
- inspecting the coil;
- checking the drain;
- checking the fan;
- examining the line-set cover;
- inspecting the outdoor unit;
- removing leaves and debris;
- checking for unusual noises.
Any sign of moisture around the door frame should also be monitored. Prompt intervention helps prevent damage to the mouldings and paint.
An AirGreen installation adapted to La Prairie
This Fujitsu Aquila XLTH dual-zone heat pump installation in La Prairie shows that an unusual location can become an effective solution when properly assessed.
The indoor unit was installed above an exterior door, in a very limited space between the transom and the ceiling. This position frees up the side walls and allows air to be directed into the home.
The vertical line-set cover protects the connections, while the drainage and clearances were planned to preserve operation and access to the filters.
At AirGreen, we install dual-zone heat pumps, multi-zone systems, and wall-mounted air conditioners in La Prairie, Montreal, Laval, Longueuil, the North Shore, and the South Shore.
We adapt each project to the building’s actual structure. Doors, ceilings, mouldings, furniture, and pipe routes are taken into account before work begins.
A successful installation must provide comfort while remaining clean, accessible, and reliable for many years. In this project, the location above the door made it possible to use otherwise wasted space while providing effective air distribution to the living areas.
The job tools
Two quick checks with real numbers: what heat costs, and what your current heaters add up to in BTU/h.
Conversion: 1 W = 3.412 BTU/h. An indication, not a load calculation: baseboards and furnaces are often stronger than the real need, and they can stay as backup. AirGreen confirms the capacity on site.
How the job unfolds
The main steps of this kind of job at AirGreen. Every house has its quirks: the estimate brings them out.
We look at the room, the outside wall, the line route and where the outdoor unit will go. That is where the capacity gets chosen.
Model, capacity and price, in writing. We also check whether the model qualifies for assistance programs.
Floors and furniture protected, wall plate position marked level, wall opening located.
A single opening, with the slope the drain needs to flow outside.
Set on a stand raised above the snow, with the clearances the manufacturer requires.
Connected, insulated and protected. The opening is then sealed against water, cold air and insects.
A dedicated circuit and an accessible disconnect near the outdoor unit.
Leak test, vacuum, then start-up and a check of heating and cooling.
Remote, modes, filters: we show you the essentials before we leave.
- The on-site estimateWe look at the room, the outside wall, the line route and where the outdoor unit will go. That is where the capacity gets chosen.
- The quoteModel, capacity and price, in writing. We also check whether the model qualifies for assistance programs.
- Getting readyFloors and furniture protected, wall plate position marked level, wall opening located.
- The wall openingA single opening, with the slope the drain needs to flow outside.
- The outdoor unitSet on a stand raised above the snow, with the clearances the manufacturer requires.
- Lines, cable and drainConnected, insulated and protected. The opening is then sealed against water, cold air and insects.
- The electrical workA dedicated circuit and an accessible disconnect near the outdoor unit.
- Tests and start-upLeak test, vacuum, then start-up and a check of heating and cooling.
- The walkthroughRemote, modes, filters: we show you the essentials before we leave.
What we check on a job like this one
Each number is a point we check on site. Switch between summer and winter to watch air and heat move.
In summer, the outdoor unit rejects the house's heat outside.
Generic illustration of this type of installation, not a survey of this job site. Tap a number.
Mounted level on a wall plate, high enough for the air to reach the whole room, with enough space around it to slide the filters out easily.
The refrigerant lines, the communication cable and the drain go through the wall in a single opening, sealed against water, cold air and insects.
Two insulated copper pipes connect the two units. Outside, a line cover can protect them from sun, knocks and weather.
A shut-off switch near the outdoor unit isolates it safely for service. It must stay accessible at all times.
The compressor and the fan. In heating mode it captures heat from the outdoor air, even in winter, and moves it inside.
On the ground or on the wall, it keeps the unit above accumulated snow. The unit stays clear and defrost water can drain away.
The fan needs to blow freely. Storage, a fence or a wall too close, and efficiency drops while noise goes up.
Is your home ready?
Check what applies at your place. A "no" is not a refusal: it is what we sort out during the estimate.
Good habits, once the unit is in place
Six simple habits that keep the unit going. Your list stays on this device.
What to do, season by season
Three habits per season for this unit. They take a few minutes and prevent many calls.
- Clean the indoor unit's filters.
- Clear leaves and debris left on the outdoor unit by winter.
- Test cooling before the first hot days.
- Clean the filters more often when the unit runs a lot.
- Keep plants away from the outdoor unit.
- Check that no water drips from the indoor unit.
- Rake the leaves around the outdoor unit.
- Test heating before the first cold days.
- Book periodic maintenance before winter.
- Keep snow away from the stand and the front of the unit.
- Let the unit defrost: it is normal.
- Never hit the ice on the fins; call us if the unit stays iced up.
The right pages, at the right time
Four statements: true or false?
It all comes down to details you have just seen.
1. In heating mode, the outdoor unit can produce water.
During defrost cycles. That water must drain away without forming ice.
2. You pick the capacity with a simple square-footage rule.
Windows, insulation, orientation and how the room is used all count. Capacity is chosen on site.
3. A multi-zone connects several indoor heads to a single condenser.
One head per room, all on the same condenser. Each room keeps its own temperature.
4. The disconnect can sit behind the patio furniture.
It must stay accessible: it is what shuts the unit off for service.
0 / 4 right answers
What people ask us about this kind of work
Does a wall-mounted heat pump heat in winter?
Wall-mounted or multi-zone: how do I choose?
Where does the outdoor unit go?
Are there grants?
Do I need a permit?
How cold can it heat?
How much can I save?
How is the LogisVert assistance calculated?
Is it noisy?
The outdoor unit is covered in ice: is that normal?
Does AirGreen hold the required licences?
Is the estimate free?
No question matches. Write to us: we answer.
More jobs to see, near you
By town, by equipment or by region: browse more than 4,700 published projects.
Each dot: a town where AirGreen has published projects. The glowing dot: this job.
An on-site estimate, the right capacity, the right equipment.
The on-site estimate is free and the quote follows within 24 hours.
Text and photo: a real AirGreen Climatisation & Chauffage job. The diagrams are generic illustrations of the type of installation, not a survey of this job site. Sources of the added figures: airgreen.ca product pages (NEEP / AHRI performance), Hydro-Québec (Heat pumps page, LogisVert, read on 13 October 2026), Régie de l’énergie (rate D as of 1 April 2026).