
Installation of a Broan-NuTone HRV90 air exchanger (HRV90T model, Compact Flex series) in Saint-Clet, in Vaudreuil-Soulanges
Baseboard heating, no existing ductwork, and a laundry room as the only available location: here’s how we designed a fully ducted system around a Broan-NuTone HRV90 in Saint-Clet. Main trunk and branches, return-air grille placement, and keeping the dryer separate.
Generic illustration of this type of installation, not a survey of this job site. Tap a number.
It removes stale air and brings in fresh air. The two airflows cross in the core without mixing.
It recovers part of the heat from the outgoing air to temper the incoming air. Depending on the model, it also manages humidity.
An outdoor hood, kept away from the exhaust so the house does not pull back the air it just removed.
Humid, stale air leaves through its own hood, fitted with a damper.
The ducts that connect to the outside are insulated to prevent condensation inside the house.
Stale air is drawn from humid rooms and fresh air is sent to living areas. The airflows are balanced.
It sets the mode and speed. You use it more when the house is humid or full of people.
Depending on the model and the season, the core produces condensation, removed through a drain with its loop.
A home heated with electric baseboards, no existing ductwork, and a laundry room as the only available location
Saint-Clet is a small agricultural municipality in the Vaudreuil-Soulanges RCM, between Les Cèdres, Coteau-du-Lac, and Sainte-Justine-de-Newton. Fewer than two thousand residents, rows lined with fields, and a housing stock dominated by single-family homes built between the 1970s and 1990s.
These homes share a characteristic that completely changes the design of a ventilation system: they are heated with electric baseboards. No furnace, no central unit, no ductwork. Nothing to connect to.
This is the case of the residence discussed here: a single-story home of approximately 1,400 sq. ft., with three bedrooms, heated entirely by electricity, with a partially finished basement and a laundry room on the main floor.
What electric baseboard heating changes in a ventilation project
In a forced-air home, an installer can connect an air exchanger to the existing ductwork in a few hours. Stale air is extracted through the return plenum, fresh air is injected there, and the main system's fan handles distribution.
In a home with electric baseboard heating, this option does not exist. The unit must have its own complete duct network: ducts to extract stale air where it accumulates and others to deliver fresh air where people breathe it. This is called a fully ducted system, and it is the only viable configuration in this type of building.
This constraint has three consequences homeowners should know before requesting a quote:
- The project takes longer. A complete duct network must be drilled, routed, supported, and sealed, often through finished ceilings.
- Design matters more than the unit. An excellent HRV connected to a poorly designed duct network delivers poor results. The reverse is rarer.
- The result is superior. A dedicated duct network captures pollutants exactly at the source and delivers fresh air exactly where people sleep. No simplified configuration reaches this level.
Readings taken before the work: 56% relative humidity on the main floor in April, 61% in the basement, condensation on bedroom windows during the previous winter, and no continuous mechanical ventilation.
Selected unit: Broan-NuTone HRV90
| Feature | Broan-NuTone HRV90 |
|---|---|
| Model number | HRV90T (top ports) / HRV90S (side ports) |
| Series | Compact Flex |
| Continuous airflow min/max at 0.2 in. w.g. | 47 to 95 CFM |
| Continuous airflow min/max at 0.4 in. w.g. | 47 to 90 CFM |
| Apparent sensible efficiency at 0 °C | 75 % |
| Sensible recovery efficiency (SRE) at 0 °C | 66 % |
| Sensible recovery efficiency at -25 °C | 60 % |
| Fan efficiency | 1.2 CFM per watt |
| Filtration | washable 30 PPI foam |
| Replacement filter | SV18883 |
| Certifications | ENERGY STAR, HVI certified |
| Connections | 4 in., side or top |
| Dimensions, top-port version | 18 5/8 × 15 1/4 × 15 5/8 in. |
| Weight | 30 lb |
| Optional wall bracket | VACCWMK |
| Pressure taps | integrated into the access door |
Airflow calculation
- According to the formula: 0.01 × 1,400 = 14, plus 7.5 × (3 + 1) = 30. Total: 44 CFM.
- According to the reference table (under 1,500 sq. ft., 2 to 3 bedrooms): 45 CFM.
Selected setting: 50 CFM in continuous operation, with a maximum programmed speed of 90 CFM for showers, cooking, and periods of high occupancy.
The HRV90 covers this range without ever being strained. Its 30 lb weight and compact dimensions also make it the only reasonable format for a wall-mounted installation in a laundry room, and Broan offers a dedicated wall bracket (VACCWMK) for this series, designed precisely for this purpose.
Designing a dedicated network from scratch
This is the part of the project that distinguishes a professional installation from an improvised connection.
The trunk-and-branch principle
The HRV90 connections are 4 inches. This diameter is perfectly suitable for an individual branch, but it becomes limiting if you try to run an entire network through it over long distances.
Our design:
- An immediate transition upon leaving the unit, from 4 inches to a 6-inch main duct, on both circuits—exhaust and supply.
- The 6-inch main duct covers the primary distance through the ceiling cavity, with as few elbows as possible.
- The branches resume with 4-inch or 5-inch ducts toward each register, as close as possible to their destination.
- An accessible balancing damper on each branch, to distribute airflow among the rooms instead of letting the shortest branch take it all.
This layout reduces total pressure loss without multiplying large ducts in finished ceilings. It is the compromise that makes a fully ducted system feasible in an existing home.
Where to place stale-air returns
Stale air is captured where it accumulates, never at random. Three points were selected:
- The main bathroom, in the ceiling, away from the shower stream but within the steam zone.
- The kitchen, in the ceiling and away from the range hood—the goal is to capture moisture and residual odors, not compete with the hood.
- The finished basement, at the lowest and dampest point of the space.
Where to place fresh-air grilles
Fresh air is delivered where people breathe for long periods: bedrooms and the living room.
Two rules we apply without exception:
- Never directly above a bed or in line with an armchair. Even with 66% heat recovery, the incoming air in January remains cooler than the room air. A poorly placed grille creates a draft, and the client eventually blocks it with duct tape.
- Preferably near a heat source—above an electric baseboard, for example—so the fresh air mixes before reaching occupants.
The selected grilles are Whisper-style registers, available in 4, 5, 6, and 8 in. according to the branch diameter, chosen for their quiet operation and finish in occupied rooms.
The length budget: count the elbows, not just the feet
This is what diagrams never show. Every duct resists airflow, and that resistance is not measured solely by straight-line length.
In a flex-duct system, a tight 90° elbow is equivalent, in terms of pressure loss, to several feet of straight duct—often the equivalent of around ten feet, depending on the radius and diameter. A twenty-foot route with four tight elbows can therefore “cost” as much as a well-designed sixty-foot route.
Our design method:
- The layout is drawn before drilling, not improvised as the work progresses.
- Every elbow is included in the total pressure-loss calculation.
- Bends are kept as wide as possible, even if that means extending the route by two feet to avoid a tight elbow.
- The ducts are kept taut, never corrugated or sagging between supports, spaced no more than 1.2 m apart.
This is the work that explains why two installations of the same unit, in two homes of identical size, do not deliver the same airflow rates.
The laundry room: the best and worst location
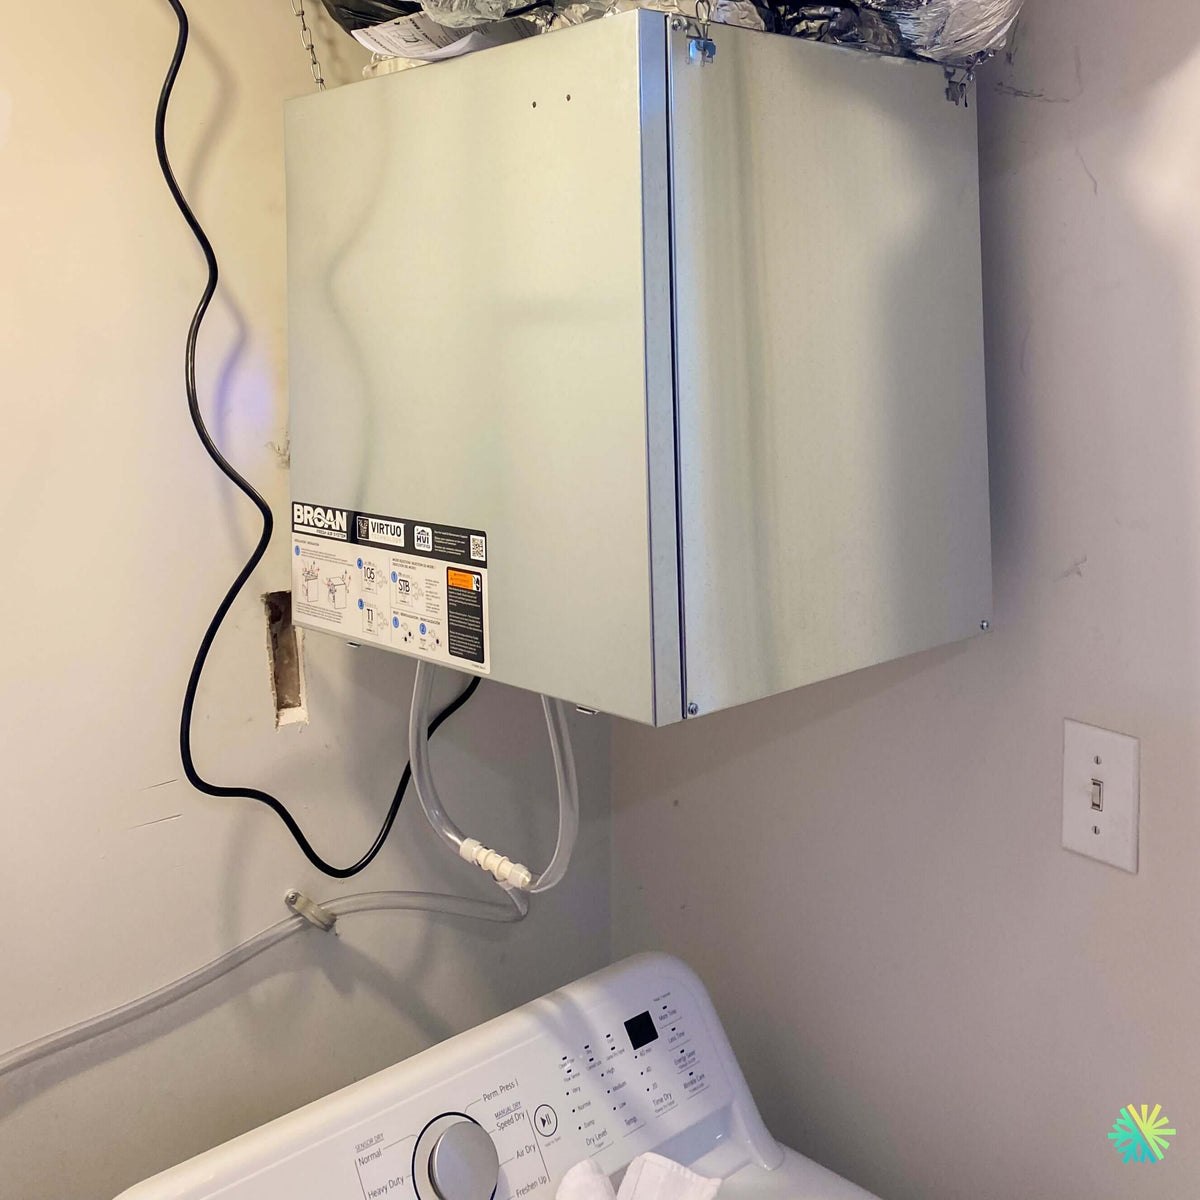
The unit was mounted on the wall, high up, in the corner of the laundry room, directly above the dryer. It is a location worth discussing because it combines advantages and pitfalls.
The case for it
- It is often the only available space in a house without a mechanical room.
- The washer drain is in the immediate vicinity, which resolves the condensate-drain issue.
- An electrical supply is generally already available.
- The room is already utilitarian, so the unit is not visually intrusive there.
The dryer, the number-one enemy of the heat-recovery core
This is the most important warning in this article, and the one we repeat at every job site.
The dryer must never, under any circumstances, be connected to the air exchanger's ductwork. Not its exhaust, not a shared connection, and not a branch connection “just to help.”
The reasons are mechanical and indisputable:
- Lint passes through a dryer filter in sufficient quantities to clog a heat-recovery core within a few months.
- Dryer air is saturated with moisture and hot, causing massive condensation in the core and ductwork.
- A dryer's airflow is incompatible with an HRV's balancing: it throws the system out of balance during every cycle.
The dryer retains its dedicated exhaust, short and rigid, with a downward slope and an exterior flapper vent cover.
A design consideration that follows directly from this shared space: the HRV's stale-air return must not be located in the laundry room when the unit is installed there. Airborne lint is much more concentrated there than elsewhere, and it would end up in the filter within a few weeks. In this house, no return was installed in this room.
High wall mounting
The unit is mounted high, beneath the ceiling, freeing up the workspace below it. Three precautions:
- The mounting transfers the load to the studs, located with a detector, using lag screws. Never into drywall alone.
- Insulating washers are placed between the bracket and the wall to prevent vibrations from being transmitted through the partition.
- The access door must be able to open fully, and the owner must be able to remove the filter from a stable stepladder. We verify this operation with the client before leaving the job site.
The condensate drain to the washer drain
Condensate drains from the unit through a flexible tube, forms a U-shaped trap, and then connects to the washer drain.
Two rules:
- The trap is filled during commissioning and remains accessible without tools so it can be reprimed if it dries out during a period of extreme cold.
- The connection to the drain is made with an interruption, never as a direct watertight connection to a wastewater drainage system, so that no backflow can reach the unit.
Mistakes to avoid
- Connecting the air exchanger to the dryer ductwork, or placing a stale-air intake in the laundry room. This is the fastest route to a destroyed core.
- Attempting a fully ducted system without a routing plan, improvising the paths as each opening is drilled.
- Keeping the fitting diameter constant throughout the entire network instead of using a larger-diameter main trunk.
- Adding multiple tight elbows without accounting for them in the pressure-loss calculation.
- Placing a fresh-air vent above a bed, guaranteeing that the grille will be blocked by the occupant before winter ends.
- Omitting balancing dampers on the branches, leaving remote rooms without useful airflow.
- Securing the unit to the drywall without locating the studs.
- Installing the unit too high for the filter to be accessible, making maintenance impossible from the first year onward.
What Saint-Clet adds to our method in homes without ductwork
Five months after commissioning, the relative humidity on the main level stabilized at around 38 % during cold weather, compared with 56% before the work, and the basement at around 42 % compared with 61%. No condensation appeared on the bedroom windows during the following winter.
The homeowners mainly noticed an effect they had not expected: the evening cooking smell no longer reached the bedrooms by bedtime. This was the direct result of an exhaust intake located at the source rather than general distribution.
Applicable subsidies
The Québec government’s Rénoclimat program provides financial assistance of approximately $500 for installing or replacing an HRV or an ERV, provided that the unit appears in the Home Ventilating Institute (HVI) certified products directory. The HRV90 carries this certification, as well as ENERGY STAR certification, which applies when the unit is used in Canada.
Two decisive procedural conditions:
- The initial energy assessment must precede the work. An assessment carried out afterward makes the application ineligible.
- A post-work assessment is required to trigger payment.
The amounts and criteria are periodically revised by the government. We confirm eligibility when preparing the estimate rather than quoting a figure that may have changed.
Maintenance
- Every 3 months: remove and wash the foam filter (SV18883) in warm, soapy water, squeeze it without twisting, and dry it completely before reinstalling it. In a laundry room, this deadline must not be postponed.
- Once a year: rinse the recovery core, reprime the drain trap, and check the airflow rates at the pressure taps on the access door.
- Twice a year: clean the exterior hoods of the HRV and separately check the dryer vent hood flap.
- Every 2 to 3 years: have the branch balancing checked again, especially if renovations have altered the ductwork.
Why entrust your ventilation to AirGreen
We design, install, and maintain heating, ventilation, and air conditioning systems across Greater Montreal with more than fifteen teams on the road. Our service area covers Montreal, Laval, Longueuil, the North Shore, the South Shore, and all of Montérégie, including Vaudreuil-Soulanges: Saint-Clet, Les Cèdres, Coteau-du-Lac, Sainte-Justine-de-Newton, Rigaud, and Vaudreuil-Dorion.
What we bring to a residential ventilation HVAC installation:
- A ductwork design drawn up before the first opening is cut, including pressure-loss calculations and elbow counts.
- Calculated sizing using formulas and tables, never estimates.
- Thoughtful placement of return grilles and supply vents, based on the actual use of each room.
- Mounting solutions for homes without a mechanical room: wall mounts, custom platforms, and compact units.
- Documented commissioning, with airflow rates and settings provided to the client in writing.
- A team holding an RBQ licence and providing complete assistance with subsidy applications.
- HVAC maintenance and repair services in the years that follow.
If your home is heated with electric baseboards and no one has yet explained how to install an air exchanger, contact AirGreen. We survey the site, design the ductwork, and provide you with a plan and price before touching a ceiling.
How it goes, from the first call to the end
The main steps of this kind of job at AirGreen. Every house has its quirks: the estimate brings them out.
We locate the wall for the two outdoor hoods, the unit's spot, service access and the drain.
The unit, its location and the price, in writing.
Hung or set level, with clear access to the filters and the core.
Fresh air intake and exhaust, kept apart and sealed.
The ones connected to the outside are insulated to prevent condensation inside the house.
Connected with its loop, when the unit needs one.
Installed where you will see it and use it.
Incoming and outgoing airflows are adjusted so the house is neither pressurized nor depressurized.
Speeds, filters, core: how to use it through the seasons.
- The on-site estimateWe locate the wall for the two outdoor hoods, the unit's spot, service access and the drain.
- The quoteThe unit, its location and the price, in writing.
- The unitHung or set level, with clear access to the filters and the core.
- The outdoor hoodsFresh air intake and exhaust, kept apart and sealed.
- The ductsThe ones connected to the outside are insulated to prevent condensation inside the house.
- The drainConnected with its loop, when the unit needs one.
- The wall controlInstalled where you will see it and use it.
- BalancingIncoming and outgoing airflows are adjusted so the house is neither pressurized nor depressurized.
- The walkthroughSpeeds, filters, core: how to use it through the seasons.
What to do, season by season
Three habits per season for this unit. They take a few minutes and prevent many calls.
- Clean the filters and core as the manufacturer specifies.
- Check the outdoor hoods: nests, debris, dampers.
- Lower the speed if the outdoor air gets humid.
- Adjust the speed to the humidity in the house.
- Check that the drain flows.
- Keep the outdoor hoods clear.
- Clean the filters before the closed-house season.
- Check the exhaust damper.
- Book a full cleaning if the unit has not had one in a long time.
- Clear snow from both outdoor hoods.
- Raise the speed if condensation appears on windows.
- Let the unit run: with the house closed, humidity builds up.
Which type of equipment for your project?
Pick what looks like your need.
Four mistakes we do not make
Flip each card to see what we do instead.
What people ask us about this kind of work
What does an air exchanger do?
Does fresh air cool the house in winter?
What speed should it run at?
Does an exchanger need cleaning?
What are the signs of poor ventilation?
HRV or ERV: what is the difference?
Should it run in winter?
Does AirGreen hold the required licences?
Is the estimate free?
No question matches. Write to us: we answer.
Useful pages for what comes next
More jobs to see, near you
By town, by equipment or by region: browse more than 4,700 published projects.
Each dot: a town where AirGreen has published projects. The glowing dot: this job.
Tell us about your house. We come and see it for free.
The on-site estimate is free and the quote follows within 24 hours.
Text and photo: a real AirGreen Climatisation & Chauffage job. The diagrams are generic illustrations of the type of installation, not a survey of this job site. Sources of the added figures: airgreen.ca product pages (NEEP / AHRI performance), Hydro-Québec (Heat pumps page, LogisVert, read on 13 October 2026), Régie de l’énergie (rate D as of 1 April 2026).