
Installation of a FANTECH HERO 200H air exchanger in Kirkland, on Montreal’s West Island
A FANTECH HERO 200H HRV installed in Kirkland: 88% adjusted sensible recovery, 203 CFM, a fully dedicated duct system, and three RTS 4 timers placed where occupants actually use them. Our sizing and commissioning method.
Take a tour of the installation
Each number is a point we check on site. Switch between summer and winter to watch air and heat move.
Generic illustration of this type of installation, not a survey of this job site. Tap a number.
It removes stale air and brings in fresh air. The two airflows cross in the core without mixing.
It recovers part of the heat from the outgoing air to temper the incoming air. Depending on the model, it also manages humidity.
An outdoor hood, kept away from the exhaust so the house does not pull back the air it just removed.
Humid, stale air leaves through its own hood, fitted with a damper.
The ducts that connect to the outside are insulated to prevent condensation inside the house.
Stale air is drawn from humid rooms and fresh air is sent to living areas. The airflows are balanced.
It sets the mode and speed. You use it more when the house is humid or full of people.
Depending on the model and the season, the core produces condensation, removed through a drain with its loop.
The 20-minute wall timer: the $60 detail that determines the success of a $4,000 ventilation system
A Kirkland home, built in the mid-1980s, with four bedrooms, a finished basement, two full bathrooms, and an attached garage. The homeowners called us after spending two winters with an air exchanger inherited from the previous owner, which they never used. Their explanation was simple: “We don’t know what it’s for or how it works, so we unplugged it.”
We hear this sentence regularly on the West Island, in Laval, Longueuil, and throughout the North Shore and South Shore. It is not about an equipment defect. It is about a commissioning failure.
We replaced the unit with a FANTECH HERO 200H, an HRV (heat recovery ventilator) with top ports, installed as a fully dedicated system. But the part of this project we are most proud of is not the cabinet in the basement: it is the three RTS 4 wall timers installed in the right locations, and the twenty minutes we spent with the homeowners explaining what to press and when.
Why the old system had been abandoned
Before proposing a replacement, we wanted to understand why a functioning unit had ended up disconnected. The reasons proved to be very concrete.
- A single control, in the basement mechanical room. To change the airflow, someone had to go down two floors. No one did.
- No timers in the bathrooms. After a shower, the steam remained in the room, then migrated into the corridor and bedrooms.
- A unit set to intermittent mode for 20 minutes per hour, which, for a house of this size, was not enough to maintain stable air quality.
- Constant high-speed noise in the bedroom above the mechanical room, due to a lack of vibration isolation and a poorly supported layout of rigid ductwork.
- Zero explanation at the time of sale. No documentation, no demonstration, no maintenance instructions.
The equipment was not the problem. The human interface design was entirely at fault. An air exchanger that occupants do not understand becomes a device that occupants turn off.
Sizing: why the HERO 200H instead of the 150H
We never choose an HRV by guesswork or “by square footage.” We apply the room-by-room calculation method derived from the CSA F326 standard, which assigns an airflow rate to each habitable room.
The actual calculation for this Kirkland home
| Room | Assigned airflow |
|---|---|
| Primary bedroom | 10 L/s |
| 3 additional bedrooms | 3 × 5 = 15 L/s |
| Living room | 5 L/s |
| Family room | 5 L/s |
| Dining room | 5 L/s |
| Kitchen | 5 L/s |
| Office | 5 L/s |
| Finished basement | 5 L/s |
| Playroom | 5 L/s |
| Total | 60 L/s ≈ 127 CFM |
This figure disqualified the HERO 150H, whose maximum range stops at 150 CFM. Using a 150H here would have meant running it near its ceiling continuously, with no safety margin for peak periods or compensation for gradual filter loading.
The HERO 200H reaches 203 CFM and goes down to 76 CFM. We therefore set the base airflow to 127 CFM for continuous operation, with more than 70 CFM of reserve available on demand. This reserve is what makes timers useful.
FANTECH HERO 200H specifications
| Specification | Value |
|---|---|
| Airflow range | 76 to 203 CFM at 0.4 in. w.g. |
| Connections | 6 in, round, top-mounted |
| Power supply | 120 V / 1 phase, maximum current 2.0 A |
| Power consumption | 98 W (low) / 210 W (high) |
| Adjusted sensible recovery efficiency | 88 % |
| ERV at 0 °C | 80 % |
| ERV at –25 °C | 67 % |
| Defrost | Recirculation, with an interlocked mechanical backdraft damper |
| Dimensions | 24 7/8 in H × 27 7/8 in W × 15 3/8 in D |
| Weight | 59 lb (26 kg) |
| Filtration | MERV 8 or optional MERV 13 |
The 88% adjusted sensible recovery efficiency is the best value in FANTECH's entire residential HRV range. In practical terms: of the warm air the house exhausts, nearly nine-tenths of the sensible heat is transferred to the incoming fresh air. In January in Kirkland, with –22 °C outdoors, the fresh air does not enter the ducts at –22 °C—it enters tempered, eliminating cold drafts at the supply grilles.
The fully dedicated installation: why we did not connect it to the central system
The old installation used the furnace network. We chose a fully dedicated configuration, with ducts dedicated to the HRV, separate from the heating and cooling network. Three reasons.
First reason: delivery precision. In a system connected to the central system, fresh air only reaches the bedrooms when the furnace fan is running. In the shoulder seasons, this fan runs infrequently. Result: fresh air stagnates in the ducts instead of reaching the occupants. With dedicated ducts, each bedroom receives its assigned airflow at all times, independently of heating.
Second reason: balancing. A dedicated system can be measured and adjusted register by register, without interaction with heating airflow rates. We obtain stable, reproducible readings, making the adjustments verifiable during subsequent HVAC maintenance visits.
Third reason: the house made it possible. Half of the finished basement had a removable suspended ceiling, and the floor cavity above the garage provided a direct route to the bedroom wing. This opportunity does not exist everywhere—when it does not, a partially dedicated installation remains an excellent solution.
The selected layout
Exhaust (stale air):
- Primary bathroom upstairs
- Main-floor bathroom
- Kitchen, at the edge of the cooking area (never above the cooktop: grease destroys a heat-recovery core)
- Laundry room
- Finished basement, at the point farthest from the stairs
Supply (fresh air):
- Four bedrooms
- Living room and family room
- Office
- Basement playroom
The attached garage: Kirkland’s specific constraint
Almost all homes in Kirkland have an attached garage, often with a connecting door to the house. This is a factor we address systematically.
We positioned the outdoor fresh-air intake on the façade opposite the garage, more than 3 m from the garage door and well away from the driveway entrance. An air exchanger positioned to draw in the exhaust gases from a vehicle starting in the morning would distribute those gases to all four bedrooms within minutes. We also maintained the required separation between the intake and exhaust, and positioned the hoods above the snow-accumulation line—a detail that matters more on the West Island than on the central island, where snowbanks along private driveways are smaller.
The three RTS 4 timers: where the system becomes truly usable
What exactly an RTS 4 does
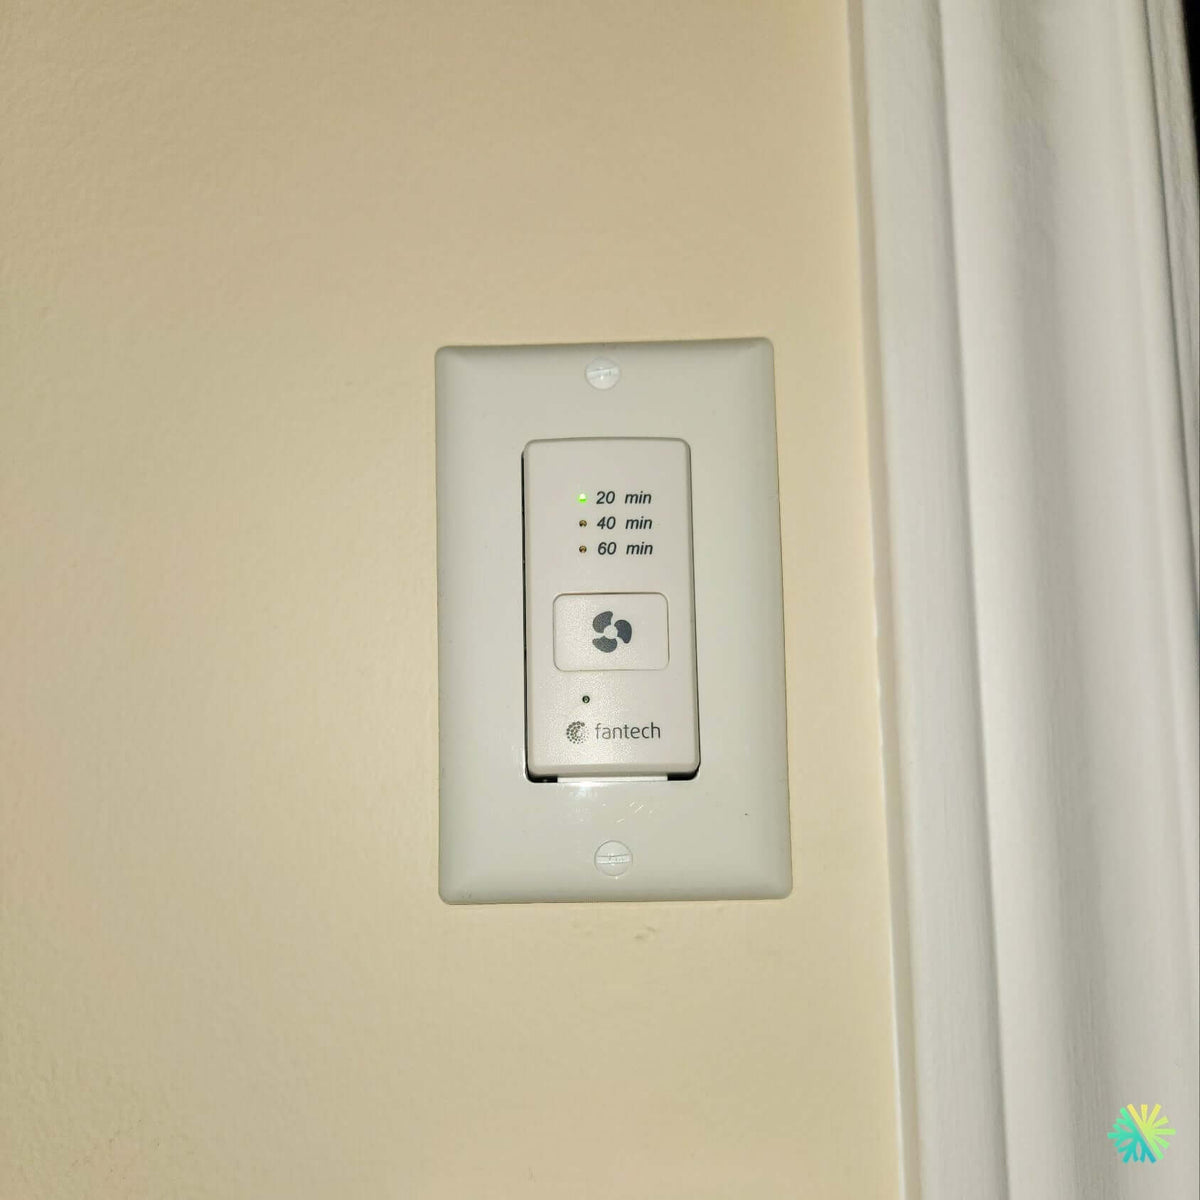
The FANTECH RTS 4 wall timer is a wired push-button control. A single press switches the unit to the highest setting for 20, 40, or 60 minutes, depending on the number of presses. An indicator light shows the selected duration. When the time expires, the unit automatically returns to its base setting—the one we programmed during commissioning.
This is exactly what a family home needs: no menu, no screen, no mode to figure out. One button, three durations, automatic reset.
Where we installed them, and why
Primary bathroom upstairs. Outside the shower area, at switch height, on the hinge side of the door so it is visible upon entering. One press upon entering the shower, and the steam is extracted before migrating to the bedroom.
Main-floor bathroom. Same logic, used mainly by visitors.
Kitchen, near the island. This is the most frequently used one. It is used during dinners, when the number of occupants triples, and during long cooking sessions. It complements the range hood without replacing it: the hood captures steam above the cooking surface, while the RTS 4 renews the air throughout the main floor.
Where we did not install them: in the bedrooms. An occupant who sets the HRV to maximum before going to bed wakes the whole house with an airflow of 203 CFM and gets up to air that is too dry. The continuous base setting is more than sufficient overnight.
Wiring: low voltage, but not carelessly
The RTS 4 controls are connected in low voltage to the terminal block on top of the HERO 200H. Two rules we never violate:
- Control cables separated from 120 V circuits. Sharing the same box or pathway with a lighting circuit causes erratic triggering. We use separate boxes and parallel runs with spacing between them.
- Controlled cable runs and labeled connections. Each cable is identified at both ends. A control that stops responding three years later can be diagnosed in five minutes instead of two hours.
FANTECH also offers the wireless battery-powered RTS-W, as well as the EDF3 controllers (three modes: Econo, 20 minutes per hour, continuous) and EDF8 (four speeds, three modes), plus the Eco-Touch IAQ touch control with total VOC detection. For this home, the selected combination—a properly calibrated continuous base setting plus three RTS 4 controls at the points of use—offered the best balance of simplicity and results. We recommend the Eco-Touch when occupants want automatic adjustment based on measured air quality.
Mistakes that ruin an air exchanger installation
We regularly take over installations in Montréal, on the West Island, in Laval, in Longueuil, on the North Shore, and on the South Shore. The same defects keep recurring.
- Installing a single control in the mechanical room. No one goes down to the basement to ventilate. The system eventually goes unused.
- Placing a timer in the shower's wet area. The control box is not designed for this and will corrode.
- Taking in fresh air near the garage, driveway entrance, or dryer exhaust. You then distribute throughout the house exactly what you were trying to avoid.
- Leaving the unit on high speed continuously throughout the winter. Running a HERO 200H at 203 CFM continuously in January can push relative humidity below 20%. The result: splitting wood floors, static electricity, and irritated mucous membranes. Best practice is a calibrated continuous base airflow with occasional boosts.
- Connecting the kitchen exhaust directly above the cooking surface. Grease permanently clogs the core.
- Omitting the condensate drain trap, or installing it without priming it. An HRV produces water; if it does not drain it, the water ends up somewhere else.
- Not explaining the system to the occupants. This is by far the most common and costly mistake — it turns an investment of several thousand dollars into a disconnected box.
Maintenance: three tasks, three intervals
- Every 3 months — clean or replace the filters. On the West Island, we recommend an additional check in May and June: the pollen load there is particularly heavy, and a saturated MERV 13 filter causes airflow to drop long before it looks dirty.
- Every 6 months — rinse the heat-recovery core with warm, soapy water; inspect the drain and trap; and check the door seals.
- Annually — inspect the exterior hoods (insect nests, leaves, ice), check supply and exhaust airflow, and revalidate the balance.
Regular HRV maintenance keeps the advertised 88% performance level. A neglected unit gradually loses airflow, without any indicator light coming on and without the occupants noticing.
Compliance, humidity, and less obvious benefits
In Quebec, balanced mechanical ventilation is required for new homes covered by the Building Code and is a condition of the Novoclimat program. For an existing home like this one, adding or replacing an HRV is generally not subsidized as such—renovation programs primarily target insulation, air sealing, and heat pumps. However, as soon as a building envelope is tightened, mechanical ventilation ceases to be an accessory and becomes a technical necessity. We always confirm the order of work with the client before starting, because it directly affects eligibility for the programs in effect.
Two benefits are rarely mentioned in quotes, but deserve to be:
- Radon dilution. Some areas of Quebec have elevated concentrations, and balanced ventilation helps reduce them. A screening test remains the only way to determine your actual situation; we recommend having one done regardless of the system installed.
- Stable winter humidity. A continuously ventilated home maintains relative humidity in the 30% to 40% range effortlessly, protecting both woodwork and occupants.
For your project in Kirkland or elsewhere in Greater Montreal
At AirGreen, we design every HVAC installation around the occupants rather than the catalogue: room-by-room airflow calculations, model selection based on the building's actual configuration, planned ductwork layout, measured and documented balancing, followed by a complete system demonstration for the owners before we leave.
We install air exchangers, wall-mounted and central heat pumps, air conditioners, and heating systems in Kirkland, throughout the West Island, in Montreal, Laval, Longueuil, the North Shore, and the South Shore. Licence RBQ # 5645-9605-01.
For an assessment of your ventilation needs or a quote for a FANTECH air exchanger, contact us at (514) 316-2973 or sales@airgreen.ca. We respond quickly throughout Greater Montreal.
The big day, step by step
The main steps of this kind of job at AirGreen. Every house has its quirks: the estimate brings them out.
We locate the wall for the two outdoor hoods, the unit's spot, service access and the drain.
The unit, its location and the price, in writing.
Hung or set level, with clear access to the filters and the core.
Fresh air intake and exhaust, kept apart and sealed.
The ones connected to the outside are insulated to prevent condensation inside the house.
Connected with its loop, when the unit needs one.
Installed where you will see it and use it.
Incoming and outgoing airflows are adjusted so the house is neither pressurized nor depressurized.
Speeds, filters, core: how to use it through the seasons.
- The on-site estimateWe locate the wall for the two outdoor hoods, the unit's spot, service access and the drain.
- The quoteThe unit, its location and the price, in writing.
- The unitHung or set level, with clear access to the filters and the core.
- The outdoor hoodsFresh air intake and exhaust, kept apart and sealed.
- The ductsThe ones connected to the outside are insulated to prevent condensation inside the house.
- The drainConnected with its loop, when the unit needs one.
- The wall controlInstalled where you will see it and use it.
- BalancingIncoming and outgoing airflows are adjusted so the house is neither pressurized nor depressurized.
- The walkthroughSpeeds, filters, core: how to use it through the seasons.
Four mistakes we do not make
Flip each card to see what we do instead.
Your own project, step by step
What to do, season by season
Three habits per season for this unit. They take a few minutes and prevent many calls.
- Clean the filters and core as the manufacturer specifies.
- Check the outdoor hoods: nests, debris, dampers.
- Lower the speed if the outdoor air gets humid.
- Adjust the speed to the humidity in the house.
- Check that the drain flows.
- Keep the outdoor hoods clear.
- Clean the filters before the closed-house season.
- Check the exhaust damper.
- Book a full cleaning if the unit has not had one in a long time.
- Clear snow from both outdoor hoods.
- Raise the speed if condensation appears on windows.
- Let the unit run: with the house closed, humidity builds up.
Is your home ready?
Check what applies at your place. A "no" is not a refusal: it is what we sort out during the estimate.
Four statements: true or false?
It all comes down to details you have just seen.
1. In an air exchanger, fresh air and stale air mix.
The two airflows cross in the core without mixing.
2. The two outdoor hoods must be kept apart.
Otherwise the exchanger pulls back the air it just removed.
3. An air exchanger can help with condensation on windows.
It renews the air and helps keep humidity in the right range.
4. An exchanger never needs maintenance.
Filters and core get dirty and need regular cleaning.
0 / 4 right answers
What people ask us about this kind of work
What does an air exchanger do?
Does fresh air cool the house in winter?
What speed should it run at?
Does an exchanger need cleaning?
What are the signs of poor ventilation?
HRV or ERV: what is the difference?
Should it run in winter?
Does AirGreen hold the required licences?
Is the estimate free?
No question matches. Write to us: we answer.
More jobs to see, near you
By town, by equipment or by region: browse more than 4,700 published projects.
Each dot: a town where AirGreen has published projects. The glowing dot: this job.
Every house has its constraints. We see them before we install.
The on-site estimate is free and the quote follows within 24 hours.
Text and photo: a real AirGreen Climatisation & Chauffage job. The diagrams are generic illustrations of the type of installation, not a survey of this job site. Sources of the added figures: airgreen.ca product pages (NEEP / AHRI performance), Hydro-Québec (Heat pumps page, LogisVert, read on 13 October 2026), Régie de l’énergie (rate D as of 1 April 2026).