
Installation of a FANTECH HERO 200H air exchanger in Rosemont–La Petite-Patrie, Montreal
Renovated triplex in Rosemont–La Petite-Patrie: here’s how we integrated a FANTECH HERO 200H heat-recovery ventilator (88% adjusted efficiency) with a central system, and why a simple switch controls everything.
Take a tour of the installation
Each number is a point we check on site. Switch between summer and winter to watch air and heat move.
Generic illustration of this type of installation, not a survey of this job site. Tap a number.
It removes stale air and brings in fresh air. The two airflows cross in the core without mixing.
It recovers part of the heat from the outgoing air to temper the incoming air. Depending on the model, it also manages humidity.
An outdoor hood, kept away from the exhaust so the house does not pull back the air it just removed.
Humid, stale air leaves through its own hood, fitted with a damper.
The ducts that connect to the outside are insulated to prevent condensation inside the house.
Stale air is drawn from humid rooms and fresh air is sent to living areas. The airflows are balanced.
It sets the mode and speed. You use it more when the house is humid or full of people.
Depending on the model and the season, the core produces condensation, removed through a drain with its loop.
The Three-Position Switch That Determines Whether Your Air Exchanger Is of Any Use
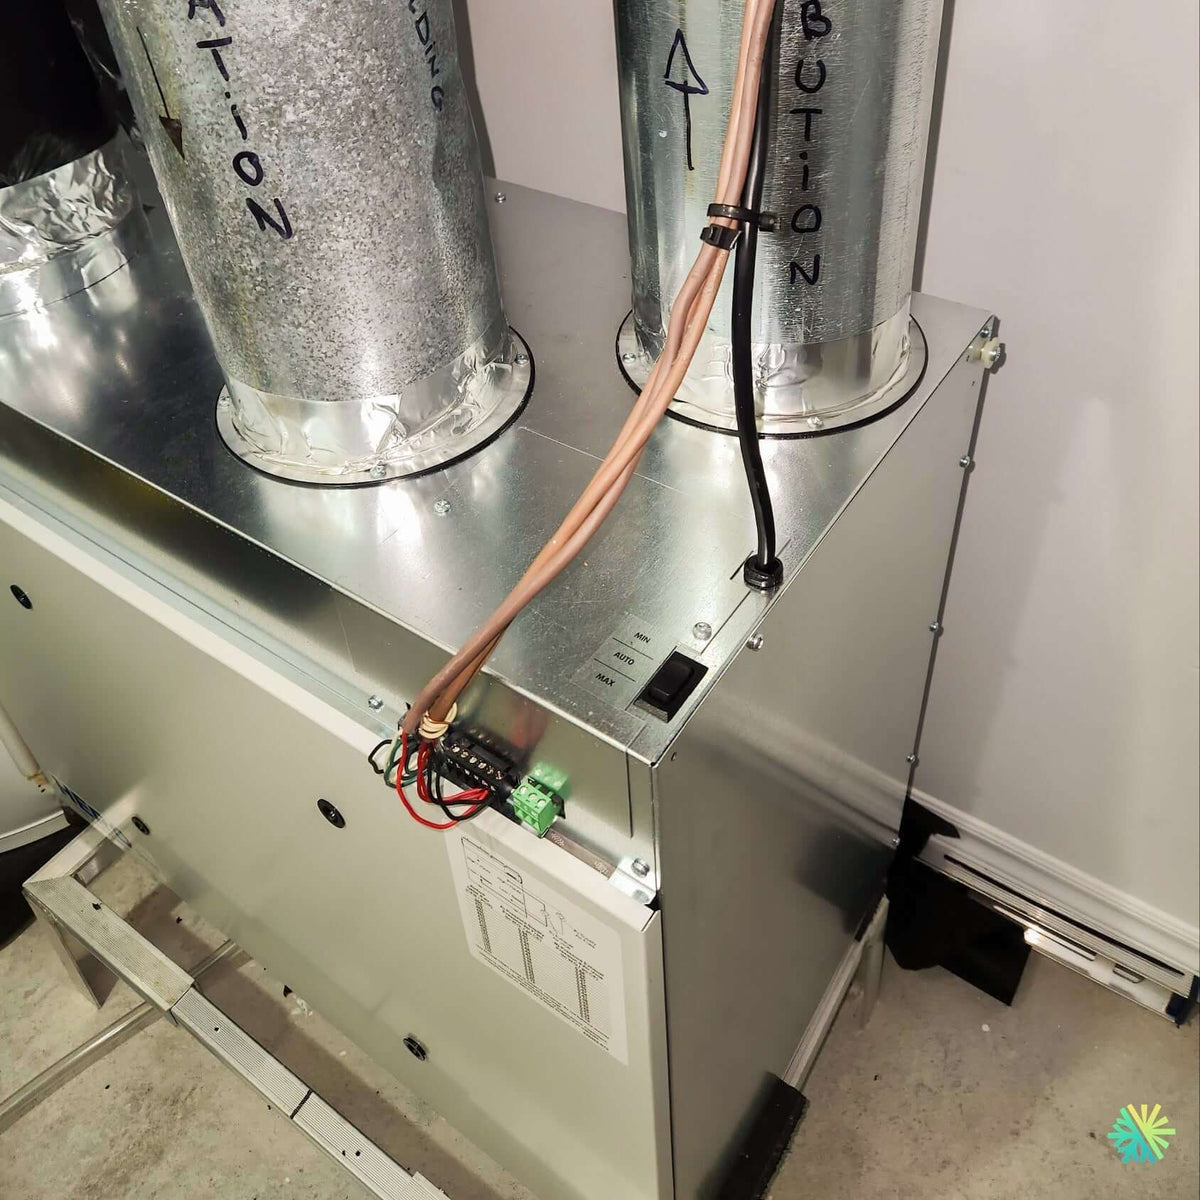
On top of the air handler installed in this mechanical room in Rosemont–La Petite-Patrie, there is a small toggle switch and three words printed on the sheet metal: MIN, AUTO, MAX. It is two centimeters long. Most homeowners do not know it exists. Yet it determines whether the fresh air supplied by an air exchanger reaches the bedrooms or circulates in circles inside a sheet-metal plenum in the basement.
We begin this article here because it is the kind of detail that appears in no brochure and explains most of the service calls we receive six months after an installation done by someone else. The customer says: “The unit is running, I can hear it, but nothing has changed upstairs.” Nine times out of ten, the cause is electrical, not mechanical.
Here is how we approached the project.
The Building and the Demand
A 1930s triplex in the area, converted into two large units and fully renovated: insulation redone from the inside, windows replaced, new partitions, and above all, the addition of a central system with new ductwork in the basement. The air handler sits on an aluminum frame, resting on anti-vibration pads, with its two large ducts identified in marker on the sheet metal: intake, from building on one side, distribution, to building on the other, with a flow-direction arrow drawn by hand on the latter.
Thermal comfort was under control. Air quality was not. After the renovation, the building had become airtight enough that the moisture produced by two households—showers, cooking, laundry, breathing—no longer had anywhere to escape. The result in February: condensation on the windows at waking, and a bathroom in the rear unit that remained damp all day.
At AirGreen, we installed a FANTECH HERO 200H, connected to the existing central ductwork.
Why the HERO 200H
- Airflow: 76 to 203 cfm at 0.4 in. w.g. Two units, six livable rooms each: capacity was essential, and above all, enough headroom to ramp up when both bathrooms are in use at the same time in the morning.
- Sensible recovery efficiency: 80% at 0 °C, 67% at -25 °C, adjusted efficiency of 88%. The figure at -25 °C is the one to watch in Montreal. Performance that collapses below -15 °C is worthless in a building that faces its real demands in January and February.
- Six-inch round connections on top, four collars, 120 V single-phase, 2.0 A maximum.
- Power consumption: 98 W at low speed, 210 W at high speed.
- Dimensions and weight: 24 7/8 in × 27 7/8 in × 15 3/8 in, 59 lb, suspended from the joists by chains.
- Recirculation defrost, which is the entry requirement whenever an HRV is connected to a central air-handling unit: these models have a mechanical backdraft damper interlocked with the unit that closes the outdoor-air duct when the HRV is off. Without it, the central fan draws raw outdoor air through a switched-off unit.
The electrical connection, explained in detail
This is the part of the trade that popular articles avoid, and it is exactly what makes the difference between an installation that works and one that merely decorates the basement.
The low-voltage terminal block and the green connector
On the front of the air-handling unit, next to the cable grommet, there is a screw terminal block where the control wires connect, and a three-position green plug-in connector. This is the entry point for everything that must control the central fan: the thermostat and—in our case—the HRV.
The principle of the interlock is simple to state and tedious to execute properly. When the air exchanger starts, it must close a dry contact. This contact tells the central unit's fan to run, even if the thermostat is not calling for heating or cooling. The fresh air tempered by the HRV is thus picked up by the central duct network and distributed to every room, instead of stagnating in the plenum.
We run this contact in low-voltage control cable, neatly stapled, separated from power lines, and label it at both ends. Five extra minutes, and the next technician knows what they are looking at.
The MIN / AUTO / MAX switch position
Let's go back to the switch from the beginning.
- In MIN, the central fan runs continuously at its lowest speed. It is comfortable, quiet, and energy-intensive year-round. Above all, in some configurations, this setting bypasses the interlock control: the fan never ramps up, and the fresh-air supply is diluted into a flow that is too weak to reach the ends of the duct network.
- In MAX, the fan runs continuously at its maximum speed. Noisy, costly, and rarely justified in a residential building.
- In AUTO, the fan responds to calls — thermostat and HRV interlock. This is the setting we leave it on, and we explain it to the homeowner before leaving.
We have seen more than one unit switched to MIN by an occupant trying to reduce noise, then left that way for three years. The HRV kept running, the meter kept turning, and fresh air no longer reached the upper floor. At an installation in Laval last year, the complete diagnosis took twelve minutes: the switch.
The question that always comes next
“Will my heat-recovery ventilator dry out the house in winter?”
An HRV exhausts the moisture produced indoors and replaces it with outdoor air, which contains very little water vapour in January. It therefore lowers indoor humidity. That is the desired outcome when windows are dripping. But in a very airtight building with strong ventilation, it can lower humidity below 25%, which becomes uncomfortable for the throat, skin, and wood floors.
That is why we never set an HRV to “maximum, just to be safe.” We aim for a moderate continuous setting, adjusted according to the number of occupants, with occasional boosts. The right airflow is the one that controls condensation without turning the home into a desert.
The mechanical assembly, from the plenum to the exterior exhaust hoods
Injecting fresh air into the central ductwork
Tempered fresh air was injected into the intake duct — the one labelled “from building” — a good distance upstream from the unit, so that it would mix with return air before reaching the coil and central filter. Injecting it too close to the unit sends a stream of cold air directly onto the heat exchanger, risking a drop in surface temperature and disrupting operation in heating mode.
The exhaust system, meanwhile, was installed with dedicated branches to the two bathrooms and the laundry room, rather than simply being tapped into the return. We capture moisture where it originates, not three rooms away.
The placement of exterior exhaust hoods in a dense area
Rosemont–La Petite-Patrie presents a problem that the suburbs overlook: the side walls face narrow alleys and neighbouring buildings just a few feet away. Choosing the wall for the opening is not merely cosmetic.
We systematically check what is located near the fresh-air intake:
- the neighbour's dryer vent, whose fabric-softener-laden air would end up directly in the bedrooms;
- plumbing vents;
- parking areas and driveways, for exhaust gases;
- the stale-air exhaust from the same unit, which must be clearly separated from the intake to prevent recirculation.
Both hoods were installed high enough to remain clear after a normal accumulation of snow, and the exterior ducts were insulated and vapor-sealed all the way to the unit, without interruption. Leaving one inch of uninsulated cold duct exposed is enough to wet a finished ceiling.
Condensate, commissioning, and balancing
The HRV was fitted with a trap-equipped drain, continuously sloped to the floor drain and tested with water. The unit was then commissioned and balanced with a manometer, cross-checking the pressure readings taken at the unit's test ports against the manufacturer's conversion table until the difference between supply and exhaust was less than ten percent.
In a two-unit building, this balancing has an additional consequence: a unit placed under negative pressure draws air from the neighboring unit through the stairwell and floor penetrations. Odors, noise, humidity—everything travels. Balance is not an engineering refinement; it is what keeps two households independent.
Two days of work, with the central system left entirely intact.
What we label in a mechanical room before leaving the site
The black marker on the galvanized sheet metal is not merely decorative. On this job and on the others, each main duct has its function written by hand, with an arrow indicating the direction of airflow. Three reasons:
- Future diagnostics. A technician entering an unfamiliar mechanical room can easily lose twenty minutes tracing a network. Those twenty minutes are billed to the client.
- Error prevention. Reversing a return and a supply during a unit replacement is a foolish, costly, and entirely avoidable mistake.
- Resale. A building inspector who finds an identified and documented installation reasonably concludes that the work was done properly.
We also leave the wiring diagram affixed to the front of the unit, the switch position explained verbally and in writing, and the airflow readings recorded during commissioning.
The most common mistakes when integrating an HRV with a central system
- No electrical interlock. The unit ventilates independently. Classic symptom: the bill goes up, but the air does not change.
- A model with defrosting by stopping the fan, connected to the central system. Without a backdraft damper, the outdoor air duct remains open permanently.
- Fresh-air intake too close to the coil. Poor mixing, unnecessary strain on the central unit.
- No dedicated exhaust. Bathroom humidity crosses the entire floor before reaching the HRV.
- A drain without a trap. The unit draws air through the drain line and brings the drain odor back in.
- Commissioning without measurement. Without a manometer, balancing is an opinion.
Applicable rebates
The Québec government's Rénoclimat program provides assistance of $500 for installing or replacing an HRV or ERV, provided the unit is certified by the Home Ventilating Institute (HVI) and an energy evaluation is performed before and after the work, with the initial evaluation completed before the project begins. No retroactive applications are accepted. Provincial program conditions and amounts change from year to year; we recommend verifying them when planning the work.
Required maintenance
- Every three months: clean or replace the HRV filters, and check the central unit's filter as well, which now operates with an additional supply of outdoor air.
- Once a year: remove the core, vacuum it, wash it with warm soapy water, and check the drain trap.
- Twice a year: clear debris from the exterior hood grilles.
Regular HVAC maintenance keeps airflow rates at their commissioning levels. It is the only way to preserve over time what the installation was paid to deliver.
AirGreen in Rosemont–La Petite-Patrie and Greater Montréal
We work every day in Rosemont–La Petite-Patrie, Villeray, Le Plateau-Mont-Royal, Ahuntsic, and all of the central boroughs of Montréal, as well as in Laval, Longueuil, the North Shore, and the South Shore. Renovated plexes, new condos, single-family homes, multi-unit buildings: we install air exchangers, heat pumps, and central systems, and connect everything so the equipment works together instead of interfering with one another.
If your home or plex already has a central system but no fresh-air supply, or if you suspect that your current air exchanger is not interlocked with the central fan, contact us. We check the wiring, measure the actual airflow rates, and give you a quantified picture of what your installation does—not what it is supposed to do.
The big day, step by step
The main steps of this kind of job at AirGreen. Every house has its quirks: the estimate brings them out.
We locate the wall for the two outdoor hoods, the unit's spot, service access and the drain.
The unit, its location and the price, in writing.
Hung or set level, with clear access to the filters and the core.
Fresh air intake and exhaust, kept apart and sealed.
The ones connected to the outside are insulated to prevent condensation inside the house.
Connected with its loop, when the unit needs one.
Installed where you will see it and use it.
Incoming and outgoing airflows are adjusted so the house is neither pressurized nor depressurized.
Speeds, filters, core: how to use it through the seasons.
- The on-site estimateWe locate the wall for the two outdoor hoods, the unit's spot, service access and the drain.
- The quoteThe unit, its location and the price, in writing.
- The unitHung or set level, with clear access to the filters and the core.
- The outdoor hoodsFresh air intake and exhaust, kept apart and sealed.
- The ductsThe ones connected to the outside are insulated to prevent condensation inside the house.
- The drainConnected with its loop, when the unit needs one.
- The wall controlInstalled where you will see it and use it.
- BalancingIncoming and outgoing airflows are adjusted so the house is neither pressurized nor depressurized.
- The walkthroughSpeeds, filters, core: how to use it through the seasons.
Four mistakes we do not make
Flip each card to see what we do instead.
Your own project, step by step
What to do, season by season
Three habits per season for this unit. They take a few minutes and prevent many calls.
- Clean the filters and core as the manufacturer specifies.
- Check the outdoor hoods: nests, debris, dampers.
- Lower the speed if the outdoor air gets humid.
- Adjust the speed to the humidity in the house.
- Check that the drain flows.
- Keep the outdoor hoods clear.
- Clean the filters before the closed-house season.
- Check the exhaust damper.
- Book a full cleaning if the unit has not had one in a long time.
- Clear snow from both outdoor hoods.
- Raise the speed if condensation appears on windows.
- Let the unit run: with the house closed, humidity builds up.
Is your home ready?
Check what applies at your place. A "no" is not a refusal: it is what we sort out during the estimate.
Four statements: true or false?
It all comes down to details you have just seen.
1. In an air exchanger, fresh air and stale air mix.
The two airflows cross in the core without mixing.
2. The two outdoor hoods must be kept apart.
Otherwise the exchanger pulls back the air it just removed.
3. An air exchanger can help with condensation on windows.
It renews the air and helps keep humidity in the right range.
4. An exchanger never needs maintenance.
Filters and core get dirty and need regular cleaning.
0 / 4 right answers
What people ask us about this kind of work
What does an air exchanger do?
Does fresh air cool the house in winter?
What speed should it run at?
Does an exchanger need cleaning?
What are the signs of poor ventilation?
HRV or ERV: what is the difference?
Should it run in winter?
Does AirGreen hold the required licences?
Is the estimate free?
No question matches. Write to us: we answer.
More jobs to see, near you
By town, by equipment or by region: browse more than 4,700 published projects.
Each dot: a town where AirGreen has published projects. The glowing dot: this job.
Every house has its constraints. We see them before we install.
The on-site estimate is free and the quote follows within 24 hours.
Text and photo: a real AirGreen Climatisation & Chauffage job. The diagrams are generic illustrations of the type of installation, not a survey of this job site. Sources of the added figures: airgreen.ca product pages (NEEP / AHRI performance), Hydro-Québec (Heat pumps page, LogisVert, read on 13 October 2026), Régie de l’énergie (rate D as of 1 April 2026).