
Installation of a vänEE V150H75NT air exchanger (AI series, Virtuo technology) in Saint-Stanislas-de-Kostka, Montérégie
A finished basement at 59% humidity, a suspended ceiling, and a radon test: here’s how we installed a vänEE V150H75NT HRV in Saint-Stanislas-de-Kostka. An accessible wooden cradle, ducts sealed with aluminum tape, and a dehumidistat adjusted according to the season.
Take a tour of the installation
Each number is a point we check on site. Switch between summer and winter to watch air and heat move.
Generic illustration of this type of installation, not a survey of this job site. Tap a number.
It removes stale air and brings in fresh air. The two airflows cross in the core without mixing.
It recovers part of the heat from the outgoing air to temper the incoming air. Depending on the model, it also manages humidity.
An outdoor hood, kept away from the exhaust so the house does not pull back the air it just removed.
Humid, stale air leaves through its own hood, fitted with a damper.
The ducts that connect to the outside are insulated to prevent condensation inside the house.
Stale air is drawn from humid rooms and fresh air is sent to living areas. The airflows are balanced.
It sets the mode and speed. You use it more when the house is humid or full of people.
Depending on the model and the season, the core produces condensation, removed through a drain with its loop.
A finished basement, a suspended ceiling, and a unit that must be accessible ten years from now
Saint-Stanislas-de-Kostka occupies a unique position in Montérégie: wedged between Lake Saint-François, the Saint-Louis River, and the Beauharnois Canal, the municipality is built on low-lying land, barely a few meters above the water level. Basements there are close to the water table, sump pumps are part of the scenery, and homeowners who finish their basements do so knowing that they are entering into a permanent negotiation with soil moisture.
The project discussed here fits exactly within that logic. A single-story home in the village area, with a basement fully finished a few years earlier—family room, guest bedroom, laundry room—and an acoustic tile suspended ceiling concealing the building's mechanical systems. No mechanical ventilation apart from the bathroom fans.
The client called us for a specific and sensible reason: he had his home tested for radon, and the result made him think.
Three reasons to ventilate a finished basement in this area
Moisture coming from the ground
A concrete slab is not watertight. Even when sound and properly poured, it allows water vapor to migrate by capillary action from saturated soil. As long as the basement remains unfinished and empty, this moisture is diluted in a large volume of air. The day you add partitions, a floating floor, a suspended ceiling, and furniture, it becomes concentrated in the materials.
Our readings in this home, taken in March: 59% relative humidity in the basement, 48% on the main floor, with only a three-degree temperature difference between the two levels. A humidity difference of this magnitude between two floors of the same house always indicates a local source.
Radon, the reason for the call
Radon is a naturally occurring radioactive gas produced by the decay of uranium in the soil. It enters buildings through cracks in the slab, foundation wall joints, pipe penetrations, and sump pits. It is odorless and colorless, and Health Canada classifies it as the second-leading cause of lung cancer in the country.
The Canadian guideline is 200 Bq/m³ for the annual average concentration in normally occupied areas of a home. Above this threshold, corrective measures are recommended.
Two technical details that we systematically share with our clients because they are often misunderstood:
- The test must be long-term—at least three months, ideally during the heating season, when the windows remain closed. A test lasting only a few days does not provide a usable reading.
- An air exchanger is not a radon mitigation system. Balanced mechanical ventilation helps dilute concentrations and prevents the basement from becoming depressurized, which actively draws gas in from the soil. But when measurements clearly exceed the guideline, the standard solution remains active sub-slab depressurization, installed by a certified specialist. We never sell an air exchanger as a cure for radon—we install it as one component of a comprehensive system.
In this case, the client's measurement was below the intervention threshold, but close enough to justify not leaving the basement permanently depressurized.
The airtightness of recent renovations
The third factor is the most mundane, and the most universal. Every well-executed renovation reduces a building's air leaks. Replaced windows, weatherstripping, foundation-wall insulation, and sealing around wire penetrations: the house loses its accidental ventilation without anyone providing intentional ventilation.
The unit: vänEE V150H75NT, AI series
| Feature | vänEE V150H75NT |
|---|---|
| Type | HRV (heat recovery ventilator), AI series |
| Airflow range | 35 to 150 cfm |
| Sensible Recovery Efficiency (SRE) | 82 % |
| Connections | 5 in., on top of the unit |
| Motorization | High-efficiency ECM PMSM motors |
| Dampers | Integrated motorized dampers |
| Filtration | Washable MERV 8 interior filters |
| Certifications | HVI certified, ENERGY STAR |
| Platform | Virtuo Air Technology, interchangeable Broan / Venmar / vänEE controls |
Humidity control, the feature we almost always overlook
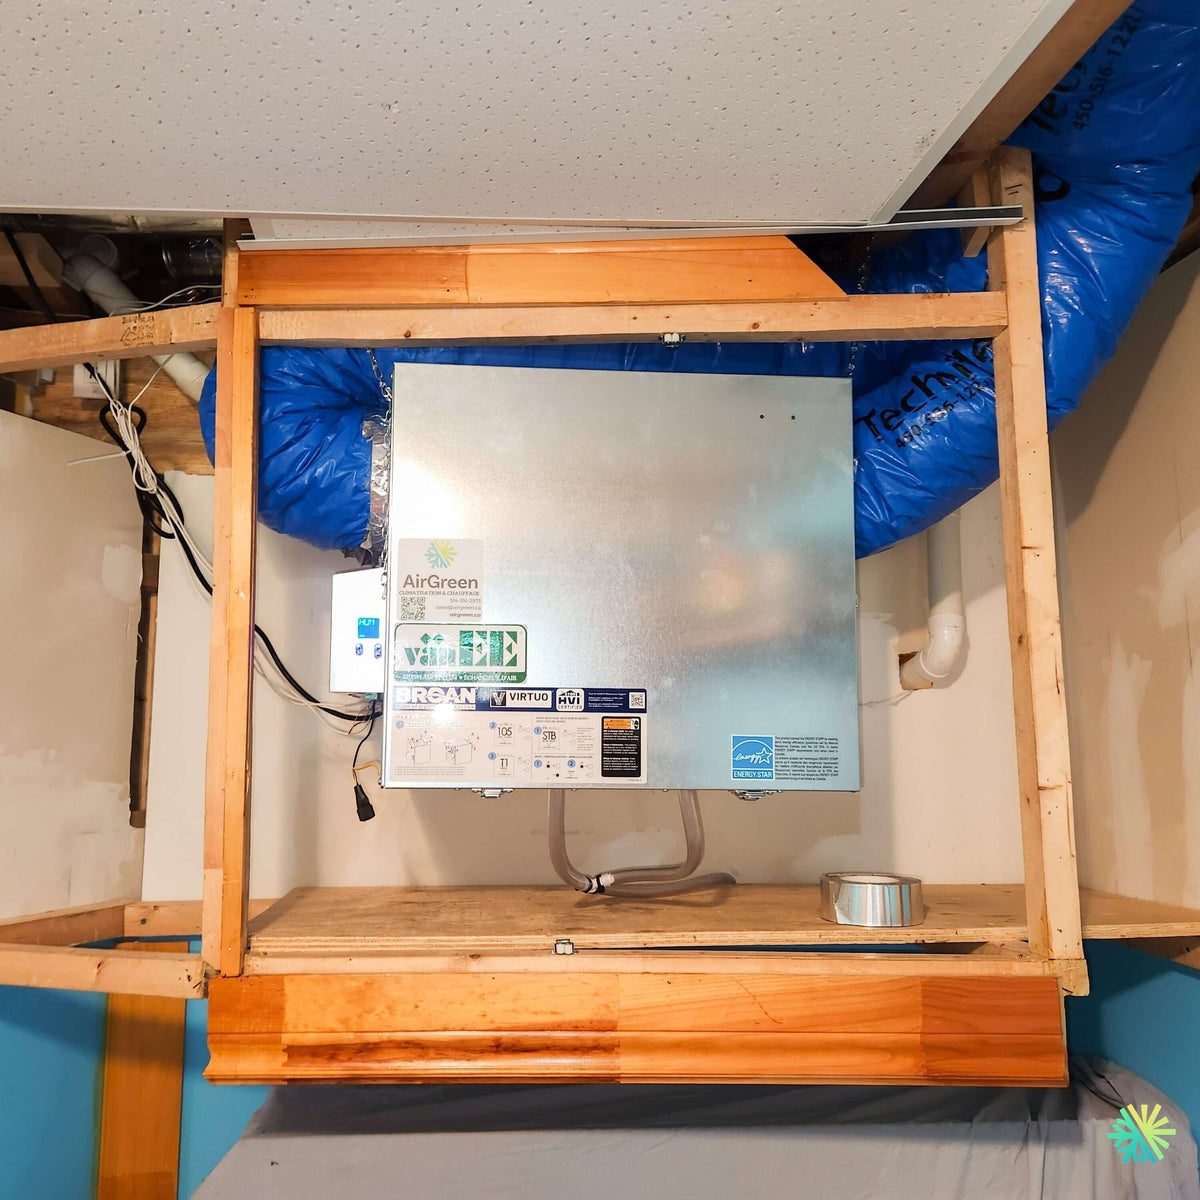
In the site photo, the control mounted to the left of the unit displays HUM: humidity-control mode. This is the function that transforms an air exchanger from a passive appliance into an active building regulator.
The principle is simple: the humidistat monitors indoor relative humidity and switches the unit to high speed as soon as the set threshold is exceeded, then returns it to continuous operation once the setpoint is reached. The homeowner does not have to do anything.
Where almost all installations fail is in setting the threshold. A fixed setting of 40% left in place all year produces either condensation in January or unnecessarily dry air in November.
Adjusting the humidistat according to the season: the table we provide to our clients
The maximum humidity a house can tolerate without condensation depends directly on the outdoor temperature. The colder it is outside, the colder the interior surface of the windows, and the lower the threshold must be.
| Outdoor temperature | Relative humidity setting |
|---|---|
| 0 °C and above | 40 % |
| -5 °C | 35 % |
| -10 °C | 30 % |
| -20 °C | 25 % |
| -30 °C | 20 % |
Three practical guidelines accompany this table:
- Condensation at the bottom of the windows is the best indicator. If it appears, the setting is 5% too high.
- The setting is checked twice each winter, at the beginning of the season and during the first intense cold snap.
- In summer, the setting is raised to 50%, or humidity mode is disabled in favor of continuous operation, since the summer objective is air quality rather than condensation control.
It is a three-minute adjustment we make during commissioning, then explain to the client until they can do it themselves.
The project: integrating a mechanical unit into a finished basement
1. A wooden cradle designed like a piece of cabinetry
The suspended ceiling could not support the unit, and demolishing a section of tiles to screw in an improvised support was out of the question. We built an independent wooden cradle, anchored to the upper floor structure, with a plywood platform at the bottom and a perimeter frame.
What sets this project apart: the frame was finished with varnished wood trim, aligned with the suspended ceiling grid. Viewed from the family room, the whole assembly does not look like an exposed mechanical repair, but rather like an intentional enclosure.
This choice is not merely aesthetic. A unit concealed behind screwed-in tiles or enclosed drywall becomes a unit that is no longer opened. By keeping access permanent and presentable, we directly increase the likelihood that the interior filters will actually be washed every three months.
2. Chain suspension inside the cradle
The unit is suspended by the vänEE kit chain inside the cradle, rather than screwed to the wood. The mechanical decoupling prevents the motor hum from being transmitted to the frame, then to the ceiling, and finally to the guest bedroom three metres away.
We checked the unit's plumb in both axes before permanently securing it: a tilted cabinet retains water in its condensate pan.
3. Working around the existing plumbing
A PVC drain stack runs through the space to the right of the unit, with an elbow a few centimeters from the cabinet. This is the reality in most finished basements: the mechanical equipment arrives last, in the space left by the other trades.
Our method in these situations:
- Service clearance takes priority over compactness. We offset the unit rather than placing it against a pipe, even if that means extending a duct by two feet.
- No duct rests on the plumbing. A duct laid on a drainpipe transmits the sound of running water throughout the ventilation system.
- The routing is documented and photographed before closure, then provided to the client. If a plumber needs to intervene later, they will know what is behind the finish.
4. Insulated ducts, sealed with aluminum tape
All four connections are on top. The insulated flexible ducts with vapor barriers run vertically, then branch through the ceiling cavity toward the exterior hoods and the return and supply points.
Every connection is sealed with aluminum tape — the roll is visible on the equipment platform, placed there after crimping the last collar. Ordinary cloth duct tape dries out and peels off within three basement winters. Aluminum tape remains airtight throughout the installation's service life.
Three rules applied to this system, as on all our projects in Montréal, Laval, Longueuil, the North Shore, and the South Shore:
- Ducts kept taut, never wavy.
- Supports spaced no more than 1.2 m apart, with wide straps.
- Proper bend radii maintained, even if that means rethinking the routing.
5. The condensate drain, mounted on a shelf
Condensate exits from the bottom of the unit. We formed a clearly visible U-shaped trap, connected with a mechanical connector, then routed the line to the nearest drain with a continuous slope.
The trap sits on the equipment platform, accessible in thirty seconds. This is intentional: in a heated, dry basement, the water in a trap can evaporate during a few weeks of extreme cold, and it must then be possible to prime it again without dismantling anything.
6. Wiring and identification
The unit is powered by a dedicated outlet, with a separate ground connection and a cord clear of the duct path. The low-voltage wiring for the wall control runs up to the main floor through an existing wire passage.
Our AirGreen identification plate—phone number, email, and QR code—is affixed to the front. Ten years from now, whoever opens this enclosure will know who did the work and how to reach us.
The mistakes we correct most often in Montérégie
- The unit enclosed behind a closed ceiling or screwed-in tiles. Maintenance becomes a construction project, so it never gets done.
- The humidistat set once and never adjusted, with condensation guaranteed as soon as the first cold snap arrives.
- The unit connected to a circuit controlled by a switch, so it is off most of the time.
- The dryer or range hood connected to the air exchanger's ductwork. Lint and grease saturate the core. Dedicated exhaust, without exception.
- Ducts resting on plumbing or joists, transmitting noise.
- A missing or inaccessible drain trap.
- The shortcut of using cloth duct tape instead of aluminum tape.
What we take away for all finished basements in Greater Montreal
Five months after commissioning, the basement's relative humidity remained between 37% and 43%, depending on the season, compared with 59% before the work. The client noted that the guest room, which had previously been cool and slightly damp, had become usable without a portable dehumidifier. A new long-term radon test was started during the following heating season, with a documented comparison point now available.
Applicable rebates
The Quebec government's Rénoclimat program provides financial assistance of approximately $500 for installing or replacing an HRV or an ERV, provided that the unit is listed in the Home Ventilating Institute (HVI) certified products directory. HVI certification appears directly on the V150H75NT rating plate.
The two procedural requirements not to overlook:
- The initial energy assessment must take place before work begins. An assessment conducted afterward makes the application ineligible.
- A post-work assessment is required to trigger the payment.
Amounts and criteria are periodically revised by the government. We verify eligibility with each customer when preparing the estimate rather than announcing a figure that may have changed.
Maintenance for an AI series unit
- Every 3 months: wash the indoor MERV 8 filters in warm, soapy water, dry them completely, and reinstall them. Then check the displayed airflow: returning to the setpoint confirms that the ductwork is clear.
- Once a year: rinse the recovery core, reprime the trap, and inspect the chain and cradle.
- Twice a year: clean the outdoor hoods and remove leaves, nests, and ice.
- Twice each winter: adjust the dehumidistat setting according to the seasonal chart.
Why entrust your ventilation to AirGreen
We design, install, and maintain heating, ventilation, and air conditioning systems across Greater Montreal with more than fifteen teams on the road. Our service area covers Montreal, Laval, Longueuil, the North Shore, the South Shore, and all of Montérégie, extending to the municipalities of Beauharnois-Salaberry and Haut-Saint-Laurent: Saint-Stanislas-de-Kostka, Salaberry-de-Valleyfield, Sainte-Barbe, Saint-Louis-de-Gonzague, Howick, and Ormstown.
What we bring to a residential ventilation HVAC installation:
- A measured assessment before any recommendation: humidity, differences between floors, and the condition of the existing ductwork.
- Compliant sizing meeting Quebec's residential ventilation requirements.
- Custom-built and finished supports, adapted to finished basements and suspended ceilings.
- Humidity control settings explained to the customer, with the seasonal chart provided in writing.
- Documented commissioning, supported by actual airflow measurements.
- A team holding an RBQ licence, along with complete support for subsidy applications.
- A HVAC maintenance and repair service in the years that follow.
If your finished basement remains damp, your windows run with condensation in January, or a radon test has raised questions about your home's ventilation, these factors can be measured in a single visit. Contact AirGreen: we take the readings, explain what your building requires, and provide you with a clear, itemized plan.
The big day, step by step
The main steps of this kind of job at AirGreen. Every house has its quirks: the estimate brings them out.
We locate the wall for the two outdoor hoods, the unit's spot, service access and the drain.
The unit, its location and the price, in writing.
Hung or set level, with clear access to the filters and the core.
Fresh air intake and exhaust, kept apart and sealed.
The ones connected to the outside are insulated to prevent condensation inside the house.
Connected with its loop, when the unit needs one.
Installed where you will see it and use it.
Incoming and outgoing airflows are adjusted so the house is neither pressurized nor depressurized.
Speeds, filters, core: how to use it through the seasons.
- The on-site estimateWe locate the wall for the two outdoor hoods, the unit's spot, service access and the drain.
- The quoteThe unit, its location and the price, in writing.
- The unitHung or set level, with clear access to the filters and the core.
- The outdoor hoodsFresh air intake and exhaust, kept apart and sealed.
- The ductsThe ones connected to the outside are insulated to prevent condensation inside the house.
- The drainConnected with its loop, when the unit needs one.
- The wall controlInstalled where you will see it and use it.
- BalancingIncoming and outgoing airflows are adjusted so the house is neither pressurized nor depressurized.
- The walkthroughSpeeds, filters, core: how to use it through the seasons.
Four mistakes we do not make
Flip each card to see what we do instead.
Your own project, step by step
What to do, season by season
Three habits per season for this unit. They take a few minutes and prevent many calls.
- Clean the filters and core as the manufacturer specifies.
- Check the outdoor hoods: nests, debris, dampers.
- Lower the speed if the outdoor air gets humid.
- Adjust the speed to the humidity in the house.
- Check that the drain flows.
- Keep the outdoor hoods clear.
- Clean the filters before the closed-house season.
- Check the exhaust damper.
- Book a full cleaning if the unit has not had one in a long time.
- Clear snow from both outdoor hoods.
- Raise the speed if condensation appears on windows.
- Let the unit run: with the house closed, humidity builds up.
Is your home ready?
Check what applies at your place. A "no" is not a refusal: it is what we sort out during the estimate.
Four statements: true or false?
It all comes down to details you have just seen.
1. In an air exchanger, fresh air and stale air mix.
The two airflows cross in the core without mixing.
2. The two outdoor hoods must be kept apart.
Otherwise the exchanger pulls back the air it just removed.
3. An air exchanger can help with condensation on windows.
It renews the air and helps keep humidity in the right range.
4. An exchanger never needs maintenance.
Filters and core get dirty and need regular cleaning.
0 / 4 right answers
What people ask us about this kind of work
What does an air exchanger do?
Does fresh air cool the house in winter?
What speed should it run at?
Does an exchanger need cleaning?
What are the signs of poor ventilation?
HRV or ERV: what is the difference?
Should it run in winter?
Does AirGreen hold the required licences?
Is the estimate free?
No question matches. Write to us: we answer.
More jobs to see, near you
By town, by equipment or by region: browse more than 4,700 published projects.
Each dot: a town where AirGreen has published projects. The glowing dot: this job.
Every house has its constraints. We see them before we install.
The on-site estimate is free and the quote follows within 24 hours.
Text and photo: a real AirGreen Climatisation & Chauffage job. The diagrams are generic illustrations of the type of installation, not a survey of this job site. Sources of the added figures: airgreen.ca product pages (NEEP / AHRI performance), Hydro-Québec (Heat pumps page, LogisVert, read on 13 October 2026), Régie de l’énergie (rate D as of 1 April 2026).