
Installation of a Fujitsu Aquila XLTH R32 dual-zone heat pump in Delson, on Montreal’s South Shore
In Delson, AirGreen installs a Fujitsu Aquila XLTH R32 dual-zone heat pump on a wall bracket, with anti-vibration pads, precise leveling, and protection adapted to Quebec winters.
In summer, the outdoor unit rejects the house's heat outside.
Generic illustration of this type of installation, not a survey of this job site. Tap a number.
Mounted level on a wall plate, high enough for the air to reach the whole room, with enough space around it to slide the filters out easily.
The refrigerant lines, the communication cable and the drain go through the wall in a single opening, sealed against water, cold air and insects.
Two insulated copper pipes connect the two units. Outside, a line cover can protect them from sun, knocks and weather.
A shut-off switch near the outdoor unit isolates it safely for service. It must stay accessible at all times.
The compressor and the fan. In heating mode it captures heat from the outdoor air, even in winter, and moves it inside.
On the ground or on the wall, it keeps the unit above accumulated snow. The unit stays clear and defrost water can drain away.
The fan needs to blow freely. Storage, a fence or a wall too close, and efficiency drops while noise goes up.
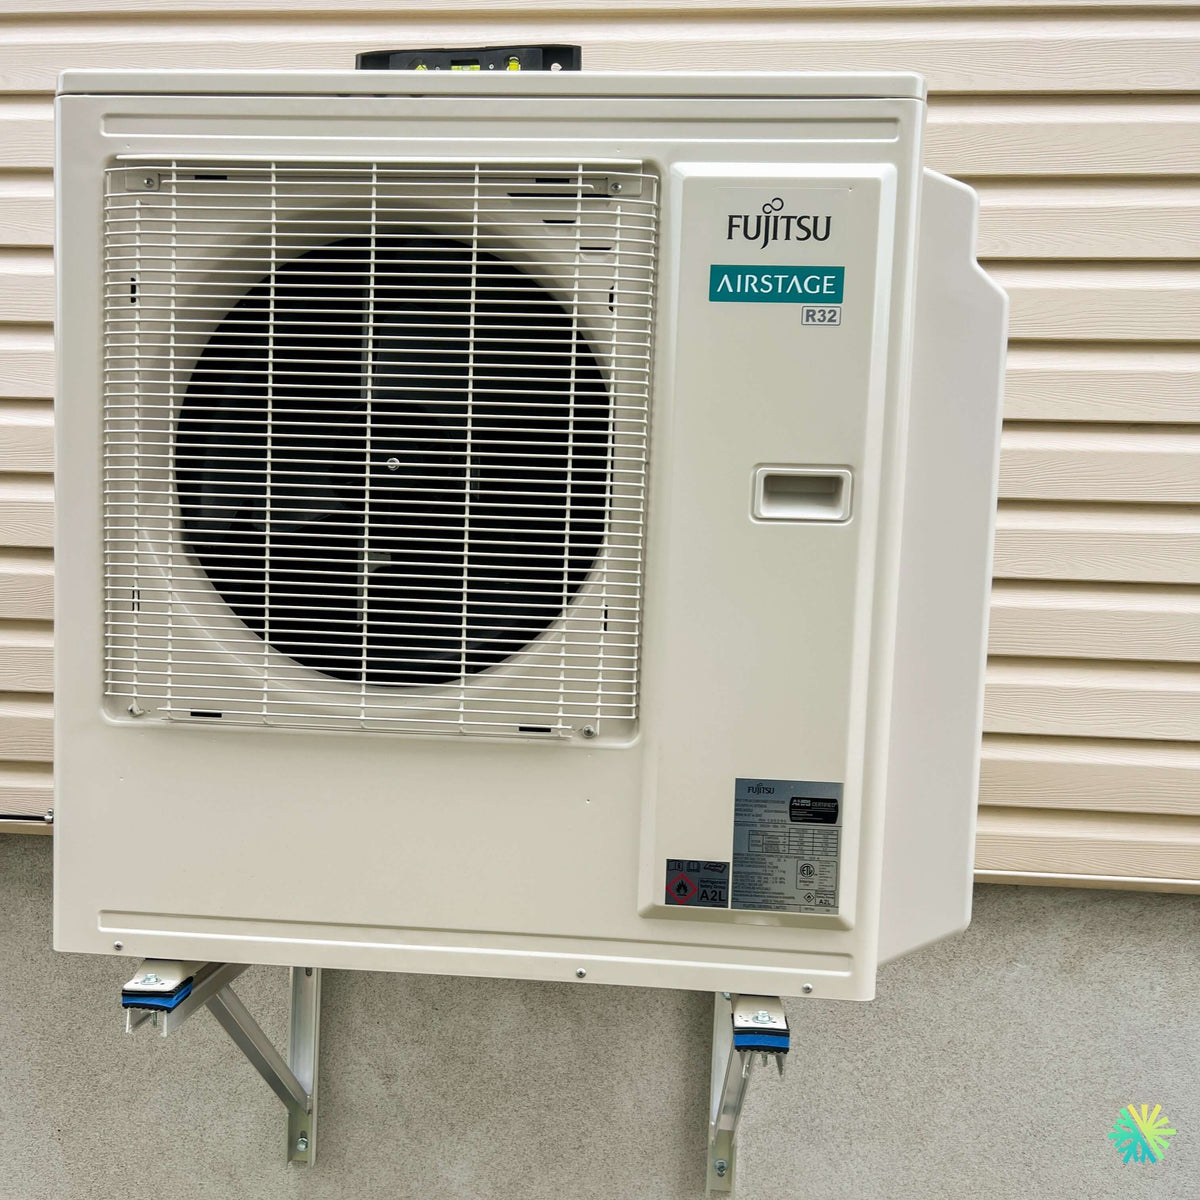
An outdoor unit precisely installed on a wall bracket to better withstand Delson’s winter conditions
In Delson, on the South Shore of Montreal, we completed the installation of a Fujitsu Aquila XLTH dual-zone heat pump designed to heat and cool two distinct areas of the residence using a single outdoor unit. The project photograph highlights a fundamental aspect of our work at AirGreen: the quality of an installation is measured not only by the performance of the selected equipment, but also by the precision of the assembly, the stability of the support, and the accessibility of the components for years to come.
The Fujitsu AIRSTAGE R32 outdoor unit was mounted on a metal wall bracket anchored to the foundation. Blue anti-vibration pads were placed beneath the machine’s support points. A level is visible above the unit during the work, illustrating an essential installation step: we must confirm that the appliance is positioned correctly before finalizing the connections.
The exterior wall has two distinct materials: horizontal siding in the upper section and a stucco-covered foundation in the lower section. This configuration requires careful selection of the mounting points. The support must never rely solely on decorative siding. It must transfer the weight of the unit to a stable, suitable structure.
This heat pump installation in Delson was therefore designed to meet several objectives:
- keep the unit above snow and ice;
- limit the transmission of vibrations to the building;
- maintain sufficient clearance around the unit;
- make cleaning and maintenance easier;
- protect the refrigerant and electrical connections;
- provide two comfort zones without multiplying the number of outdoor units.
Why a dual-zone heat pump was suitable for this residence
A dual-zone heat pump uses a single outdoor unit to power two indoor units. Each indoor unit can be installed in a different space and controlled separately.
This configuration is particularly relevant when a home includes two areas with different needs, for example:
- a ground floor and an upper floor;
- an open-plan area and a bedroom;
- a room highly exposed to sunlight and a more shaded area;
- an extension and the main part of the residence;
- two distant spaces separated by a hallway or staircase;
- an area that is poorly served by the existing heating system.
In many homes in Delson, a single wall-mounted unit placed in a central area is not enough to ensure an even temperature. The conditioned air must pass through doors, partitions, and sometimes a change in level. By distributing the work between two indoor units, we can better target the spaces that are actually occupied.
The dual-zone system also helps reduce the amount of equipment outside. Rather than installing two separate condensers, we use a single multi-zone outdoor unit.
A clearly identified R32 Fujitsu AIRSTAGE unit
The photo clearly shows the Fujitsu, AIRSTAGE, and R32 markings on the front of the outdoor unit.
R32 is a refrigerant used in several recent HVAC systems. Its use requires appropriate procedures, instruments, and practices. The safety label visible on the nameplate also indicates the classification A2L, which is a mildly flammable refrigerant.
This characteristic should not be dramatized, but it must be taken seriously by the installer. An R32 installation requires, among other things:
- the use of compatible tools;
- appropriate ventilation during the work;
- precisely prepared refrigerant connections;
- a thorough leak check;
- a complete vacuum evacuation;
- compliance with the manufacturer’s requirements;
- commissioning performed by qualified technicians.
We never treat an R32 installation as a simple automatic replacement for an older system. The piping diameters, permitted lengths, refrigerant quantity, and electrical requirements must be confirmed for the exact model.
The wall bracket: a solution suited to Quebec winters
The Fujitsu unit was installed on a metal wall bracket rather than on a slab placed on the ground.
This decision offers several advantages for a residence on the South Shore.
Better protection against snow
An outdoor unit installed too low can quickly become surrounded by snow after a storm. If the heat exchanger or the lower part of the chassis is blocked, airflow decreases and the system may lose efficiency.
The wall-mounted support keeps the heat pump at a height that facilitates snow removal and reduces the risk of it being buried.
Better management of defrost water
During winter, the heat pump accumulates frost on its outdoor heat exchanger. It must periodically perform a defrost cycle to melt this buildup.
The water produced falls beneath the unit. An installation that is too close to the ground can gradually end up above a block of ice.
Raising the unit provides more space for drainage, although the ground and the area beneath the unit must still be monitored.
An installation independent of ground movement
Freeze-thaw cycles can shift some bases placed directly on the ground. A support properly secured to the foundation reduces this risk.
Stability nevertheless depends on the quality of the anchors, the building’s structure, and the choice of support.
Visible anti-vibration pads beneath the unit
The photograph shows blue pads installed beneath the feet of the outdoor unit.
These components serve an important purpose. The compressor and fan naturally produce some vibration during operation. When the unit is attached to the structure, part of this vibration can be transmitted to the building.
Under certain conditions, occupants may perceive a humming sound in a room on the other side of the wall, particularly at night.
Anti-vibration pads help limit this transmission. However, their effectiveness depends on the installation as a whole:
- rigidity of the support;
- quality of the anchors;
- leveling of the machine;
- position of the lines;
- contact with the wall;
- tightness of the fasteners;
- proximity to bedrooms.
We also check that the refrigerant lines are not rubbing directly against the foundation, since this contact can become another path for noise transmission.
Leveling the unit is not merely an aesthetic detail
The visible level above the heat pump reflects an important stage of the installation.
An outdoor unit must be positioned correctly for several reasons:
- ensure good mechanical stability;
- avoid uneven loads on the support points;
- maintain the frame’s geometry;
- facilitate the drainage specified by the manufacturer;
- achieve a clean finish;
- limit abnormal vibrations.
We do not rely solely on the lines of the exterior cladding. A façade can appear straight while having a slight slope, and the foundation parging can be uneven.
We therefore use a level before permanently tightening the fasteners.
A mounting system that respects the façade materials
The upper part of the wall is covered with horizontal siding. The lower part consists of a foundation covered with stucco.
The heat pump support must not be anchored only in the siding. The siding protects and covers the building, but is not necessarily designed to support the weight and vibrations of an outdoor unit.
We must locate a load-bearing structure and choose anchors suited to the material encountered.
An improperly designed mounting system can lead to:
- sagging of the support;
- excessive vibration;
- cracks in the stucco;
- deformation of the siding;
- misalignment of the unit;
- noise transmitted to the residence.
Our method consists of assessing the wall before drilling, selecting suitable anchor points, and checking the final rigidity of the support.
The technical characteristics and design decisions behind this multi-zone installation
Fujitsu Aquila XLTH: a range designed for multiple combinations
The Fujitsu AIRSTAGE Aquila range belongs to the H-series multi-zone systems. According to the documentation provided, Fujitsu offers 18,000, 24,000, 36,000, and 45,000 BTU/h outdoor units that can be combined with different indoor units.
Compatible unit types include:
- wall-mounted models;
- Slim Duct units;
- compact cassettes;
- Mid Static Duct units.
For a dual-zone configuration, the 18,000 BTU/h outdoor unit can be connected to two compatible indoor units. Page 2 of the Fujitsu document presents various combinations using 7,000, 9,000, 12,000, and 15,000 BTU/h units.
However, the photo does not make it possible to confirm with certainty the exact capacity of the installed unit. The outdoor dimensions may be similar from one model to another. The capacity must be verified using the complete model number, the quotation, and the nameplate.
Heating designed for cold conditions
The Aquila series documentation indicates that the cold-climate versions can operate in heating mode down to -26 °C.
This information is particularly important in Delson, where winter temperatures require a heat pump capable of continuing to produce heat well below freezing.
However, three concepts must be distinguished:
- the minimum operating temperature;
- the capacity actually available at that temperature;
- the residence’s heating load.
The fact that a unit can operate down to -26 °C does not automatically mean that it will cover 100% of each home’s heat loss on its own at that temperature.
We must consider insulation, windows, airtightness, and the auxiliary heating system.
Sizing is not limited to floor area
To select a dual-zone heat pump, we analyze each space separately.
The main factors include:
- floor area;
- ceiling height;
- the number of windows;
- solar orientation;
- insulation;
- the age of the building;
- exposed walls;
- air infiltration;
- the number of occupants;
- the presence of an open staircase;
- airflow between the zones.
Two 400 sq. ft. rooms may require different capacities. An open-plan area with several west-facing windows may accumulate much more heat than a shaded bedroom.
An oversized system may reach the setpoint quickly and run excessively short cycles. In cooling mode, this can reduce dehumidification.
An undersized system may run continuously without achieving the requested comfort during extreme conditions.
Understanding combinations exceeding 100% capacity
In some multi-zone configurations, the combined rated capacities of the indoor units may exceed the outdoor unit’s rated capacity.
Fujitsu indicates a connection capacity of up to 130 % may be permitted depending on the combination. However, the manufacturer clearly states that exceeding 100% does not increase the system’s maximum output.
For example, two indoor units may be technically compatible with an outdoor unit whose rated capacity is lower than their combined capacity. This configuration may be appropriate when the two zones do not reach their maximum load at the same time.
However, if both areas simultaneously demand their full capacity, the outdoor unit distributes its capacity between them.
An approved combination is not a load calculation
The manufacturer’s charts are used to confirm permitted combinations between units. They do not automatically determine the appropriate capacity for a home.
The documentation specifies that Fujitsu’s “Design Simulator” software should be used to select equipment for the H series.
Two separately controlled zones, but one shared mode
Each indoor unit can be controlled individually. Occupants can adjust separately:
- temperature;
- fan speed;
- shutters;
- schedules;
- startup.
The two units nevertheless share the same refrigerant circuit. They generally must operate in the same primary mode.
The system can heat both zones or cool them, but it normally cannot provide heating in one room while the other simultaneously calls for cooling.
Fujitsu documentation states that the system provides heating and cooling, but not both simultaneously.
This feature should be explained to occupants to avoid conflicting commands from the remote controls.
Inverter modulation in a dual-zone application
The inverter-driven compressor adjusts its speed according to demand.
When only one indoor unit is operating, the system can reduce its output. When both zones require more heating or cooling, it can gradually increase its operating rate.
This modulation promotes:
- more stable temperatures;
- longer cycles;
- fewer abrupt startups;
- quieter operation at partial load;
- consumption better suited to demand.
In a dual-zone installation, this flexibility is particularly useful because the two areas are not necessarily occupied at the same time.
Protecting the refrigerant lines
Although the lines are not visible in the front-facing photograph, they must be connected to the service side of the outdoor unit and protected along their route.
The system generally includes:
- two sets of copper piping;
- insulation;
- communication cables;
- certain electrical components;
- drainage from the indoor units.
In a multi-zone installation, each indoor unit has its own connection circuit to the outdoor unit.
Proper protection prevents:
- deterioration of the insulation;
- damage caused by ultraviolet rays;
- tool impacts;
- animal bites;
- water infiltration;
- thermal losses.
A complete commissioning after installation
Physically securing the unit is only part of the work.
Before startup, we notably perform:
- checking the refrigerant connections;
- a leak test;
- a vacuum evacuation;
- checking the electrical power supply;
- confirming communication between the units;
- starting each zone;
- measuring system behavior;
- inspecting vibrations and noises;
- checking the indoor drainage.
Vacuum evacuation is essential for removing air and moisture from the lines. Rushing the commissioning process can affect compressor reliability and system performance.
Mistakes to Avoid with This Type of Outdoor Installation
Secure the unit only to the cladding
Exterior cladding is not necessarily load-bearing. The bracket must be anchored to an appropriate structure.
Install the unit too close to the ground
Snow, ice, and debris can obstruct the heat exchanger or drainage.
Neglect leveling
A tilted unit may be less stable and result in a poor finish.
Omit anti-vibration components
An overly rigid mounting can transmit more noise into the building.
Block the service side
The technician must be able to access the components and connections without dismantling permanent structures.
Enclose the unit under a poorly designed shelter
An enclosure that is too closed can cause discharged air to recirculate and reduce performance.
Push snow in front of the fan
The front clearance must remain unobstructed throughout the winter.
Recommended Maintenance After Installation
The owner must keep the area around the unit clear.
We specifically recommend:
- remove leaves and debris;
- trim vegetation around the bracket;
- clear snow after storms;
- do not place objects against the grille;
- monitor ice buildup;
- keep access to the service panel;
- visually inspect the pads and bracket.
Inside, the filters of both units must be cleaned regularly. A clogged filter reduces airflow and may make it seem as though the system lacks capacity.
An Installation Designed to Last in Delson
This Fujitsu Aquila XLTH dual-zone heat pump installation in Delson highlights several elements that directly influence the reliability of an HVAC system:
- a sturdy wall bracket;
- anchoring into the foundation;
- a height suited to winter conditions;
- anti-vibration pads;
- verified leveling;
- a clearly identified R32 unit;
- full front clearance.
At AirGreen, we install wall-mounted heat pumps, multi-zone systems, and central solutions in Montreal, Laval, Longueuil, the North Shore, and the South Shore.
Each project is adapted to the actual building. The façade type, expected snow depth, window placement, electrical access, and piping route influence our approach.
Our goal is to deliver a clean, stable, accessible HVAC installation suited to Quebec’s climate conditions, while giving occupants precise comfort control in each of the two zones.
How it goes, from the first call to the end
The main steps of this kind of job at AirGreen. Every house has its quirks: the estimate brings them out.
We look at the room, the outside wall, the line route and where the outdoor unit will go. That is where the capacity gets chosen.
Model, capacity and price, in writing. We also check whether the model qualifies for assistance programs.
Floors and furniture protected, wall plate position marked level, wall opening located.
A single opening, with the slope the drain needs to flow outside.
Set on a stand raised above the snow, with the clearances the manufacturer requires.
Connected, insulated and protected. The opening is then sealed against water, cold air and insects.
A dedicated circuit and an accessible disconnect near the outdoor unit.
Leak test, vacuum, then start-up and a check of heating and cooling.
Remote, modes, filters: we show you the essentials before we leave.
- The on-site estimateWe look at the room, the outside wall, the line route and where the outdoor unit will go. That is where the capacity gets chosen.
- The quoteModel, capacity and price, in writing. We also check whether the model qualifies for assistance programs.
- Getting readyFloors and furniture protected, wall plate position marked level, wall opening located.
- The wall openingA single opening, with the slope the drain needs to flow outside.
- The outdoor unitSet on a stand raised above the snow, with the clearances the manufacturer requires.
- Lines, cable and drainConnected, insulated and protected. The opening is then sealed against water, cold air and insects.
- The electrical workA dedicated circuit and an accessible disconnect near the outdoor unit.
- Tests and start-upLeak test, vacuum, then start-up and a check of heating and cooling.
- The walkthroughRemote, modes, filters: we show you the essentials before we leave.
And at your place?
Two quick checks with real numbers: what heat costs, and what your current heaters add up to in BTU/h.
Conversion: 1 W = 3.412 BTU/h. An indication, not a load calculation: baseboards and furnaces are often stronger than the real need, and they can stay as backup. AirGreen confirms the capacity on site.
What to do, season by season
Three habits per season for this unit. They take a few minutes and prevent many calls.
- Clean the indoor unit's filters.
- Clear leaves and debris left on the outdoor unit by winter.
- Test cooling before the first hot days.
- Clean the filters more often when the unit runs a lot.
- Keep plants away from the outdoor unit.
- Check that no water drips from the indoor unit.
- Rake the leaves around the outdoor unit.
- Test heating before the first cold days.
- Book periodic maintenance before winter.
- Keep snow away from the stand and the front of the unit.
- Let the unit defrost: it is normal.
- Never hit the ice on the fins; call us if the unit stays iced up.
Which type of equipment for your project?
Pick what looks like your need.
Four mistakes we do not make
Flip each card to see what we do instead.
What people ask us about this kind of work
Does a wall-mounted heat pump heat in winter?
Wall-mounted or multi-zone: how do I choose?
Where does the outdoor unit go?
Are there grants?
Do I need a permit?
How cold can it heat?
How much can I save?
How is the LogisVert assistance calculated?
Is it noisy?
The outdoor unit is covered in ice: is that normal?
Does AirGreen hold the required licences?
Is the estimate free?
No question matches. Write to us: we answer.
Useful pages for what comes next
More jobs to see, near you
By town, by equipment or by region: browse more than 4,700 published projects.
Each dot: a town where AirGreen has published projects. The glowing dot: this job.
Tell us about your house. We come and see it for free.
The on-site estimate is free and the quote follows within 24 hours.
Text and photo: a real AirGreen Climatisation & Chauffage job. The diagrams are generic illustrations of the type of installation, not a survey of this job site. Sources of the added figures: airgreen.ca product pages (NEEP / AHRI performance), Hydro-Québec (Heat pumps page, LogisVert, read on 13 October 2026), Régie de l’énergie (rate D as of 1 April 2026).