
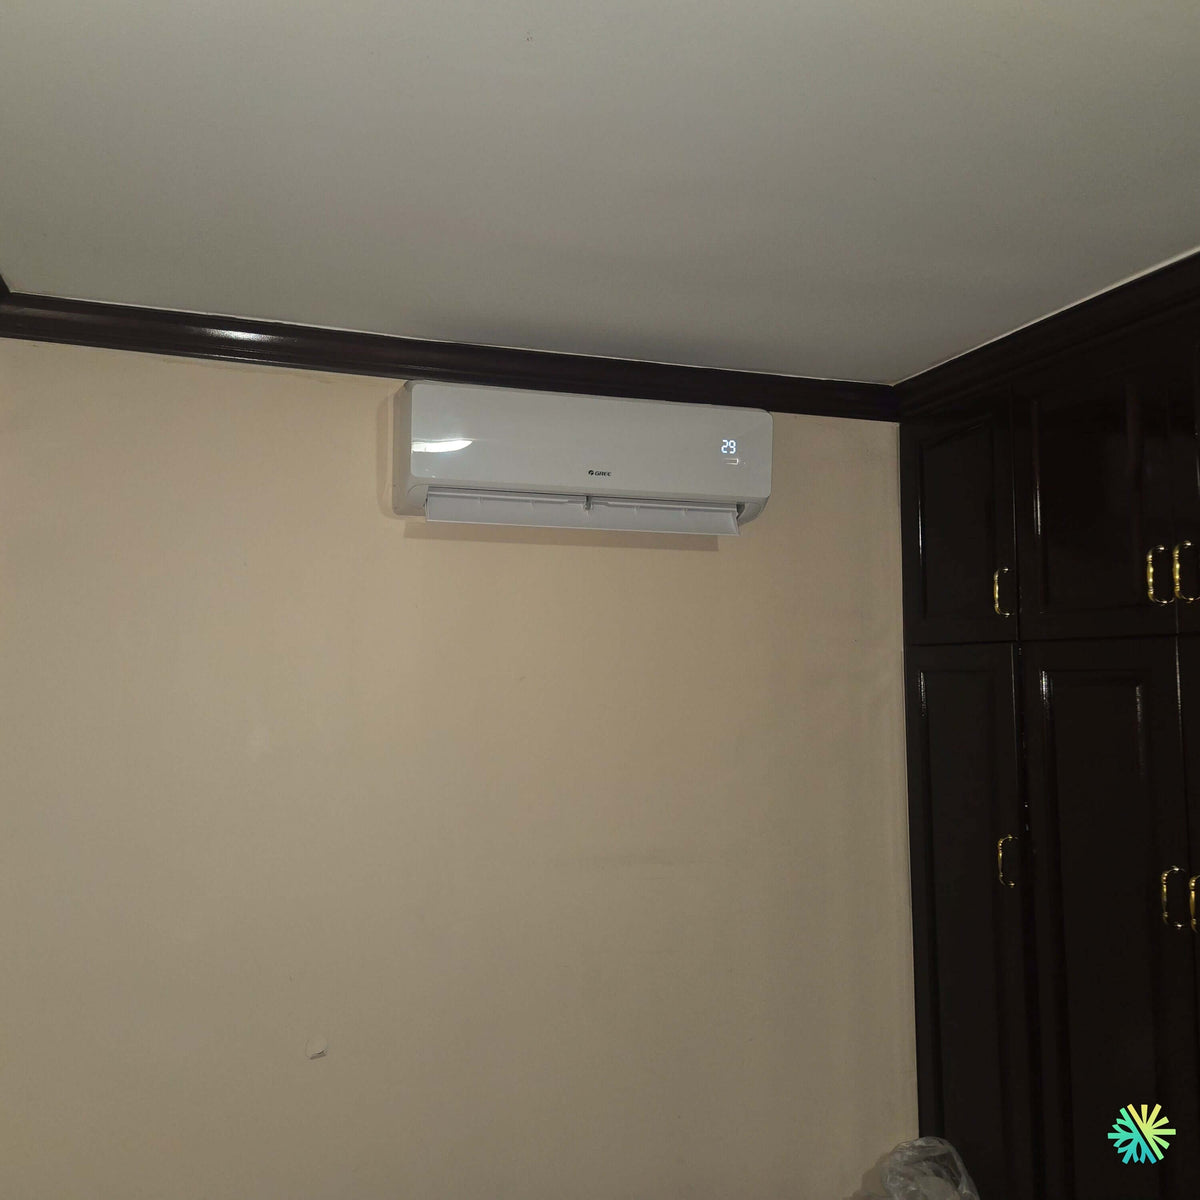
Installation of a GREE VITA R32 wall-mounted heat pump in the West Island of Montreal: discreet mini split air conditioner installed in a residential room with dark wood paneling
AirGreen installs a GREE VITA R32 wall-mounted heat pump in the West Island: discreet R32 mini split, clean wall installation, zoned comfort, and finish adapted to the interior decor.
Take a tour of the installation
Each number is a point we check on site. Switch between summer and winter to watch air and heat move.
In summer, the outdoor unit rejects the house's heat outside.
Generic illustration of this type of installation, not a survey of this job site. Tap a number.
Mounted level on a wall plate, high enough for the air to reach the whole room, with enough space around it to slide the filters out easily.
The refrigerant lines, the communication cable and the drain go through the wall in a single opening, sealed against water, cold air and insects.
Two insulated copper pipes connect the two units. Outside, a line cover can protect them from sun, knocks and weather.
A shut-off switch near the outdoor unit isolates it safely for service. It must stay accessible at all times.
The compressor and the fan. In heating mode it captures heat from the outdoor air, even in winter, and moves it inside.
On the ground or on the wall, it keeps the unit above accumulated snow. The unit stays clear and defrost water can drain away.
The fan needs to blow freely. Storage, a fence or a wall too close, and efficiency drops while noise goes up.
A GREE VITA R32 wall installation designed for a residential interior in the West Island
In the West Island of Montreal, HVAC installation projects often require a precise balance between performance, visual discretion, and respect for the existing decor. This installation of a wall-mounted heat pump GREE VITA R32 perfectly illustrates this reality: the indoor unit was mounted high on a light wall, near a set of dark woodwork and ceiling moldings, in a room where the interior aesthetic had to remain sober and harmonious.
The photo shows a GREE wall unit installed near the ceiling, with its digital display visible on the front. This position allows good air distribution in the room while letting the walls, furniture, and existing cabinets breathe. In a residential environment like this, a heat pump must not only heat and cool well: it must also integrate into the client's daily life without becoming a dominant visual element.
The choice of the GREE VITA R32 model was based on a clear logic: to offer a modern, efficient, compact Wall-Mounted Heat Pump – Air Conditioner – Mini Split solution adapted to a living area requiring stable comfort in all seasons. For homeowners, condo owners, and residents of the West Island, this type of system represents an excellent option when you want to improve the comfort of a specific room without installing a full central system.
A high positioning to optimize air distribution
The location of a wall-mounted heat pump directly influences the comfort felt. A unit installed too low can create unpleasant drafts or limit the reach of the airflow. A unit placed too close to an obstacle can hinder circulation. Here, the device was positioned high, with particular attention to the necessary clearances around the unit.
In this room, the constraints were visible: dark molding on the ceiling, nearby cabinets, light wall, limited space to achieve a clean alignment. Our team therefore chose a position that allowed:
- effective air distribution towards the room;
- easy access to filters for HVAC maintenance;
- a discreet integration despite the proximity of the woodwork;
- a clean finish around the unit;
- a visually balanced installation on the wall.
The result is simple and clean. The unit does not overwhelm the room and its white color naturally blends with the wall. In many homes in Montreal, Laval, Longueuil, the North Shore, and the South Shore, this attention to interior positioning is as important as the choice of brand.
Why the GREE VITA R32 was a good choice for this project
The GREE VITA R32 is a popular series in residential projects where a reliable, easy-to-use wall system well suited to daily needs is sought. It combines the functions of a wall air conditioner and heat pump heating, allowing the client to better control the temperature in a specific area of the house.
The refrigerant R32 is part of the important technical elements of this model. It is used in many recent wall-mounted heat pumps and is part of a transition to more modern equipment. For AirGreen, working with this type of equipment requires a rigorous installation method: clean connections, airtightness control, proper vacuuming, drainage verification, electrical validation, and full system startup.
The VITA R32 range also offers a very appreciated practical advantage: intelligent control, depending on the configuration of the installed model. For clients, this makes temperature management easier, especially when they want to adjust comfort before arriving home, reduce system use during an absence, or maintain a more stable temperature during heat or cold periods.
An ideal solution for zoned comfort
In a house in the West Island, it is not uncommon for a room to be warmer in summer or cooler in winter than the rest of the home. This can be caused by sun orientation, insulation, window size, number of occupants, room layout, or the presence of a partially open floor. A wall-mounted heat pump allows targeted treatment of this area.
In this project, the client was looking for a solution capable of making the room more comfortable without changing the entire existing heating system. The mini split was therefore a logical option: minimally invasive, quick to use, effective for a specific area, and more flexible than a simple portable air conditioner.
An installation like this can meet several needs:
- cool a room during hot periods;
- provide efficient heating during a significant part of the cold season;
- reduce temperature variations;
- improve the comfort of a frequently used space;
- limit interior work;
- maintain a clean and discreet appearance.
The aesthetic challenge: integrating the unit near dark woodwork
One of the most interesting details of this installation is the proximity between the white wall unit and the dark cabinets on the right. In a room where the woodwork has a strong visual presence, a poorly placed installation can quickly seem unbalanced. Our team therefore worked with a precise approach: choosing a consistent height, keeping the unit well aligned, and avoiding a position that would give the impression of a device added without planning.
The contrast between the light wall, the white unit, and the dark woodwork was well managed. The device remains visible, of course, but it does not dominate the room. It becomes a functional element, carefully installed, rather than an aesthetic compromise. For AirGreen, this aspect is essential, especially in residential homes where clients want to improve their comfort without altering their interior.
A well-executed HVAC installation: the details that make the difference
A good HVAC installation is not only measured at the moment the device starts. It is also measured by the quality of the details: location, mounting, connections, drainage, level, filter access, site cleanliness, and explanations given to the client.
In this West Island project, our technicians followed a structured method to ensure a reliable and durable result.
Room assessment before installation
Before attaching the unit to the wall, the space must be understood. A heat pump installed in a closed room does not behave the same way as a device installed in an open area. Ceiling height, openings to other rooms, heat sources, windows, and the house’s orientation influence the choice of location.
In this case, the selected wall offered a good balance between air circulation, technical access, and appearance. The elevated position helps the air distribute, while the distance from the cabinets limits obstacles around the device.
Wall installation and secure mounting
The mounting of an indoor unit must be solid, straight, and well supported. Even if the device seems light, it must remain perfectly stable over time. A poorly leveled installation can affect drainage and cause condensation problems. That is why our technicians carefully check the level, wall strength, and alignment before finalizing the installation.
This rigor is especially important in older residential buildings in the West Island, where walls may have irregularities, different materials, or hidden constraints. An experienced team knows how to adapt the method without sacrificing the finish.
Drainage and condensation: a point never to neglect
A wall-mounted air conditioner produces condensation when operating in cooling mode. This water must be properly drained. Poorly planned drainage can cause odors, leaks, wall stains, or unnecessary interventions later.
On every project, we pay special attention to:
- the slope of the drain;
- continuity of the path;
- protection against blockages;
- the quality of connections;
- accessibility for maintenance;
- the absence of voltage on components.
Even when these elements are not visible in the final photo, they are among the most important aspects of a successful installation.
Commissioning and explanations to the client
Once the device is installed, commissioning confirms that everything is working properly. Our technicians test the operating modes, check the unit’s response, observe drainage, validate controls, and ensure the client understands the basic settings.
We also explain good usage habits: do not set the temperature excessively, clean the filters regularly, avoid blocking airflow, use the appropriate modes, and schedule HVAC maintenance when necessary. These simple tips help preserve the performance of the heat pump and improve daily comfort.
Subsidies and eligibility: a check to do before every project
For owners in West Island, Montreal, Laval, Longueuil, North Shore, and South Shore, subsidies can influence the choice of a system. However, eligibility depends on the exact model, installed capacity, criteria in effect at the time of installation, and the rules of the applicable program.
At AirGreen, we help our clients gather the necessary information when the equipment is eligible: detailed invoice, model identification, proof of installation, and useful technical information. This assistance prevents many errors in the process and allows the client to better understand the real value of their investment.
Mistakes to avoid in a similar project
An installation of a GREE VITA R32 wall heat pump may seem simple when looking only at the final unit on the wall. In reality, several decisions must be made correctly from the start.
Installing the unit solely based on available space
The first free wall is not always the best choice. You must consider airflow, room usage, presence of furniture, line routing, and future maintenance.
Ignoring the interior appearance
A poorly aligned or positioned installation can harm the harmony of the room. In this project, the proximity of the woodwork required special attention to keep the result clean.
Underestimating drainage
Drainage is often invisible after installation, but it is essential. A mistake at this stage can cause problems far more costly than the time needed to plan it properly.
Choosing the system without assessing the real need
The capacity must match the room. A unit that is too weak will run too long; an oversized unit may provide less stable comfort. Building evaluation remains essential.
A discreet, functional, and durable final result
This installation of a GREE VITA R32 wall heat pump in the West Island of Montreal demonstrates the importance of a comprehensive approach. The indoor unit is installed neatly, its positioning respects the room, the air distribution is well thought out, and the whole integrates with the existing decor.
For the client, the result is tangible: better temperature control, a modern wall unit, a heating and cooling solution tailored to a specific area, and an interior finish that does not compromise the room’s appearance.
At AirGreen, we install HVAC systems throughout Greater Montreal, including Montreal, Laval, Longueuil, the North Shore, the South Shore, and the West Island. Every project is different, but our priority remains the same: recommend the right equipment, install it methodically, and deliver a clean, reliable result designed to last.
The big day, step by step
The main steps of this kind of job at AirGreen. Every house has its quirks: the estimate brings them out.
We look at the room, the outside wall, the line route and where the outdoor unit will go. That is where the capacity gets chosen.
Model, capacity and price, in writing. We also check whether the model qualifies for assistance programs.
Floors and furniture protected, wall plate position marked level, wall opening located.
A single opening, with the slope the drain needs to flow outside.
Set on a stand raised above the snow, with the clearances the manufacturer requires.
Connected, insulated and protected. The opening is then sealed against water, cold air and insects.
A dedicated circuit and an accessible disconnect near the outdoor unit.
Leak test, vacuum, then start-up and a check of heating and cooling.
Remote, modes, filters: we show you the essentials before we leave.
- The on-site estimateWe look at the room, the outside wall, the line route and where the outdoor unit will go. That is where the capacity gets chosen.
- The quoteModel, capacity and price, in writing. We also check whether the model qualifies for assistance programs.
- Getting readyFloors and furniture protected, wall plate position marked level, wall opening located.
- The wall openingA single opening, with the slope the drain needs to flow outside.
- The outdoor unitSet on a stand raised above the snow, with the clearances the manufacturer requires.
- Lines, cable and drainConnected, insulated and protected. The opening is then sealed against water, cold air and insects.
- The electrical workA dedicated circuit and an accessible disconnect near the outdoor unit.
- Tests and start-upLeak test, vacuum, then start-up and a check of heating and cooling.
- The walkthroughRemote, modes, filters: we show you the essentials before we leave.
What would it look like at your place?
Two quick checks with real numbers: what heat costs, and what your current heaters add up to in BTU/h.
Conversion: 1 W = 3.412 BTU/h. An indication, not a load calculation: baseboards and furnaces are often stronger than the real need, and they can stay as backup. AirGreen confirms the capacity on site.
Four mistakes we do not make
Flip each card to see what we do instead.
Your own project, step by step
What to do, season by season
Three habits per season for this unit. They take a few minutes and prevent many calls.
- Clean the indoor unit's filters.
- Clear leaves and debris left on the outdoor unit by winter.
- Test cooling before the first hot days.
- Clean the filters more often when the unit runs a lot.
- Keep plants away from the outdoor unit.
- Check that no water drips from the indoor unit.
- Rake the leaves around the outdoor unit.
- Test heating before the first cold days.
- Book periodic maintenance before winter.
- Keep snow away from the stand and the front of the unit.
- Let the unit defrost: it is normal.
- Never hit the ice on the fins; call us if the unit stays iced up.
Is your home ready?
Check what applies at your place. A "no" is not a refusal: it is what we sort out during the estimate.
Four statements: true or false?
It all comes down to details you have just seen.
1. In heating mode, the outdoor unit can produce water.
During defrost cycles. That water must drain away without forming ice.
2. You pick the capacity with a simple square-footage rule.
Windows, insulation, orientation and how the room is used all count. Capacity is chosen on site.
3. A multi-zone connects several indoor heads to a single condenser.
One head per room, all on the same condenser. Each room keeps its own temperature.
4. The disconnect can sit behind the patio furniture.
It must stay accessible: it is what shuts the unit off for service.
0 / 4 right answers
What people ask us about this kind of work
Does a wall-mounted heat pump heat in winter?
Wall-mounted or multi-zone: how do I choose?
Where does the outdoor unit go?
Are there grants?
Do I need a permit?
How cold can it heat?
How much can I save?
How is the LogisVert assistance calculated?
Is it noisy?
The outdoor unit is covered in ice: is that normal?
Does AirGreen hold the required licences?
Is the estimate free?
No question matches. Write to us: we answer.
More jobs to see, near you
By town, by equipment or by region: browse more than 4,700 published projects.
Each dot: a town where AirGreen has published projects. The glowing dot: this job.
Every house has its constraints. We see them before we install.
The on-site estimate is free and the quote follows within 24 hours.
Text and photo: a real AirGreen Climatisation & Chauffage job. The diagrams are generic illustrations of the type of installation, not a survey of this job site. Sources of the added figures: airgreen.ca product pages (NEEP / AHRI performance), Hydro-Québec (Heat pumps page, LogisVert, read on 13 October 2026), Régie de l’énergie (rate D as of 1 April 2026).