
Installation of a Fujitsu AIRSTAGE Aquila XLTH dual-zone heat pump on a flat roof in Rosemère
In Rosemère, AirGreen installs a Fujitsu Aquila XLTH dual-zone heat pump on an enlarged rooftop base, with an elevated support and anti-vibration components to protect the building and ensure reliable operation.
In summer, the outdoor unit rejects the house's heat outside.
Generic illustration of this type of installation, not a survey of this job site. Tap a number.
Mounted level on a wall plate, high enough for the air to reach the whole room, with enough space around it to slide the filters out easily.
The refrigerant lines, the communication cable and the drain go through the wall in a single opening, sealed against water, cold air and insects.
Two insulated copper pipes connect the two units. Outside, a line cover can protect them from sun, knocks and weather.
A shut-off switch near the outdoor unit isolates it safely for service. It must stay accessible at all times.
The compressor and the fan. In heating mode it captures heat from the outdoor air, even in winter, and moves it inside.
On the ground or on the wall, it keeps the unit above accumulated snow. The unit stays clear and defrost water can drain away.
The fan needs to blow freely. Storage, a fence or a wall too close, and efficiency drops while noise goes up.
A rooftop installation designed to protect the membrane, stabilize the equipment, and facilitate winter operation
In Rosemère, our AirGreen team installed a Fujitsu AIRSTAGE Aquila XLTH dual-zone heat pump to serve two distinct zones of the property from a single outdoor unit. The project had an important particularity: the outdoor unit had to be installed on a flat roof covered with gravel, rather than on the ground near the building.
A rooftop installation requires a different approach from a conventional installation on a slab or wall bracket. The machine's weight must be distributed properly, the roofing membrane must be protected, the lines must remain accessible, and the water produced during defrost cycles must be able to drain away without forming a block of ice beneath the unit.
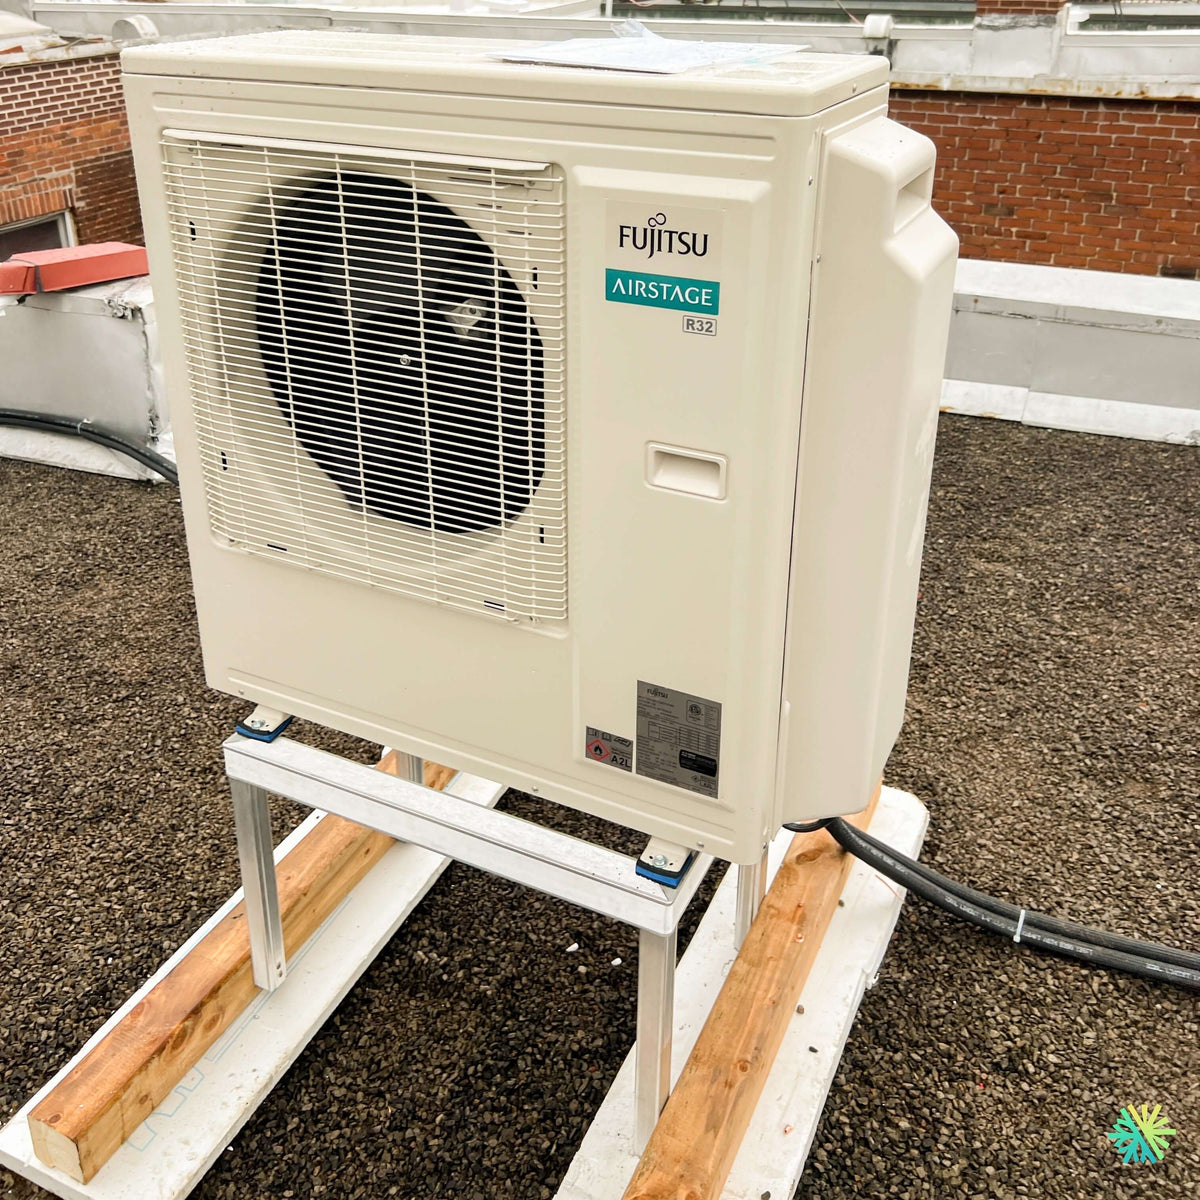
The project photograph shows a Fujitsu AIRSTAGE outdoor unit bearing the identification R32installed on a raised metal support. Anti-vibration elements are visible between the machine's feet and the frame. The support itself rests on two long bases arranged parallel to each other on the roof. This structure keeps the equipment stable without concentrating its entire load on a few small points.
For this type of project, installation quality depends not only on refrigeration performance. It also depends on how the heat pump integrates with the building throughout all seasons.
Why install a heat pump on a flat roof?
A rooftop installation may be the most logical solution when the space around the property is limited or already occupied.
In Rosemère, as elsewhere in Greater Montréal, several constraints can prevent a traditional ground installation:
- a landscaped backyard;
- a side passage that is too narrow;
- a terrace located against the building;
- basement windows close to the ground;
- a parking space;
- insufficient distance from the neighboring property;
- acoustic considerations;
- a more advantageous routing of the lines through the roof.
A flat roof often makes it possible to place the outdoor unit away from traffic areas and preserve the exterior layout. However, this solution must be carefully evaluated because the equipment will be more exposed to wind, snow, freezing, and maintenance work at height.
We must therefore examine the entire project before selecting the final location:
- the roof structure;
- the type of roofing;
- the slopes and drains;
- the height of the parapets;
- access to the roof;
- the distances from other equipment;
- the routing of the lines;
- the space needed for future repairs.
An expanded base to distribute the load across the roof
One of the most important elements visible in the photo is the base installed beneath the metal support.
An outdoor unit should not be placed directly on gravel or the membrane. Its weight would then be concentrated on a few points of support, which could compress the roof layers or cause localized wear.
In this project, two long white bases are positioned beneath the wooden rails and the metal structure. This configuration increases the contact area and helps distribute the load more evenly.
Distributing the weight helps prevent:
- localized sinking of the support;
- deformation of the roofing;
- movement of the unit;
- abrasion of the membrane;
- the creation of areas where water could accumulate;
- instability caused by gravel.
The wooden pieces serve as an interface between the long bases and the metal support. They must be positioned precisely so that the structure remains straight, stable, and properly level.
Why raise the outdoor unit?
The Fujitsu heat pump is installed on a support that keeps it well above the roof level. This height serves several technical purposes.
In winter, a heat pump produces water during its defrost cycles. When the temperature is low, this water can freeze beneath the unit. If the unit is too close to the roof, ice can accumulate around its base and eventually interfere with its operation.
Raising the unit makes it possible to:
- to leave clearance beneath the unit;
- to promote water drainage;
- to reduce the risk of contact with ice;
- to keep the unit above snow accumulation;
- to improve access to the connections;
- to facilitate inspection of the underside of the cabinet.
On a flat roof, snow does not always accumulate evenly. Wind can create deeper drifts near parapets and obstacles. The location must therefore be chosen based not only on the average snow depth, but also on areas where snow is likely to accumulate.
Anti-vibration pads between the unit and the frame
In the photograph, small blue pieces are visible beneath the feet of the outdoor unit. They create separation between the heat pump and the metal support.
An outdoor unit contains a compressor and a fan. Even when operating normally, it produces slight vibrations. On a roof, these vibrations can be transmitted to the building structure if the installation is too rigid.
Anti-vibration components help to:
- limit vibration transmission;
- reduce certain structural noises;
- protect contact points;
- improve stability;
- reduce direct metal-to-metal contact.
The acoustic performance also depends on how level the support is, the rigidity of the base, and the routing of the lines. A line pulled tightly against a structure can transmit a humming sound even when the heat pump itself is operating properly.
A dual-zone heat pump for two separate areas
The system installed in Rosemère is a dual-zone heat pump. A single outdoor unit therefore powers two indoor units located in different areas of the property.
This configuration offers better control than using a single wall-mounted unit intended to cover several distant rooms.
It is particularly suitable for:
- two floors;
- an open-plan area and a bedroom;
- a front section and a rear section;
- a main living area and a basement;
- two zones with different levels of sunlight.
Each indoor unit can be controlled independently. Occupants can set different temperatures and fan speeds according to the needs of each zone.
Fujitsu documentation states that H-series AIRSTAGE multi-zone systems allow individual control of each indoor unit. However, it also specifies that the system provides heating or cooling, but not both simultaneously in different zones.
How does independent control work?
The word “independent” can sometimes be confusing.
The two indoor units can operate at different setpoints, but they share the same outdoor unit and the same overall mode.
Therefore, it is possible to:
- heat one zone to 20°C and the other to 22°C;
- cool one room to 22°C and the other to 24°C;
- operate only one unit;
- use different fan speeds;
- temporarily turn off a zone that is rarely occupied.
However, it is not possible to heat one room while the other is simultaneously calling for cooling.
This limitation is not a defect specific to the installation. It results from the normal operation of a shared multi-zone system.
Fujitsu AIRSTAGE Aquila: several possible configurations
Fujitsu’s documentation for H-series Aquila systems presents outdoor units rated at 18,000, 24,000, 36,000 and 45,000 BTU/h. Depending on the selected outdoor unit, a single outdoor unit can serve two to five indoor units.
The systems can be paired with several indoor unit formats:
- wall-mounted models;
- Slim Duct units;
- compact cassettes;
- Mid Static Duct units.
This flexibility makes it possible to adapt the system to the building’s architectural characteristics.
In a dual-zone project, the two indoor units do not necessarily have to be the same capacity. A larger living area may receive a larger unit, while a bedroom or office may be served by a lower capacity.
Authorized combinations for a dual-zone system
Page 2 of Fujitsu’s documentation presents several possible combinations for the AOUH18KWAS2 and AOUH18KWAH2 dual-zone outdoor units.
The listed nominal combinations include:
- 7,000 + 7,000 BTU/h;
- 7,000 + 9,000 BTU/h;
- 7,000 + 12,000 BTU/h;
- 7,000 + 15,000 BTU/h;
- 9,000 + 9,000 BTU/h;
- 9,000 + 12,000 BTU/h;
- 9,000 + 15,000 BTU/h;
- 12,000 + 12,000 BTU/h.
These tables are used to verify the technical compatibility of the units. However, they are not sufficient for choosing the appropriate capacity for a home.
Fujitsu specifies that its tables are not intended for final capacity selection and recommends using its Design Simulator software for H-series AIRSTAGE systems.
Why load calculations remain essential
Sizing a dual-zone heat pump cannot be based solely on a quick estimate in square feet.
Each area must be evaluated according to its actual characteristics:
- floor area;
- ceiling height;
- insulation;
- airtightness;
- number and dimensions of windows;
- solar exposure;
- presence of a floor or roof above;
- number of occupants;
- heat-generating appliances;
- air circulation between rooms.
An area located directly beneath the roof may experience more heat in summer than a ground-floor room. A room with large windows may also have very different requirements from another room of similar size.
An oversized unit can reach the setpoint quickly without providing optimal dehumidification. An undersized unit may run continuously during the most demanding periods.
A connected capacity that can exceed 100%
Fujitsu documentation indicates that a multi-zone outdoor unit can accept a connected capacity of up to 130 %, depending on the model and selected combination.
This data means that the sum of the rated capacities of the indoor units can sometimes exceed the rated capacity of the outdoor unit.
It does not mean that the outdoor unit will automatically produce 130% of its capacity. Fujitsu specifies that exceeding 100% in a combination does not increase the system's total production capacity.
When both zones require their full capacity at the same time, the available capacity is divided between them.
This flexibility can be useful when the zones have different schedules or loads, but it must be carefully validated.
The R32 refrigerant visible on the outdoor unit
Identification R32 appears clearly on the front of the installed machine.
The refrigerant is an integral part of the system design. Its use requires installation in accordance with the prescribed methods, particularly for:
- line preparation;
- flaring;
- connections;
- leak tests;
- evacuation;
- commissioning;
- the use of appropriate tools.
The visible danger label near the rating plate also reminds us that the refrigerant must be handled by qualified technicians.
The lines visible on the right side of the machine are protected by a black insulating sleeve. On a roof, this protection is important because the lines are exposed to sunlight, freezing temperatures, rain, and movement caused by the wind.
The route of the lines across the roof
Refrigerant lines must be supported so that they do not rub directly against the roof covering.
A line left loose on the gravel could:
- move under the effect of the wind;
- suffer abrasion;
- retain water;
- be crushed during work;
- be damaged by ice;
- transmit vibrations.
The route must also avoid areas used by roofers and technicians. It must remain sufficiently accessible to allow inspection or repair without having to completely move the unit.
In a dual-zone system, several lines share the route to the building. Advance planning is therefore essential to avoid a disorganized grouping.
An installation that must withstand wind
A unit installed on a roof is generally more exposed to wind than a unit installed near ground level.
Stability depends on several factors:
- the base width;
- the frame rigidity;
- the weight of the unit;
- the support height;
- the rooftop location;
- the building’s exposure;
- the prevailing wind direction.
The unit shown in the photo rests on an extended structure. Its position should be chosen to avoid areas too close to the edge or a parapet that could cause strong turbulence.
A stable installation protects not only the machine but also the pipes and connections.
Maintaining clearance around the fan
The large front fan must discharge air without any immediate obstruction.
Poor placement can cause discharged air to recirculate toward the heat exchanger. This recirculation reduces heating or cooling capacity and increases the effort required from the system.
We must therefore maintain:
- sufficient space in front of the fan;
- adequate clearance behind the heat exchanger;
- an appropriate distance from parapets;
- separation from ventilation outlets;
- access to the service panels;
- a safe work area.
The photo shows a unit installed in a relatively open area. No significant obstacle is positioned directly in front of the fan.
The importance of access for future maintenance
A flat-roof HVAC installation must be designed with future service work in mind.
A technician may need to:
- clean the coil;
- check the connections;
- measure temperatures;
- diagnose a fault;
- replace a component;
- inspect the base;
- clear an accumulation of ice;
- check the condition of the pipes.
The raised support improves access beneath the machine and around the connections. The side clearance also allows the service panel to be opened.
Equipment that is difficult to access increases the time and complexity of every service call. It is therefore preferable to plan for this aspect during installation.
Mistakes to avoid on a flat roof
Installing a heat pump on a roof involves several risks when preparation is inadequate.
-
Placing the machine directly on the roof
The weight and vibrations can damage the roofing. -
Using a base that is too narrow
The load must be distributed over a sufficiently large surface. -
Installing the unit too close to the roof
Snow and ice can obstruct the underside of the machine. -
Blocking roof drainage
The base must never retain water or cover a drain. -
Neglecting defrosting
Water must be able to drain freely beneath the unit. -
Allowing the pipes to rub against the gravel
They must be supported and protected. -
Placing the machine too close to a parapet
Airflow and maintenance can be compromised. -
Forget the vibrations
An anti-vibration separation helps reduce their transmission to the building. -
Choosing capacity based solely on floor area
The two zones must be analyzed separately. -
Confusing connected capacity with delivered capacity
A combination exceeding 100% does not turn the outdoor unit into a larger appliance.
Essential commissioning steps
Once the equipment is installed, we perform several checks.
Base inspection
The structure must be stable, level, and properly distributed across the roof.
Roofing inspection
No sharp element or aggressive contact point should damage the surface.
Line inspection
The lines must be insulated, protected, and free of excessive tension.
Leak test
The connections are checked to confirm the integrity of the circuit.
Vacuuming
Air and moisture must be removed before commissioning.
Electrical check
The connections, protections, and communications between the components are tested.
Two-zone test
Each indoor unit is tested separately, then both are operated according to the conditions available.
Noise check
We inspect the operation of the compressor, fan, support, and lines.
Drainage check
The underside of the unit must remain sufficiently clear to manage the water produced during winter operation.
A rooftop HVAC installation adapted to Rosemère’s requirements
This Fujitsu AIRSTAGE Aquila XLTH dual-zone heat pump project in Rosemère illustrates the level of preparation required when an outdoor unit must be installed on a roof.
The unit is elevated on a metal support, the load is distributed across long bases, vibration-damping components separate the unit from the structure, and the lines remain accessible on the side. These choices help protect the roof, stabilize the equipment, and prepare the installation for the winter conditions of the North Shore.
At AirGreen, we install wall-mounted heat pumps, dual-zone systems, and multi-zone systems in Montréal, Laval, Longueuil, the North Shore, and the South Shore. We assess not only the equipment but also the building that will house it.
A durable installation must protect the roof, maintain adequate airflow, facilitate maintenance, and properly manage snow, ice, and defrost water. In this Rosemère project, the Fujitsu Aquila XLTH solution now makes it possible to control two separate zones from a single outdoor unit installed on a stable, carefully prepared base.
How it goes, from the first call to the end
The main steps of this kind of job at AirGreen. Every house has its quirks: the estimate brings them out.
We look at the room, the outside wall, the line route and where the outdoor unit will go. That is where the capacity gets chosen.
Model, capacity and price, in writing. We also check whether the model qualifies for assistance programs.
Floors and furniture protected, wall plate position marked level, wall opening located.
A single opening, with the slope the drain needs to flow outside.
Set on a stand raised above the snow, with the clearances the manufacturer requires.
Connected, insulated and protected. The opening is then sealed against water, cold air and insects.
A dedicated circuit and an accessible disconnect near the outdoor unit.
Leak test, vacuum, then start-up and a check of heating and cooling.
Remote, modes, filters: we show you the essentials before we leave.
- The on-site estimateWe look at the room, the outside wall, the line route and where the outdoor unit will go. That is where the capacity gets chosen.
- The quoteModel, capacity and price, in writing. We also check whether the model qualifies for assistance programs.
- Getting readyFloors and furniture protected, wall plate position marked level, wall opening located.
- The wall openingA single opening, with the slope the drain needs to flow outside.
- The outdoor unitSet on a stand raised above the snow, with the clearances the manufacturer requires.
- Lines, cable and drainConnected, insulated and protected. The opening is then sealed against water, cold air and insects.
- The electrical workA dedicated circuit and an accessible disconnect near the outdoor unit.
- Tests and start-upLeak test, vacuum, then start-up and a check of heating and cooling.
- The walkthroughRemote, modes, filters: we show you the essentials before we leave.
And at your place?
Two quick checks with real numbers: what heat costs, and what your current heaters add up to in BTU/h.
Conversion: 1 W = 3.412 BTU/h. An indication, not a load calculation: baseboards and furnaces are often stronger than the real need, and they can stay as backup. AirGreen confirms the capacity on site.
What to do, season by season
Three habits per season for this unit. They take a few minutes and prevent many calls.
- Clean the indoor unit's filters.
- Clear leaves and debris left on the outdoor unit by winter.
- Test cooling before the first hot days.
- Clean the filters more often when the unit runs a lot.
- Keep plants away from the outdoor unit.
- Check that no water drips from the indoor unit.
- Rake the leaves around the outdoor unit.
- Test heating before the first cold days.
- Book periodic maintenance before winter.
- Keep snow away from the stand and the front of the unit.
- Let the unit defrost: it is normal.
- Never hit the ice on the fins; call us if the unit stays iced up.
Which type of equipment for your project?
Pick what looks like your need.
Four mistakes we do not make
Flip each card to see what we do instead.
What people ask us about this kind of work
Does a wall-mounted heat pump heat in winter?
Wall-mounted or multi-zone: how do I choose?
Where does the outdoor unit go?
Are there grants?
Do I need a permit?
How cold can it heat?
How much can I save?
How is the LogisVert assistance calculated?
Is it noisy?
The outdoor unit is covered in ice: is that normal?
Does AirGreen hold the required licences?
Is the estimate free?
No question matches. Write to us: we answer.
Useful pages for what comes next
More jobs to see, near you
By town, by equipment or by region: browse more than 4,700 published projects.
Each dot: a town where AirGreen has published projects. The glowing dot: this job.
Tell us about your house. We come and see it for free.
The on-site estimate is free and the quote follows within 24 hours.
Text and photo: a real AirGreen Climatisation & Chauffage job. The diagrams are generic illustrations of the type of installation, not a survey of this job site. Sources of the added figures: airgreen.ca product pages (NEEP / AHRI performance), Hydro-Québec (Heat pumps page, LogisVert, read on 13 October 2026), Régie de l’énergie (rate D as of 1 April 2026).