
Installation of a Fujitsu Aquila XLTH dual-zone heat pump on a flat roof in LaSalle, Montreal
In LaSalle, AirGreen installs a Fujitsu Aquila XLTH dual-zone heat pump on an elevated rooftop support, with anti-vibration mounts, service access, and protection against snow.
- City
- Region
- Equipment
- Brand
- Challenges
- Published
The job on one screen
The article, chapter by chapter
An elevated HVAC installation designed for the real constraints of a LaSalle building
This Fujitsu Aquila XLTH dual-zone heat pump in LaSalle installation stands out immediately because of its location: the outdoor unit was installed on the flat roof of a Montréal residential building, near a parapet and an existing roof vent. This configuration required more extensive preparation than a conventional ground-level installation.
On a roof, every decision matters. The stability of the support, air circulation, vibration transmission, snow accumulation, drainage of defrost water, and future access for maintenance must be analyzed before the equipment is even brought up.
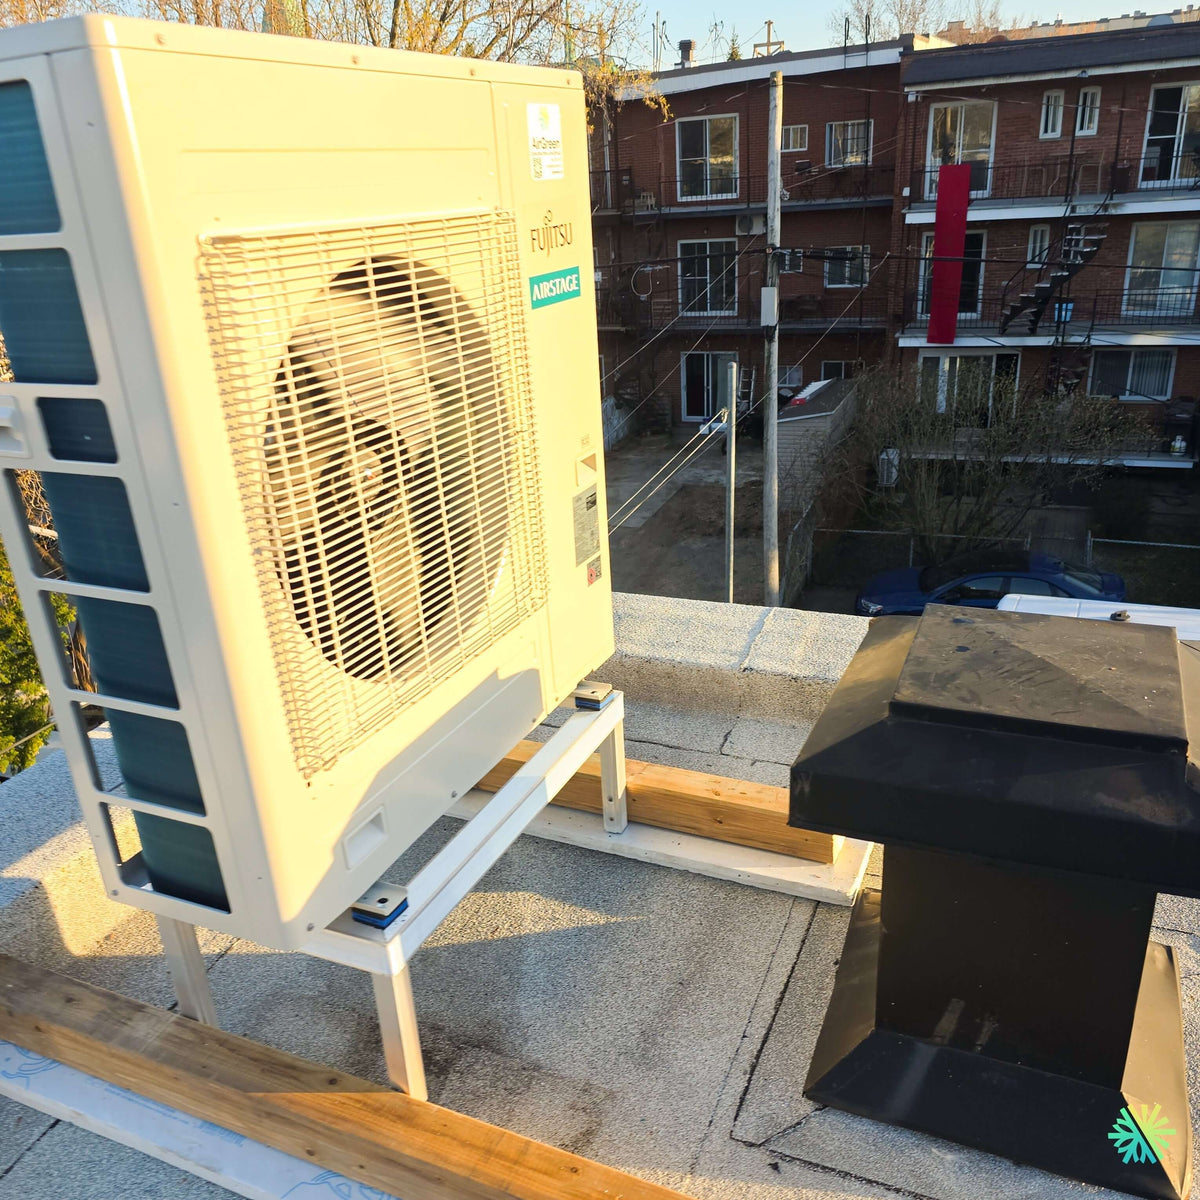
For this project, we installed a Fujitsu AIRSTAGE Aquila XLTH outdoor unit on a raised metal structure. Anti-vibration supports are visible beneath the heat pump’s feet, while the base is positioned on load-bearing elements that distribute the load across the roof. The result is a compact, unobstructed, and accessible installation suited to the climate of Montréal.
The unit serves two separate indoor zones. This allows the owner to better control the comfort of two spaces without having to install two outdoor compressor units. This setup preserves the available roof space, reduces visual clutter, and centralizes a significant part of the system.
Why install the outdoor unit on the roof?
In several areas of LaSalle, residential buildings are close together. Rear façades may be occupied by balconies, stairs, windows, electrical outlets, existing ducts, or shared passageways. In some properties, the roof then becomes the most logical location for a multi-zone HVAC installation.
Choosing a rooftop installation can offer several advantages:
- freeing up ground-level space;
- fewer obstacles in the yard;
- better protection against accidental impacts;
- reduced risk of obstruction from waste or vegetation;
- sometimes more direct mechanical routing to the upper floors;
- more discreet integration when the parapet partially conceals the unit.
However, a rooftop installation should never be considered merely a ground-level installation moved higher up. It requires an approach adapted to the building.
For this project, we had to take the roofing membrane, the supporting structure, the proximity of the parapet, and the black vent located near the unit into account. The heat pump needed to retain sufficient space to draw in and discharge air without restriction, while also allowing a technician to move around the unit during future HVAC maintenance.
A raised structure adapted to Montreal winters
The photograph shows that the heat pump is not placed directly on the membrane. It rests on a metal structure that increases its clearance from the roof surface.
This elevation is essential in the Montreal area. In winter, snow can quickly accumulate on a flat roof. If the base of the unit becomes surrounded or obstructed, airflow can be compromised. Ice can also form beneath the unit during defrost cycles.
A heat pump that provides heating in cold weather draws heat from the outdoor air. When certain conditions are met, frost forms on the outdoor coil. The system then automatically initiates a defrost cycle. The resulting water must be able to drain away without trapping the base of the unit in a block of ice.
The structure used for this installation helps to:
- keep the outdoor coil above the snow;
- provide clearance beneath the heat pump;
- promote water drainage;
- improve access to the connections;
- protect the membrane from direct contact with the housing;
- facilitate visual inspection of the unit.
The appropriate height always depends on the building, wind exposure, and snowfall conditions. An installation that is too low can become problematic after a major storm. Conversely, an unnecessarily tall structure can increase mechanical stresses and complicate access.
Visible vibration-isolating supports under the unit
The small components placed under the heat pump’s feet are not incidental. They are supports designed to limit vibration transmission between the outdoor unit and its support.
On a roof, vibration control is particularly important. A building’s structure can transmit slight mechanical movement to the ceilings or walls of the units located directly below. Even if the equipment’s outdoor noise level is reasonable, structural vibration can become noticeable indoors.
We therefore check several elements during installation:
- the leveling of the heat pump;
- the rigidity of the support;
- the tightness of the fasteners;
- the position of the vibration-isolating supports;
- the absence of rigid contact between the pipes and the structure;
- the stability of the system at different operating speeds.
The inverter technology used by Fujitsu systems allows the compressor to adjust its speed to demand. This modulation promotes more stable operation, but it also means that the system may run for long periods at reduced output. Proper mechanical insulation helps maintain consistent acoustic comfort.
A dual-zone heat pump for two different comfort needs
The principle of a dual-zone heat pump is to connect two indoor units to a single outdoor unit. Each indoor unit serves a specific space and has its own controller.
In a LaSalle building, this solution may suit different configurations:
- a living room and a bedroom;
- a ground floor and an upper floor;
- two dwellings or separate spaces, where the design permits;
- an open area and an office;
- a main living area and a basement;
- two bedrooms with different exposures.
The temperature of each zone can be adjusted separately. A very sunny room may require more cooling in the afternoon, while a bedroom at the back of the home may need quieter operation and a different setpoint.
However, it is important to understand a normal limitation of multizone systems: the indoor units operate in heating or cooling according to the overall mode of the outdoor unit. In a conventional configuration, they cannot simultaneously provide heating in one zone and cooling in another.
Fujitsu's technical document on H-series multizone systems specifies that each indoor unit can be controlled independently, that multiple unit formats can be combined in the same system, and that the outdoor unit provides either heating or cooling, but not both modes simultaneously.
Fujitsu Aquila XLTH: a flexible multizone platform
The Fujitsu AIRSTAGE Aquila series is designed to support multiple combinations of indoor units. Depending on the outdoor unit selected, it is possible to use wall-mounted units, compact Slim Duct units, cassettes, or medium-static-pressure ducted units.
This flexibility is useful during a renovation project. A wall-mounted unit can be installed in an open area, while another zone can be served by a unit discreetly integrated into the ceiling or a utility space, subject to combination compatibility.
Fujitsu documentation features outdoor units rated at 18,000, 24,000, 36,000, and 45,000 BTU/h, capable of supporting varying numbers of indoor units. The 18,000 BTU/h version is specifically designed for up to two indoor units, which corresponds to the principle of a dual-zone system.
However, the exact model number and rated capacity of the photographed unit are not legible with sufficient clarity for us to state them in this article. At AirGreen, we do not infer a heat pump’s capacity solely from the size of its casing. The nameplate, model numbers, and combination of indoor units must be verified.
Sizing a dual-zone system is not simply a matter of adding the BTUs
A common mistake is to choose two indoor units based on their individual capacity and then assume that any outdoor unit can power them.
Fujitsu publishes precise tables of approved combinations. For a dual-zone outdoor unit in the H series, the combinations may include indoor units with different capacities, for example:
- 7,000 and 7,000 BTU/h;
- 7,000 and 9,000 BTU/h;
- 7,000 and 12,000 BTU/h;
- 7,000 and 15,000 BTU/h;
- 9,000 and 9,000 BTU/h;
- 9,000 and 12,000 BTU/h;
- 9,000 and 15,000 BTU/h;
- 12,000 and 12,000 BTU/h.
Some combinations allow the total indoor capacity to exceed the outdoor unit’s rated capacity. This does not mean that the outdoor unit produces more than its actual capacity. The available output is distributed among the zones according to their respective demand.
This distinction is important. An oversized combination on paper may be appropriate when both zones do not reach their maximum load at the same time. However, it must be validated using the manufacturer’s selection data and an actual building analysis.
We assess, among other factors:
- dimensions of each space;
- wall and roof insulation;
- age of the windows;
- building orientation;
- number of occupants;
- solar gains;
- ceiling height;
- air infiltration;
- low-temperature heating requirements;
- the possibility that both zones will operate at full demand simultaneously.
A unit designed for cold-climate heating
The XLTH designation is associated with cold-climate use. The Aquila series documentation indicates that certain cold-climate versions can continue operating in heating mode down to approximately -26 °C.
This capacity is relevant in LaSalle, where winter temperatures can fall well below freezing. However, it does not replace proper sizing.
The minimum operating temperature does not necessarily represent the temperature at which the unit maintains its full rated capacity. As with any heat pump, available capacity and efficiency vary according to the outdoor temperature, the combination of units, and operating conditions.
A property owner must therefore distinguish between three concepts:
- the minimum operating temperature;
- the heating capacity actually available at low temperatures;
- the building's heat load on the coldest days.
When preparing a quote, we analyze these elements to avoid proposing a heat pump that technically operates in extreme cold but remains insufficient for the property's actual needs.
The details that ensure the durability of a rooftop installation
Membrane protection and load distribution
A flat roof is an essential part of the building envelope. All work must be carried out carefully to avoid unnecessarily puncturing the membrane or creating a pressure point that could cause deterioration.
In this installation, the structure rests on load-distributing elements. This method helps prevent a narrow metal foot from exerting concentrated pressure directly on the roof.
Before installation, the following must be examined:
- the overall condition of the membrane;
- the slope toward the drains;
- areas where water may accumulate;
- the position of the seams;
- the proximity of the parapet;
- the strength of the support;
- a safe route for technicians;
- access for lifting the unit.
A poorly positioned support can interfere with roof drainage or gradually damage the membrane. It can also complicate future roofing work.
Distance from vents and obstacles
The photo shows a black roof vent located near the heat pump. The presence of such an element requires careful verification of the clearances.
The outdoor unit must be able to discharge its air without it being immediately drawn back through the coil. Air recirculation can reduce performance, increase cooling pressures, or promote frost buildup in heating mode.
We also consider the effect of wind. On a roof, air currents can be stronger and more unpredictable than at ground level. The parapet can create turbulence zones, while a large obstacle can alter the airflow around the unit.
The positioning must therefore comply with the manufacturer's recommendations regarding:
- the clearance at the back;
- the space in front of the fan;
- the lateral clearance;
- the clearance above the unit;
- the accessibility of the service panels;
- the presence of obstacles likely to retain snow.
Safe service access
A heat pump installed on a roof must remain accessible throughout its service life. Technicians may eventually need to clean the coil, check the connections, diagnose an error, or replace a component.
An installation too close to the edge, wedged between several ducts, or placed behind fixed equipment can make every service call more complex and costly.
In this project, the space in front of the unit provides access to the fan and panels. The structure also keeps the unit at a height that facilitates inspection of its base and connections.
For building owners in Montréal, Laval, Longueuil, on the North Shore or South Shore, we recommend considering maintenance from the project’s design stage. An aesthetically pleasing installation on the day of the work must also remain practical five or ten years later.
Commissioning a Fujitsu multi-zone system
Once the units are installed, commissioning requires several methodical checks. On a dual-zone system, each circuit must correspond to the correct indoor unit.
Our steps include, among other things:
- identifying the two circuits;
- validating the piping diameters;
- checking the flared connections;
- leak testing;
- pulling a vacuum;
- confirming vacuum stability;
- opening the service valves;
- checking the electrical connections;
- checking communication between the units;
- testing each zone separately;
- testing both zones together;
- checking the indoor drainage;
- observing a heating and cooling cycle;
- explaining the controls to the customer.
Mixing up the refrigerant circuits and communication cables can cause inconsistent operation. For example, the control for an indoor unit could activate the wrong outdoor circuit. Thoroughly identifying the connections eliminates this type of problem.
Mistakes to avoid with a heat pump installed on a flat roof
A rooftop installation can deliver excellent results when properly planned. However, certain mistakes can quickly compromise the system’s reliability.
Placing the unit directly on the membrane
This method increases the risk of damage, limits airflow beneath the unit, and exposes the heat pump more to snow.
Choosing a support that is too low
A low elevation may seem sufficient in summer, then become problematic after a significant accumulation of snow.
Neglecting vibrations
Without proper supports, mechanical noise can be transmitted to the rooms beneath the roof.
Blocking air discharge
A parapet, wall, or vent placed too close can cause discharged air to recirculate.
Forgetting service access
A technician must be able to remove the panels, connect their instruments, and work safely.
Ignoring defrost water
Water produced in winter can freeze beneath the unit. Clearance and drainage must be anticipated.
Using an unapproved combination of units
The indoor capacities and outdoor unit must match the Fujitsu tables.
Confusing connected capacity with delivered capacity
A total indoor capacity greater than 100% does not turn the outdoor unit into a more powerful appliance. It distributes the existing capacity between the zones.
Recommended maintenance after installation
To preserve the performance of this Fujitsu dual-zone heat pump, we recommend a few periodic checks.
The indoor-unit filters should be cleaned according to system usage. Dust buildup reduces airflow and can cause noise, lower efficiency, or uneven temperature distribution.
On the roof, you should also monitor:
- snow accumulation around the unit;
- the presence of ice beneath the structure;
- leaves or debris near the coil;
- the stability of the support;
- the condition of the vibration-dampening pads;
- the integrity of the line-set insulation;
- the general condition of the membrane around the installation.
The unit must not be cleared with a metal tool that could damage the coil. Snow can be removed carefully while keeping the intake and discharge surfaces clear.
The result for this LaSalle property
This installation addressed several simultaneous constraints: serving two zones, limiting the outdoor footprint, using a rooftop location, and keeping the unit above winter snow accumulation.
The installed solution includes a Fujitsu Aquila XLTH multi-zone heat pump, an elevated metal support, vibration-dampening pads, and a layout that takes existing rooftop elements into account.
The owner now benefits from:
- of separate controls in two zones;
- of a single outdoor unit;
- of a heating and cooling solution;
- of an installation elevated off the ground;
- of reasonable access for maintenance;
- of a configuration suited to an urban building in LaSalle.
At AirGreen, we approach every heat pump installation in Montreal according to the building’s specific characteristics. A flat-roof installation is not designed like a slab installation, and a dual-zone system is not selected like a single-zone unit.
Our work consists of bringing together the right equipment, the right combination of units, the right support, and rigorous commissioning. It is this consistency between design and execution that allows a heat pump to provide stable comfort and operate reliably over time.
The job tools
Two quick checks with real numbers: what heat costs, and what your current heaters add up to in BTU/h.
Conversion: 1 W = 3.412 BTU/h. An indication, not a load calculation: baseboards and furnaces are often stronger than the real need, and they can stay as backup. AirGreen confirms the capacity on site.
How the job unfolds
The main steps of this kind of job at AirGreen. Every house has its quirks: the estimate brings them out.
We look at the room, the outside wall, the line route and where the outdoor unit will go. That is where the capacity gets chosen.
Model, capacity and price, in writing. We also check whether the model qualifies for assistance programs.
Floors and furniture protected, wall plate position marked level, wall opening located.
A single opening, with the slope the drain needs to flow outside.
Set on a stand raised above the snow, with the clearances the manufacturer requires.
Connected, insulated and protected. The opening is then sealed against water, cold air and insects.
A dedicated circuit and an accessible disconnect near the outdoor unit.
Leak test, vacuum, then start-up and a check of heating and cooling.
Remote, modes, filters: we show you the essentials before we leave.
- The on-site estimateWe look at the room, the outside wall, the line route and where the outdoor unit will go. That is where the capacity gets chosen.
- The quoteModel, capacity and price, in writing. We also check whether the model qualifies for assistance programs.
- Getting readyFloors and furniture protected, wall plate position marked level, wall opening located.
- The wall openingA single opening, with the slope the drain needs to flow outside.
- The outdoor unitSet on a stand raised above the snow, with the clearances the manufacturer requires.
- Lines, cable and drainConnected, insulated and protected. The opening is then sealed against water, cold air and insects.
- The electrical workA dedicated circuit and an accessible disconnect near the outdoor unit.
- Tests and start-upLeak test, vacuum, then start-up and a check of heating and cooling.
- The walkthroughRemote, modes, filters: we show you the essentials before we leave.
What we check on a job like this one
Each number is a point we check on site. Switch between summer and winter to watch air and heat move.
In summer, the outdoor unit rejects the house's heat outside.
Generic illustration of this type of installation, not a survey of this job site. Tap a number.
Mounted level on a wall plate, high enough for the air to reach the whole room, with enough space around it to slide the filters out easily.
The refrigerant lines, the communication cable and the drain go through the wall in a single opening, sealed against water, cold air and insects.
Two insulated copper pipes connect the two units. Outside, a line cover can protect them from sun, knocks and weather.
A shut-off switch near the outdoor unit isolates it safely for service. It must stay accessible at all times.
The compressor and the fan. In heating mode it captures heat from the outdoor air, even in winter, and moves it inside.
On the ground or on the wall, it keeps the unit above accumulated snow. The unit stays clear and defrost water can drain away.
The fan needs to blow freely. Storage, a fence or a wall too close, and efficiency drops while noise goes up.
Is your home ready?
Check what applies at your place. A "no" is not a refusal: it is what we sort out during the estimate.
Good habits, once the unit is in place
Six simple habits that keep the unit going. Your list stays on this device.
What to do, season by season
Three habits per season for this unit. They take a few minutes and prevent many calls.
- Clean the indoor unit's filters.
- Clear leaves and debris left on the outdoor unit by winter.
- Test cooling before the first hot days.
- Clean the filters more often when the unit runs a lot.
- Keep plants away from the outdoor unit.
- Check that no water drips from the indoor unit.
- Rake the leaves around the outdoor unit.
- Test heating before the first cold days.
- Book periodic maintenance before winter.
- Keep snow away from the stand and the front of the unit.
- Let the unit defrost: it is normal.
- Never hit the ice on the fins; call us if the unit stays iced up.
The right pages, at the right time
Four statements: true or false?
It all comes down to details you have just seen.
1. In heating mode, the outdoor unit can produce water.
During defrost cycles. That water must drain away without forming ice.
2. You pick the capacity with a simple square-footage rule.
Windows, insulation, orientation and how the room is used all count. Capacity is chosen on site.
3. A multi-zone connects several indoor heads to a single condenser.
One head per room, all on the same condenser. Each room keeps its own temperature.
4. The disconnect can sit behind the patio furniture.
It must stay accessible: it is what shuts the unit off for service.
0 / 4 right answers
What people ask us about this kind of work
Does a wall-mounted heat pump heat in winter?
Wall-mounted or multi-zone: how do I choose?
Where does the outdoor unit go?
Are there grants?
Do I need a permit?
How cold can it heat?
How much can I save?
How is the LogisVert assistance calculated?
Is it noisy?
The outdoor unit is covered in ice: is that normal?
Does AirGreen hold the required licences?
Is the estimate free?
No question matches. Write to us: we answer.
More jobs to see, near you
By town, by equipment or by region: browse more than 4,700 published projects.
Each dot: a town where AirGreen has published projects. The glowing dot: this job.
An on-site estimate, the right capacity, the right equipment.
The on-site estimate is free and the quote follows within 24 hours.
Text and photo: a real AirGreen Climatisation & Chauffage job. The diagrams are generic illustrations of the type of installation, not a survey of this job site. Sources of the added figures: airgreen.ca product pages (NEEP / AHRI performance), Hydro-Québec (Heat pumps page, LogisVert, read on 13 October 2026), Régie de l’énergie (rate D as of 1 April 2026).