
Installation of a Hitachi airHome 600 wall-mounted heat pump in Vaudreuil-Dorion on an elevated brick façade
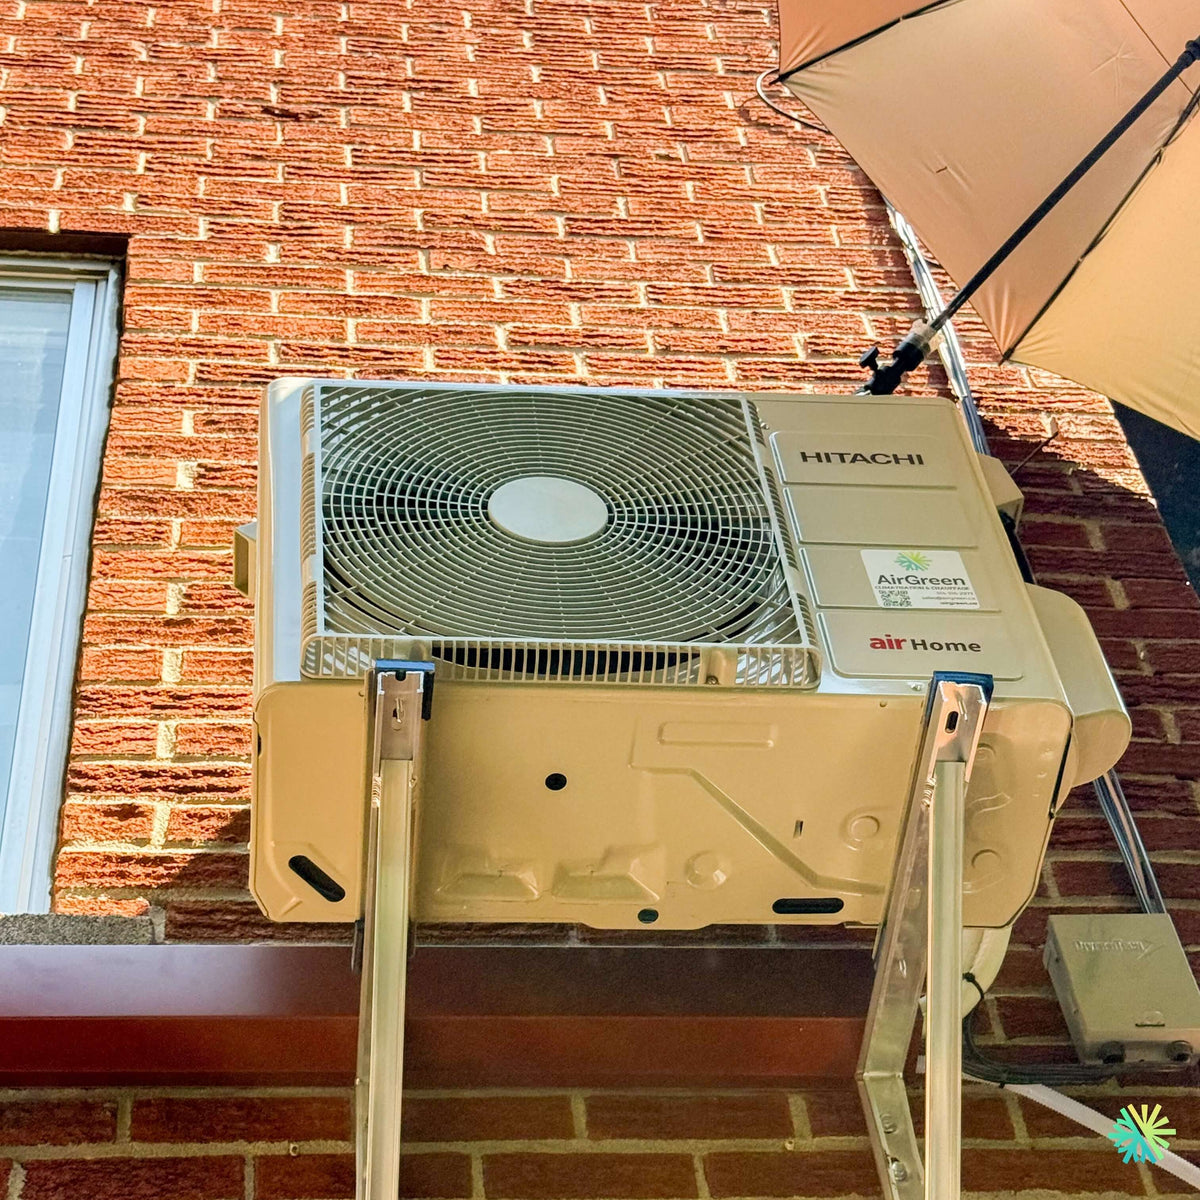
In Vaudreuil-Dorion, AirGreen installs a Hitachi airHome 600 wall-mounted heat pump on brackets secured to the brick, freeing up floor space while ensuring ventilation, stability, and access for maintenance.
In summer, the outdoor unit rejects the house's heat outside.
Generic illustration of this type of installation, not a survey of this job site. Tap a number.
Mounted level on a wall plate, high enough for the air to reach the whole room, with enough space around it to slide the filters out easily.
The refrigerant lines, the communication cable and the drain go through the wall in a single opening, sealed against water, cold air and insects.
Two insulated copper pipes connect the two units. Outside, a line cover can protect them from sun, knocks and weather.
A shut-off switch near the outdoor unit isolates it safely for service. It must stay accessible at all times.
The compressor and the fan. In heating mode it captures heat from the outdoor air, even in winter, and moves it inside.
On the ground or on the wall, it keeps the unit above accumulated snow. The unit stays clear and defrost water can drain away.
The fan needs to blow freely. Storage, a fence or a wall too close, and efficiency drops while noise goes up.
A compact wall-mounted installation that completely frees up the ground space
For this wall-mounted heat pump installation in Vaudreuil-Dorion, our AirGreen team had to integrate the outdoor unit into a brick façade already occupied by a window, cables, an electrical box, and a nearby awning structure. The chosen solution was to install the Hitachi airHome 600 high up, on two metal brackets securely anchored to the building.
This choice addresses a common reality in Vaudreuil-Dorion’s residential areas: usable outdoor space is sometimes limited by a terrace, a narrow yard, a side passage, or several existing pieces of equipment. A ground-level unit could restrict movement, complicate the layout, or end up directly in a snow accumulation area.
The project photograph shows several important elements of our work:
- the outdoor unit is elevated above the ground;
- its front fan remains completely unobstructed;
- the metal brackets are spaced apart to distribute the weight properly;
- the unit is offset from the window;
- the adjacent electrical box remains accessible;
- the piping is routed down the building;
- no base takes up space outdoors.
This configuration provides a compact result, but it requires much more thorough preparation than a simple pad installation.
Why install a heat pump high up in Vaudreuil-Dorion?
A high wall-mounted installation can be particularly appealing when a homeowner wants to preserve full use of their yard, balcony, or side passage. It also helps keep the unit away from several typical Quebec winter challenges.
In this project, the selected positioning helps to:
- reduce the risk of snow blocking the coil;
- keep the unit away from splashes, mud, and debris on the ground;
- preserve the area directly beneath the heat pump;
- limit the risk of accidental contact with the unit;
- maintain unobstructed airflow in front of the fan;
- simplify the path of the lines to the indoor unit.
An outdoor heat pump should never be installed solely based on where it physically fits. The location must also be suitable for operation during heat waves, freezing periods, defrost cycles, and future HVAC maintenance.
Anchoring into brick: a crucial technical step
The visible façade is made of red brick. This material requires an appropriate fastening method, as an outdoor unit can weigh several dozen kilograms depending on its capacity.
The brackets must not simply be screwed in at the most convenient location. Before fastening them, we must assess:
- the general condition of the masonry;
- the strength of the bricks and joints;
- the position of the anchor points;
- the weight of the outdoor unit;
- the depth required for the anchors;
- the reach of the metal arms;
- the load created by snow and wind;
- the vibrations generated during operation.
The two vertical posts visible beneath the unit were positioned to support the base of the unit across a sufficient width. A support that is too narrow or slightly misaligned could place uneven stress on the chassis.
We also check that the installation is level. This step affects not only the appearance, but also the stability and drainage of the water produced during defrost cycles.
Reducing vibrations transmitted to the building
When an outdoor unit rests on a support attached directly to a wall, vibrations must be carefully controlled. Even a modern Inverter heat pump can produce slight vibration from the compressor or fan.
If the brackets are poorly leveled or insufficiently rigid, this vibration can turn into structural noise. The owner could then hear a humming sound near the window or in the room behind the masonry.
To prevent this problem, our installation must ensure:
- rigid fastening of the brackets;
- uniform support beneath the unit;
- the absence of unnecessary contact between the lines and the brick;
- sufficient clearance to absorb normal movement;
- proper tightening of the fastening elements;
- positioning that avoids surfaces that could resonate.
The acoustic quality of an HVAC installation therefore depends as much on the support and lines as on the sound level stated by the manufacturer.
An outdoor unit installed near a window without blocking its use
The Hitachi airHome 600 was positioned to the right of the window rather than directly in front of it. This decision preserves the opening, natural light, and access to the window.
An installation that is too close could complicate:
- the possible replacement of the window;
- repairing the frame or flashing;
- cleaning the glass;
- access to the heat pump connections;
- the removal of the exterior panels;
- airflow around the condenser.
The photo also shows that the façade has a horizontal ledge below the window. We must prevent rainwater or meltwater from this ledge from falling directly onto the heat exchanger and freezing during the winter.
The unit's lateral offset helps reduce this risk while maintaining a functional distance between the heat pump and the opening.
The proximity of the awning had to be taken into account
An awning is visible in the upper-right part of the image. Its structure is relatively close to the heat pump, but it does not block the front fan.
This proximity remains important to assess. Fabric, a balcony structure, or another object installed near an outdoor unit can alter airflow and create recirculation.
When the warm air expelled during cooling or the cold air expelled during heating is immediately drawn back in by the heat exchanger, the heat pump has to work harder. Poor airflow can then lead to:
- a loss of capacity;
- longer operating cycles;
- higher electricity consumption;
- increased pressure on the compressor;
- less effective defrosting in winter.
We must also take the movement of the awning into account when it is windy. No fabric, rope, or moving part should be able to touch the fan or the unit's enclosure.
Preserving access to the electrical enclosure
A service enclosure is visible on the wall, to the right and slightly below the unit. Its location required precise coordination between the heat pump, the bracket, and the piping route.
The installation was not supposed to:
- prevent the cover from opening;
- conceal the electrical connections;
- place pressure on the existing lines;
- place the drain directly above the enclosure;
- make future electrical work impossible.
This accessibility is often overlooked when a wall has several pieces of equipment. At AirGreen, we analyze not only the space available for the heat pump, but also the access requirements for each component present on the façade.
A clean and protected line set
The two units of a wall-mounted heat pump are connected by insulated copper lines, a communication cable, and a condensate drain. In a raised installation, the outdoor routing must be properly supported so that the weight of the piping does not pull on the connections.
The routing must follow several principles:
- maintain a length compatible with the manufacturer's limits;
- avoid bends that are too tight;
- protect the insulation from ultraviolet rays;
- maintain an adequate slope for the drain;
- limit contact with the brick;
- prevent the lines from vibrating in the wind;
- remain accessible for future inspection.
The airHome 600 range documentation indicates maximum total piping lengths ranging from 82 to 98 feet, depending on the model. The permitted height difference can reach 49.2 or 66 feet, also depending on the installed capacity. These limits must be verified before choosing the final location of the units.
Indoor drainage should never be treated as an afterthought
In cooling and dehumidification mode, the indoor unit removes moisture from the air. This water must be discharged outside through a continuous drain.
When the drain operates by gravity, it must maintain a constant slope. A reverse slope or sag can cause water to accumulate and then overflow inside the building.
Possible consequences include:
- stains on the wall;
- damage to the paint or drywall;
- an odor from stagnant water;
- the formation of contaminants in the drain;
- intermittent drainage through the indoor unit;
- gurgling noises.
Outside, we also choose the discharge point so that water does not fall onto the electrical box, window, patio, or a frequently used walkway.
Defrost cycles and water produced in winter
In heating mode, the outdoor unit can accumulate frost. The heat pump then temporarily reverses its operation to defrost the coil. This process produces water, even when the outdoor temperature is below freezing.
In this Vaudreuil-Dorion installation, the unit's height offers a significant advantage: the water can drain away without the unit gradually becoming trapped in a pile of ice at ground level.
However, you must ensure that this water does not create a slippery area beneath the unit. Depending on the building configuration, additional drainage management may be required.
The Hitachi airHome 600 includes a heater in the condensate pan and adaptive defrost technology. These features support better winter operation, but they do not replace a well-planned location.
Why the Hitachi airHome 600 meets heating and cooling needs in Quebec
The Hitachi airHome 600 is a wall-mounted heat pump with Inverter technology, available in several capacities. The range meets the needs of different rooms and residential configurations, with nominal cooling capacities ranging from 9,000 to 22,000 BTU/h, marketed as part of a family ranging from 9,000 to 24,000 BTU/h.
The exact capacity of the unit visible in the photo cannot be confirmed without reading its nameplate. We always avoid inferring the number of BTUs solely from the exterior dimensions.
Efficiency that varies according to the capacity selected
According to the Hitachi technical data sheet, airHome 600 models can achieve:
- a SEER2 of up to 23;
- a Region 5 HSPF2 of up to 9.2;
- cooling operation up to 46 °C;
- heating operation down to -25 °C;
- a heating capacity maintained at -15 °C, depending on the model and conditions;
- ENERGY STAR certification for the combinations shown;
- a 208–230 V power supply.
The series uses the refrigerant R32, recognized for its lower global warming potential compared with R410A. The manufacturer also indicates that the Wi-Fi adapter and the condensate pan heater are included in the configurations shown.
Why the right number of BTUs cannot be chosen based solely on square footage
The square footage provides an initial indication, but it does not replace an actual assessment of the needs. Two properties of identical size in Vaudreuil-Dorion may require very different capacities.
We must examine, in particular:
- the level of insulation;
- the age of the building;
- the number and size of windows;
- solar orientation;
- ceiling height;
- the number of floors;
- air circulation between rooms;
- air leaks;
- the area actually served;
- the existing heating system.
An oversized unit may cool the space too quickly without removing enough humidity. It can also create short cycles and a less uniform temperature.
An undersized unit is more likely to operate for a long time at maximum capacity and fail to reach the setpoint under extreme conditions.
Inverter technology for a more stable temperature
Inverter technology allows the compressor to adjust its speed according to demand. When the room is very hot or very cold, the heat pump can operate at a higher capacity. It then slows down as the indoor temperature approaches the setpoint.
This modulation offers several advantages:
- fewer abrupt variations;
- extended operation at low speed;
- greater comfort stability;
- less frequent starts;
- more gradual humidity control;
- noise reduction during periods of low demand.
To take advantage of this modulation, it is generally preferable to maintain a relatively stable temperature rather than constantly turning the unit off.
FrostWash 3.0 and indoor heat exchanger maintenance
The Hitachi airHome 600 features FrostWash 3.0 technology, which uses a heating, freezing, and thawing cycle to help remove some of the contaminants accumulated on the indoor heat exchanger.
The process consists of three steps:
- the coil is heated to help loosen certain particles;
- it is cooled until ice forms and traps the dirt;
- the ice melts and carries away some of the contaminants.
The series also includes a stainless steel pre-filter and a PM2.5 activated carbon filter. A mold-protection function helps dry the internal components after certain cycles.
These functions help keep the unit clean, but they do not replace regular filter cleaning or professional heat pump maintenance when the heat exchanger, fan, or drain pan is dirty.
DuraSpin and FrostWash on the outdoor unit
The documentation also describes functions intended for the outdoor heat exchanger. DuraSpin reverses the fan’s rotation to help expel certain larger particles. The outdoor FrostWash uses a freeze-and-thaw cycle to help clean the coil.
This function is useful in an environment where the unit may be exposed to:
- dust;
- pollen;
- small plant debris;
- particles carried by the wind;
- urban residue.
Installing the unit higher up reduces certain contamination risks originating directly from the ground. However, it does not eliminate the need for periodic inspection, especially if the unit is near trees or an outdoor structure.
Wi-Fi control with the airCloud Go app
The airCloud Go app lets users manage the heat pump from a mobile device. The homeowner can, among other things:
- adjust the temperature remotely;
- schedule weekly programs;
- monitor an estimate of energy consumption;
- use certain geolocation features;
- integrate the controls with Amazon Alexa or Google Home;
- adjust operation to occupancy periods.
The Smart Eco function can detect when no occupants are present and automatically reduce operation after a set period. SleepSense, for its part, is designed to adjust the temperature more gradually during the night.
Mistakes to avoid during a similar installation
This installation in Vaudreuil-Dorion illustrates several common mistakes that a homeowner or building manager should avoid.
Using an undersized bracket
The bracket must match the unit’s exact weight and dimensions. Models in the range can weigh approximately 75 to 163 lb.
Securing the unit to weakened masonry
Cracked brick or deteriorated mortar does not automatically provide a reliable anchoring point. The surface must be assessed before drilling.
Blocking access to the electrical panel
The disconnect switch and other electrical equipment must remain visible and accessible after installation.
Installing the unit too close to an awning
The canopy and its structure must not block air intake or discharge, nor be able to come into contact with the fan.
Leaving the lines unprotected
Insulation exposed to sunlight can deteriorate. An appropriate exterior finish contributes to the project’s durability and appearance.
Forgetting to provide access for maintenance
A unit installed at height must be safely accessible for cleaning, diagnostics, and repairs.
A complete commissioning before handing the system over to the customer
After the mechanical installation, we complete the technical steps essential to the system’s proper operation:
- preparation and flaring of the lines;
- tightening the connections according to requirements;
- leak test;
- removal of air and moisture;
- verification of vacuum stability;
- opening the service valves;
- start-up in cooling or heating mode;
- drainage validation;
- vibration control;
- verification of communication between the units.
We then explain how the remote control works, how to clean the filters, how to program the unit, and what constitutes normal operation, including defrost cycles.
AirGreen expertise for complex installations
Every project has its own constraints. A heat pump installed on a slab in Laval does not require the same method as a unit mounted high on a brick façade in Vaudreuil-Dorion.
Our team installs wall-mounted heat pumps in Montreal, Laval, Longueuil, the North Shore, and the South Shore, adapting every detail to the building:
- capacity selection;
- indoor location;
- outdoor location;
- support and anchoring;
- drainage management;
- piping route;
- electrical accessibility;
- noise control;
- future maintenance.
In this project, the result relies on intelligent use of vertical space. The Hitachi airHome 600 is securely installed on the façade, its fan remains unobstructed, the ground stays clear, and nearby equipment remains accessible.
How it goes, from the first call to the end
The main steps of this kind of job at AirGreen. Every house has its quirks: the estimate brings them out.
We look at the room, the outside wall, the line route and where the outdoor unit will go. That is where the capacity gets chosen.
Model, capacity and price, in writing. We also check whether the model qualifies for assistance programs.
Floors and furniture protected, wall plate position marked level, wall opening located.
A single opening, with the slope the drain needs to flow outside.
Set on a stand raised above the snow, with the clearances the manufacturer requires.
Connected, insulated and protected. The opening is then sealed against water, cold air and insects.
A dedicated circuit and an accessible disconnect near the outdoor unit.
Leak test, vacuum, then start-up and a check of heating and cooling.
Remote, modes, filters: we show you the essentials before we leave.
- The on-site estimateWe look at the room, the outside wall, the line route and where the outdoor unit will go. That is where the capacity gets chosen.
- The quoteModel, capacity and price, in writing. We also check whether the model qualifies for assistance programs.
- Getting readyFloors and furniture protected, wall plate position marked level, wall opening located.
- The wall openingA single opening, with the slope the drain needs to flow outside.
- The outdoor unitSet on a stand raised above the snow, with the clearances the manufacturer requires.
- Lines, cable and drainConnected, insulated and protected. The opening is then sealed against water, cold air and insects.
- The electrical workA dedicated circuit and an accessible disconnect near the outdoor unit.
- Tests and start-upLeak test, vacuum, then start-up and a check of heating and cooling.
- The walkthroughRemote, modes, filters: we show you the essentials before we leave.
And at your place?
Two quick checks with real numbers: what heat costs, and what your current heaters add up to in BTU/h.
Conversion: 1 W = 3.412 BTU/h. An indication, not a load calculation: baseboards and furnaces are often stronger than the real need, and they can stay as backup. AirGreen confirms the capacity on site.
What to do, season by season
Three habits per season for this unit. They take a few minutes and prevent many calls.
- Clean the indoor unit's filters.
- Clear leaves and debris left on the outdoor unit by winter.
- Test cooling before the first hot days.
- Clean the filters more often when the unit runs a lot.
- Keep plants away from the outdoor unit.
- Check that no water drips from the indoor unit.
- Rake the leaves around the outdoor unit.
- Test heating before the first cold days.
- Book periodic maintenance before winter.
- Keep snow away from the stand and the front of the unit.
- Let the unit defrost: it is normal.
- Never hit the ice on the fins; call us if the unit stays iced up.
Which type of equipment for your project?
Pick what looks like your need.
Four mistakes we do not make
Flip each card to see what we do instead.
What people ask us about this kind of work
Does a wall-mounted heat pump heat in winter?
Wall-mounted or multi-zone: how do I choose?
Where does the outdoor unit go?
Are there grants?
Do I need a permit?
How cold can it heat?
How much can I save?
How is the LogisVert assistance calculated?
Is it noisy?
The outdoor unit is covered in ice: is that normal?
Does AirGreen hold the required licences?
Is the estimate free?
No question matches. Write to us: we answer.
Useful pages for what comes next
More jobs to see, near you
By town, by equipment or by region: browse more than 4,700 published projects.
Each dot: a town where AirGreen has published projects. The glowing dot: this job.
Tell us about your house. We come and see it for free.
The on-site estimate is free and the quote follows within 24 hours.
Text and photo: a real AirGreen Climatisation & Chauffage job. The diagrams are generic illustrations of the type of installation, not a survey of this job site. Sources of the added figures: airgreen.ca product pages (NEEP / AHRI performance), Hydro-Québec (Heat pumps page, LogisVert, read on 13 October 2026), Régie de l’énergie (rate D as of 1 April 2026).