
Installation of a GREE FreeMatch R32 5-head heat pump (GWHD(42)ND6MO) in Hudson, in Vaudreuil-Soulanges
Five zones on a single compressor in Hudson, including a wall-mounted unit in the kitchen: what cooking grease does to an evaporator, how a range hood and a heat pump interfere with each other, and why the wall must be photographed before it is closed up.
Take a tour of the installation
Each number is a point we check on site. Switch between summer and winter to watch air and heat move.
In summer, the outdoor unit rejects the house's heat outside.
Generic illustration of this type of installation, not a survey of this job site. Tap a number.
Mounted level on a wall plate, high enough for the air to reach the whole room, with enough space around it to slide the filters out easily.
The refrigerant lines, the communication cable and the drain go through the wall in a single opening, sealed against water, cold air and insects.
Two insulated copper pipes connect the two units. Outside, a line cover can protect them from sun, knocks and weather.
A shut-off switch near the outdoor unit isolates it safely for service. It must stay accessible at all times.
The compressor and the fan. In heating mode it captures heat from the outdoor air, even in winter, and moves it inside.
On the ground or on the wall, it keeps the unit above accumulated snow. The unit stays clear and defrost water can drain away.
The fan needs to blow freely. Storage, a fence or a wall too close, and efficiency drops while noise goes up.
A head in the kitchen: the room that multi-zone quotes treat like any other
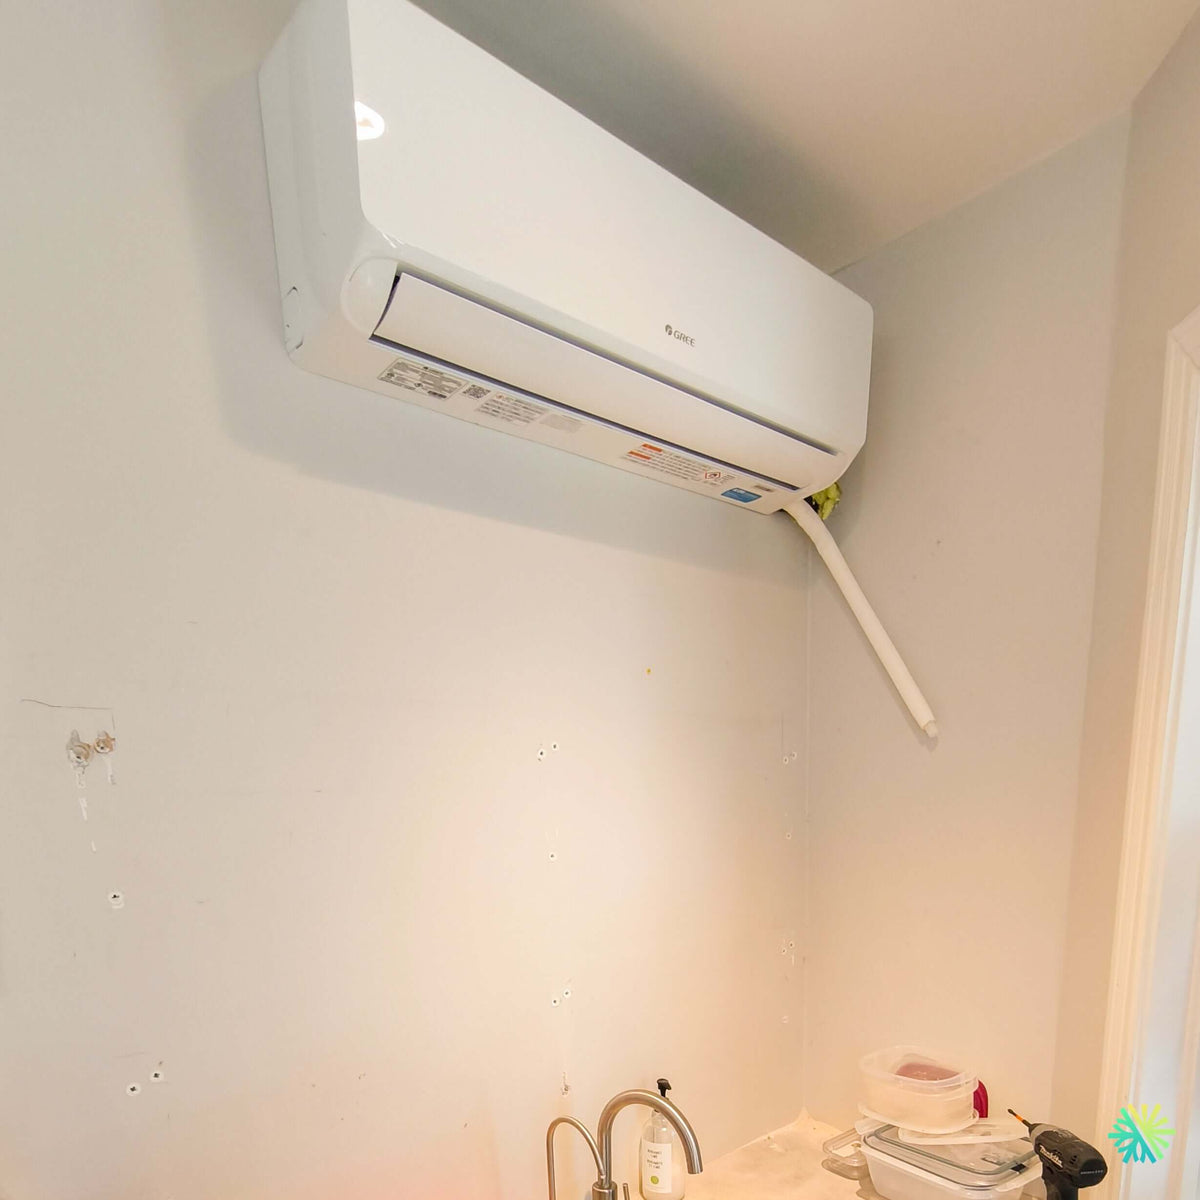
Of the five zones in this Hudson project, four were routine. The fifth, the one shown in the photo, was installed in a kitchen undergoing renovation, and it required the most thought even before the first hole was drilled in the wall. A wall-mounted heat pump installed in a kitchen faces different constraints than a bedroom head: it receives three times the internal heat gains, breathes air laden with cooking grease, must coexist with a range hood, and shares its wall with a cabinetmaker who will screw cabinets into place after we leave.
Hudson: large homes, large trees, no ductwork
Hudson occupies the shore of Lake of Two Mountains, in the Vaudreuil-Soulanges RCM, about 40 kilometers west of Montreal via Highway 40. The town is known for its mature tree cover, large lots, and older residential area, partly inherited from a resort development. This is our first documented FreeMatch R32 installation in this RCM.
This type of home always presents the same challenge: large, well-separated rooms, sometimes high ceilings, no ductwork, and supplemental electric heating distributed room by room. The owner was renovating the kitchen and wanted to take advantage of the project to air-condition five rooms at once: the kitchen, living room, primary bedroom, and two upstairs bedrooms.
Five zones, only one possible model
In the FreeMatch R32 lineup, only the GWHD(42)ND6MO accepts five indoor units — the others are limited to two, three, or four. The model choice is therefore not really a choice, and we published the complete table of connectable units in our Salaberry-de-Valleyfield article. The data governing this project:
- Cooling capacity: 12,310 W, or 42,000 BTU/h nominal, modulating from 8,870 to 44,300 BTU/h
- Heating capacity: 44,300 BTU/h nominal, modulating from 8,870 to 54,590 BTU/h
- SEER2 21, HSPF2 10, EER2 12, COP 3.9 — ENERGY STAR certified
- MCA 30 A / MOCP 45 A, one dedicated circuit, with the indoor units powered by the outdoor unit
- R32, 2,700 g factory charge, additional 20 g/m beyond the 50 m precharge, 100 m total permissible piping length, maximum elevation difference 25 m
- 79 kg, 1020 × 826 × 427 mm, 3,413 ft³/min, 63 dB(A)
- Heating range -30 °C to 24 °C, intelligent defrost, G10 inverter, automatic voltage adaptation, built-in A2L leak detector
- AHRI 214931590 (non-ducted), 214931596 and 214931600 for the ducted and mixed variants
Selected configuration: 12 000 + 12 000 + 9 000 + 9 000 + 9 000 = 51 000 BTU/h, or 121% of the nominal cooling capacity. The two 12 000 BTU/h units serve the kitchen and living room, while the three 9 000 BTU/h units serve the bedrooms. The diversity margin is intentional here because the day and night rooms are not used at the same times—the complete reasoning can be found in our Saint-Denis-sur-Richelieu installation.
Five piping runs measured: 9 + 12 + 15 + 18 + 22 m, for a total of 76 m of developed length. Since the precharge covers 50 m, we added 520 g of R32 weighed on a scale, never estimated.
What a kitchen puts an evaporator through
This is the point we had never yet developed on this site, and it is what determines the unit's actual service life.
Cooking fats become aerosolized. Frying, pan-frying, and even using an oven in broil mode release fine droplets into the ambient air, and not all of them settle in the range hood. The filter in a wall-mounted indoor unit is a protective screen against dust and hair: it does not stop a greasy aerosol. These droplets pass through, settle on the heat exchanger's cold fins, and trap dust there. The result is a greasy, sticky film between the fins, precisely where heat exchange must take place.
The consequences accumulate slowly:
- Gradual loss of capacity. The film insulates the fins and reduces the air passage area. The unit compensates by running at a higher speed, so it consumes more energy for equivalent comfort.
- Odors. Organic deposits on a wet surface in an air-conditioning system create a breeding ground. The odor coming from a neglected kitchen indoor unit will not be resolved with a rinsed filter.
- Cannot be cleaned with plain water. Greasy fouling requires professional cleaning of the heat exchanger, not rinsing a filter at the sink.
- Warranty. Fouling is not a manufacturing defect. A drop in performance attributable to a clogged heat exchanger is not covered by any warranty, including the manufacturer's 10-year warranty.
What we take from this in practical terms for a customer: the kitchen head is cleaned on a separate schedule from the others. Rinse the filters every four to six weeks during the cooling season rather than every three months, and have the heat exchanger professionally cleaned at shorter intervals than bedroom heads. We put this in writing when handing over the keys, because a customer who applies the same maintenance schedule to all five heads thinks they are doing the right thing and ends up with four clean units and a fifth one clogged.
Placement: the range hood and the head must not work against each other
A kitchen range hood works by capture. It relies on the column of hot, laden air rising from the cooking surface reaching its capture zone without being deflected. An airstream blowing across this column at two metres per second disrupts capture: the vapours move laterally into the room instead of rising into the hood, and the odour spreads.
Our three rules for this type of installation:
- The head must never blow toward the cooking surface. It is placed on a wall that directs its airflow along the room's long axis, not across the countertop.
- Maximum physical distance from the cooking area, given the available wall space. On this job, the head was installed in the corner opposite the cooking area, above the utility sink.
- Clearances measured to the nearest obstacle, not to the ceiling. In a kitchen, the obstacle is often an upper cabinet, a door frame, or a pendant light—not the ceiling.
One final point, kept brief because it was already covered in detail in our Beauharnois article: a wall-mounted unit does not ventilate. It recirculates room air over a heat exchanger and introduces no outdoor air. It therefore removes neither cooking odours nor the humidity produced by a simmering pot. That is the range hood's role, and the role of an air exchanger for the whole house.
The condensate drain hanging in the photo
The photo shows the condensate pipe exiting beneath the unit and descending freely along the wall, without support or a final connection. This is a normal and intentional work-in-progress condition: the head had been installed, the lines run, and the insulation in place at the wall penetration, but the finishing work was awaiting completion of the kitchen work.
What this same drain should look like once the work is complete:
- A continuous downward slope along the entire length, checked with a level rather than by eye, with no reverse slope or sag. One metre of pipe rising by two centimetres is enough to make the drain pan overflow into the wall.
- Closely spaced supports. An unsupported flexible pipe develops its own curve over time and creates the sag we just avoided.
- Continuous insulation on sections passing through an unheated space; otherwise, the pipe will become covered in condensation in summer and the customer will blame the roof.
- Test each unit's drain pan with water before closing any opening, not afterward.
- Identified outdoor discharge point, away from a pedestrian walkway and an entrance, because in air-conditioning mode a five-zone system produces a noticeable volume of water.
In a kitchen, the stakes are higher: an overflowing drain pan can spill onto cabinets, a countertop, and sometimes an appliance. We systematically prioritize gravity drainage; when the layout makes that impossible, a condensate pump is installed with its float switch wired to stop the indoor unit before water spills out.
When the heat pump goes in before the cabinetmaker
The wall in the photograph tells the story of the work sequence
On the wall, beneath the unit, there is a series of anchors and patched holes in a line: the imprint left by the upper cabinets that were removed. The unit was therefore installed during the window when the kitchen was dismantled, and new cabinets will be installed afterward. That is the right order, and it is also the moment when a renovation project is won or lost.
Installing the indoor unit after the cabinets have been installed means accepting that the cabinetry dictates the unit's location. In nine cases out of ten, no clear wall area remains that meets the manufacturer's clearances, and the unit ends up in a corner where it recirculates its own discharged air and shuts off based on an inaccurate temperature reading.
Installing the indoor unit before solves this problem but creates another, more costly one: when the cabinetmaker returns to screw a cabinet rail into the wall, they cannot see what is behind the drywall. A three-inch lag bolt through an insulated copper line means a refrigerant leak on a circuit supplying five rooms, discovered weeks later, and a complete rework: recovery, repair, a new evacuation, and a new top-up charge.
The no-fastening zone, and the wall photographed before it is closed up
Our practice on every job where another trade will work on the same wall:
- Photograph the open wall with the piping and drain layout visible, including a dimensional reference in the frame (an extended tape measure or a mounting plate in place).
- Physically mark the no-fastening zone on the drywall before closing it up, using a pencil and indicating the depth.
- Provide the client and the following contractor with a dimensioned sketch showing the height of the piping centerline, the distance from the corner, and the width of the no-drill zone.
- Record the location of each indoor unit by room, along with its serial number, on our commissioning form, a document that stays with the house.
This sequence costs ten minutes on the day of installation. It is the only thing protecting an invisible piping assembly for the following twenty years, and it also protects the person who will hang a picture on the wall five years from now. The broader reasoning about the right time to intervene during a renovation is developed in our Dundee project.
Mistakes to avoid
- Placing the kitchen head facing the cooktop because it is the only free wall.
- Applying the same maintenance schedule to all five heads.
- Allowing another trade to attach anything to a wall crossed by a refrigerant line without a dimensioned drawing.
- Closing an opening before testing the condensate pan with water.
- Estimating the required refrigerant charge instead of weighing it: 26 m beyond the factory charge equals 520 g, not “about a pound.”
- Removing the electric supplemental heater on the day of installation. It must remain in place for at least one full winter.
- Forgetting the minimum room size required by the refrigerant A2L in a small enclosed room; the values recorded from the rating plate are detailed in our Dundee article.
Rebates, warranty, and maintenance
The unit is ENERGY STAR certified and eligible for local rebates. For an electrically heated home, the programs to check are Hydro-Québec's LogisVert and Rénoclimat. The AHRI code listed in the file must match the configuration actually installed exactly; otherwise, the application will be blocked during processing. The warranty is 10 years, extended to 12 years when the product is registered with the distributor and proof of installation is provided: we complete the registration with the customer at the end of the project.
Servicing a five-zone system requires planning: five sets of filters, five drain pans, five drains, and a kitchen head that requires more attention than the other four. A clogged filter first causes the fan speed—and therefore the noise—to increase before performance drops. Noise is the free warning.
Our service area
At AirGreen, we design, install, and service HVAC systems — wall-mounted heat pumps, multi-zone systems, air conditioners, and central systems — in Montreal, Laval, Longueuil, on the North Shore, and throughout the South Shore, as far as Hudson, Vaudreuil-Dorion, Saint-Lazare, and the entire Vaudreuil-Soulanges area. A five-zone installation in a home under renovation requires an on-site assessment and coordination with the other trades before quoting: that is what distinguishes a system that works from one that needs repairs.
The big day, step by step
The main steps of this kind of job at AirGreen. Every house has its quirks: the estimate brings them out.
We look at the room, the outside wall, the line route and where the outdoor unit will go. That is where the capacity gets chosen.
Model, capacity and price, in writing. We also check whether the model qualifies for assistance programs.
Floors and furniture protected, wall plate position marked level, wall opening located.
A single opening, with the slope the drain needs to flow outside.
Set on a stand raised above the snow, with the clearances the manufacturer requires.
Connected, insulated and protected. The opening is then sealed against water, cold air and insects.
A dedicated circuit and an accessible disconnect near the outdoor unit.
Leak test, vacuum, then start-up and a check of heating and cooling.
Remote, modes, filters: we show you the essentials before we leave.
- The on-site estimateWe look at the room, the outside wall, the line route and where the outdoor unit will go. That is where the capacity gets chosen.
- The quoteModel, capacity and price, in writing. We also check whether the model qualifies for assistance programs.
- Getting readyFloors and furniture protected, wall plate position marked level, wall opening located.
- The wall openingA single opening, with the slope the drain needs to flow outside.
- The outdoor unitSet on a stand raised above the snow, with the clearances the manufacturer requires.
- Lines, cable and drainConnected, insulated and protected. The opening is then sealed against water, cold air and insects.
- The electrical workA dedicated circuit and an accessible disconnect near the outdoor unit.
- Tests and start-upLeak test, vacuum, then start-up and a check of heating and cooling.
- The walkthroughRemote, modes, filters: we show you the essentials before we leave.
What would it look like at your place?
Two quick checks with real numbers: what heat costs, and what your current heaters add up to in BTU/h.
Conversion: 1 W = 3.412 BTU/h. An indication, not a load calculation: baseboards and furnaces are often stronger than the real need, and they can stay as backup. AirGreen confirms the capacity on site.
Four mistakes we do not make
Flip each card to see what we do instead.
Your own project, step by step
What to do, season by season
Three habits per season for this unit. They take a few minutes and prevent many calls.
- Clean the indoor unit's filters.
- Clear leaves and debris left on the outdoor unit by winter.
- Test cooling before the first hot days.
- Clean the filters more often when the unit runs a lot.
- Keep plants away from the outdoor unit.
- Check that no water drips from the indoor unit.
- Rake the leaves around the outdoor unit.
- Test heating before the first cold days.
- Book periodic maintenance before winter.
- Keep snow away from the stand and the front of the unit.
- Let the unit defrost: it is normal.
- Never hit the ice on the fins; call us if the unit stays iced up.
Is your home ready?
Check what applies at your place. A "no" is not a refusal: it is what we sort out during the estimate.
Four statements: true or false?
It all comes down to details you have just seen.
1. In heating mode, the outdoor unit can produce water.
During defrost cycles. That water must drain away without forming ice.
2. You pick the capacity with a simple square-footage rule.
Windows, insulation, orientation and how the room is used all count. Capacity is chosen on site.
3. A multi-zone connects several indoor heads to a single condenser.
One head per room, all on the same condenser. Each room keeps its own temperature.
4. The disconnect can sit behind the patio furniture.
It must stay accessible: it is what shuts the unit off for service.
0 / 4 right answers
What people ask us about this kind of work
Does a wall-mounted heat pump heat in winter?
Wall-mounted or multi-zone: how do I choose?
Where does the outdoor unit go?
Are there grants?
Do I need a permit?
How cold can it heat?
How much can I save?
How is the LogisVert assistance calculated?
Is it noisy?
The outdoor unit is covered in ice: is that normal?
Does AirGreen hold the required licences?
Is the estimate free?
No question matches. Write to us: we answer.
More jobs to see, near you
By town, by equipment or by region: browse more than 4,700 published projects.
Each dot: a town where AirGreen has published projects. The glowing dot: this job.
Every house has its constraints. We see them before we install.
The on-site estimate is free and the quote follows within 24 hours.
Text and photo: a real AirGreen Climatisation & Chauffage job. The diagrams are generic illustrations of the type of installation, not a survey of this job site. Sources of the added figures: airgreen.ca product pages (NEEP / AHRI performance), Hydro-Québec (Heat pumps page, LogisVert, read on 13 October 2026), Régie de l’énergie (rate D as of 1 April 2026).